“JimV 操作权威指南”的版本间的差异
来自JimV-Wiki
(→IP 池) |
|||
| 第2行: | 第2行: | ||
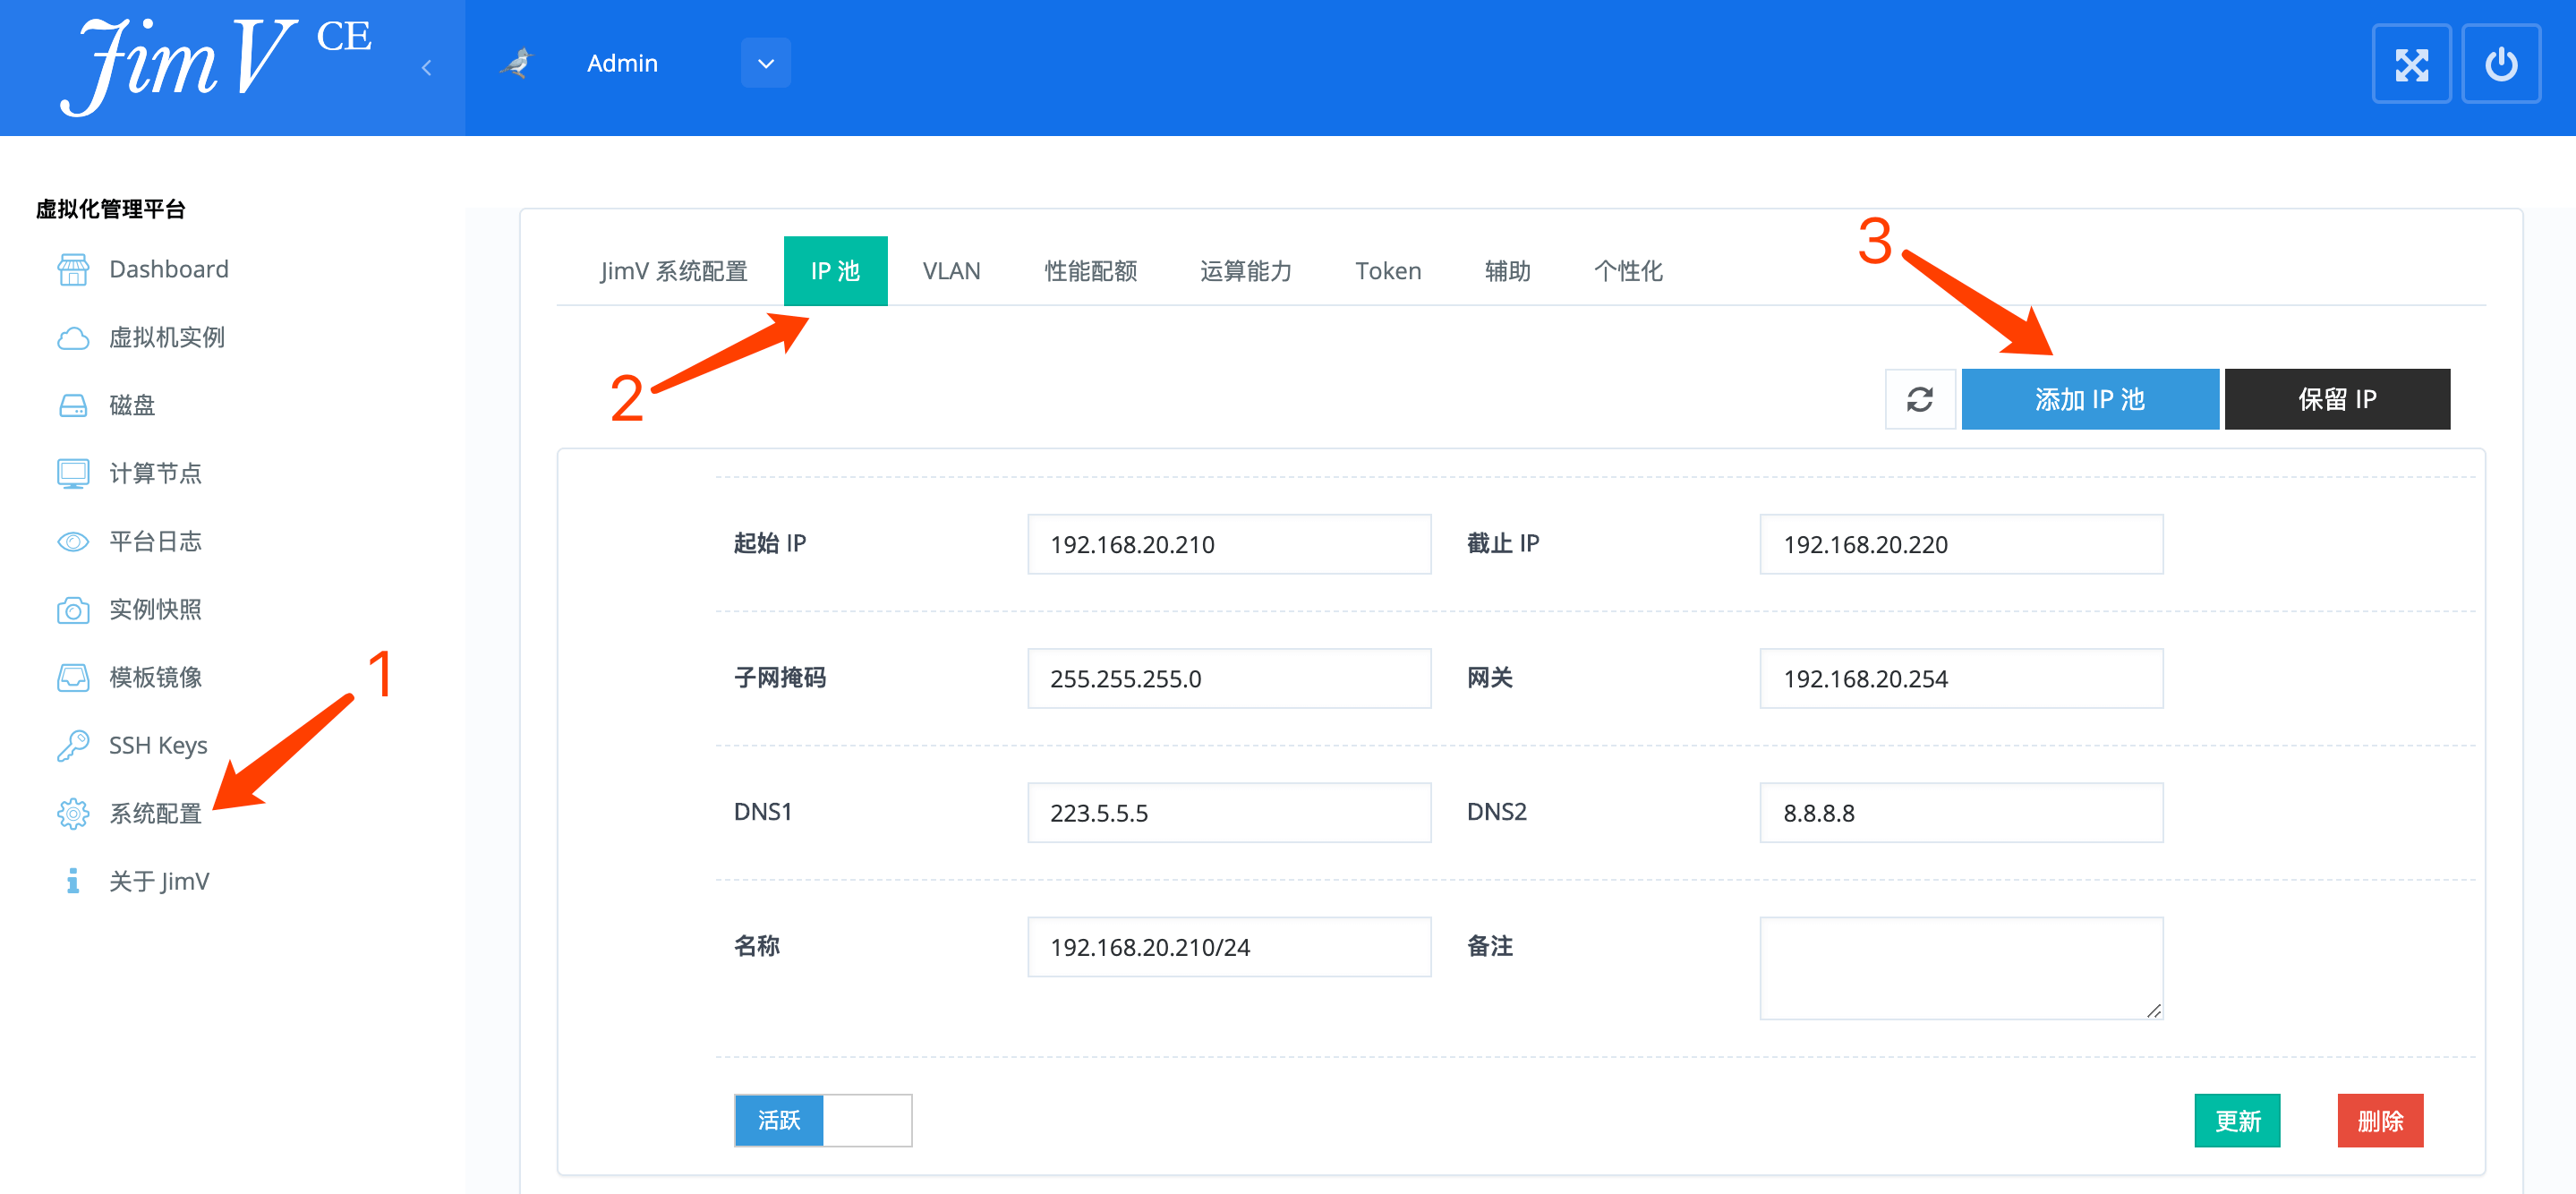
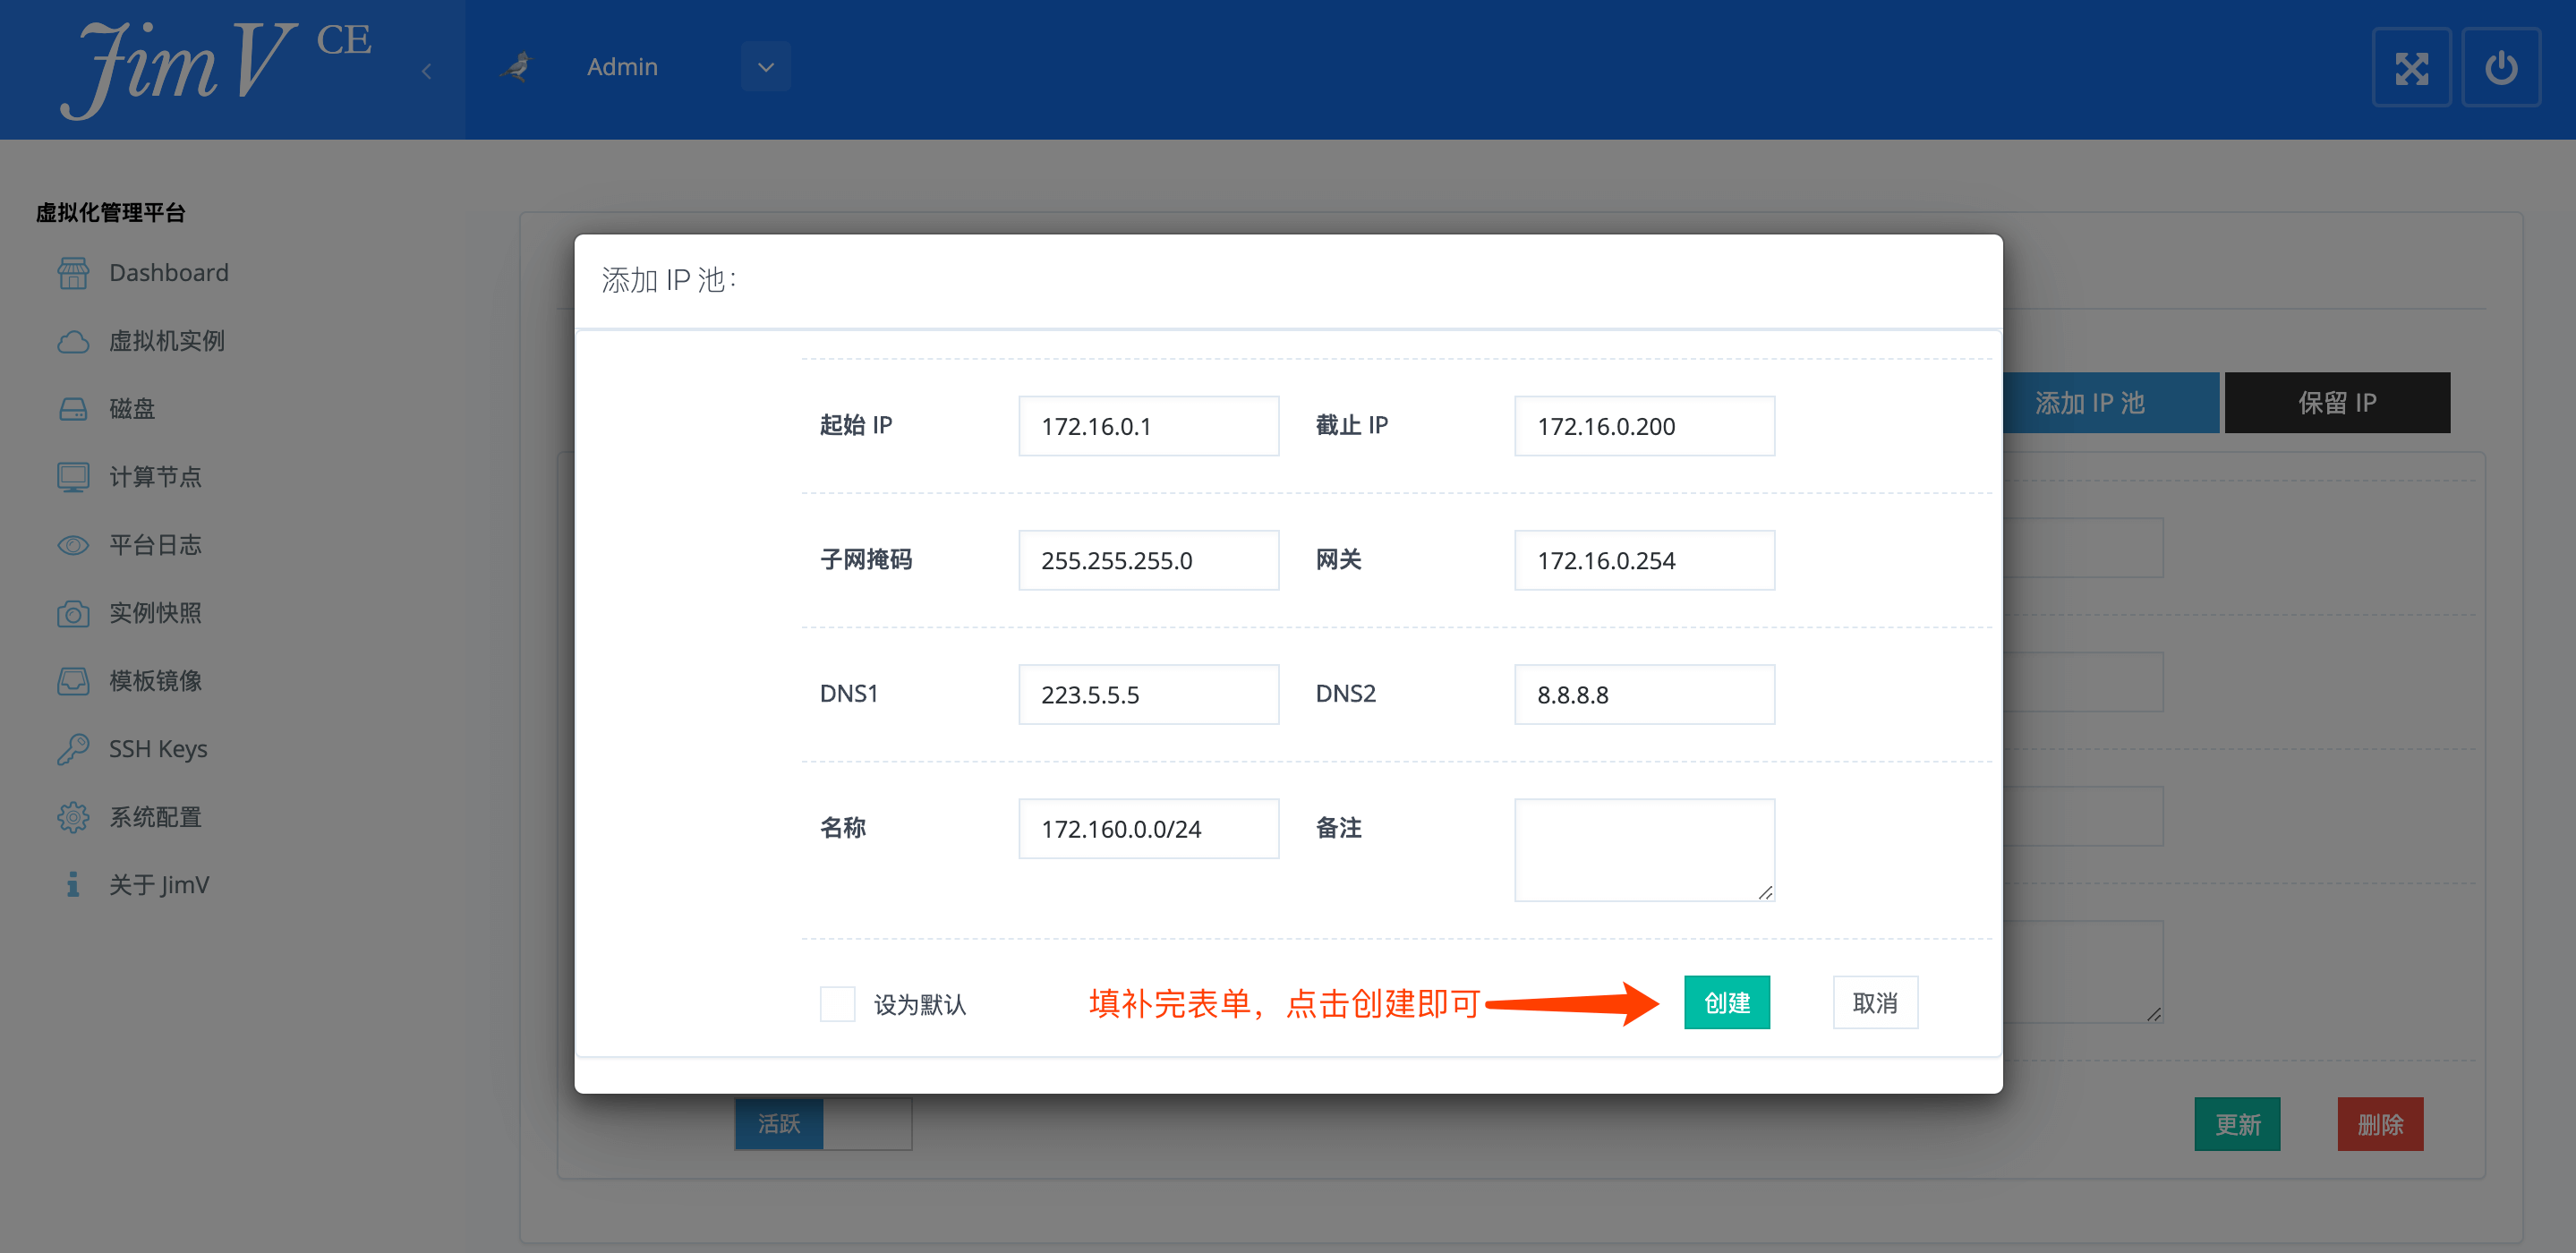
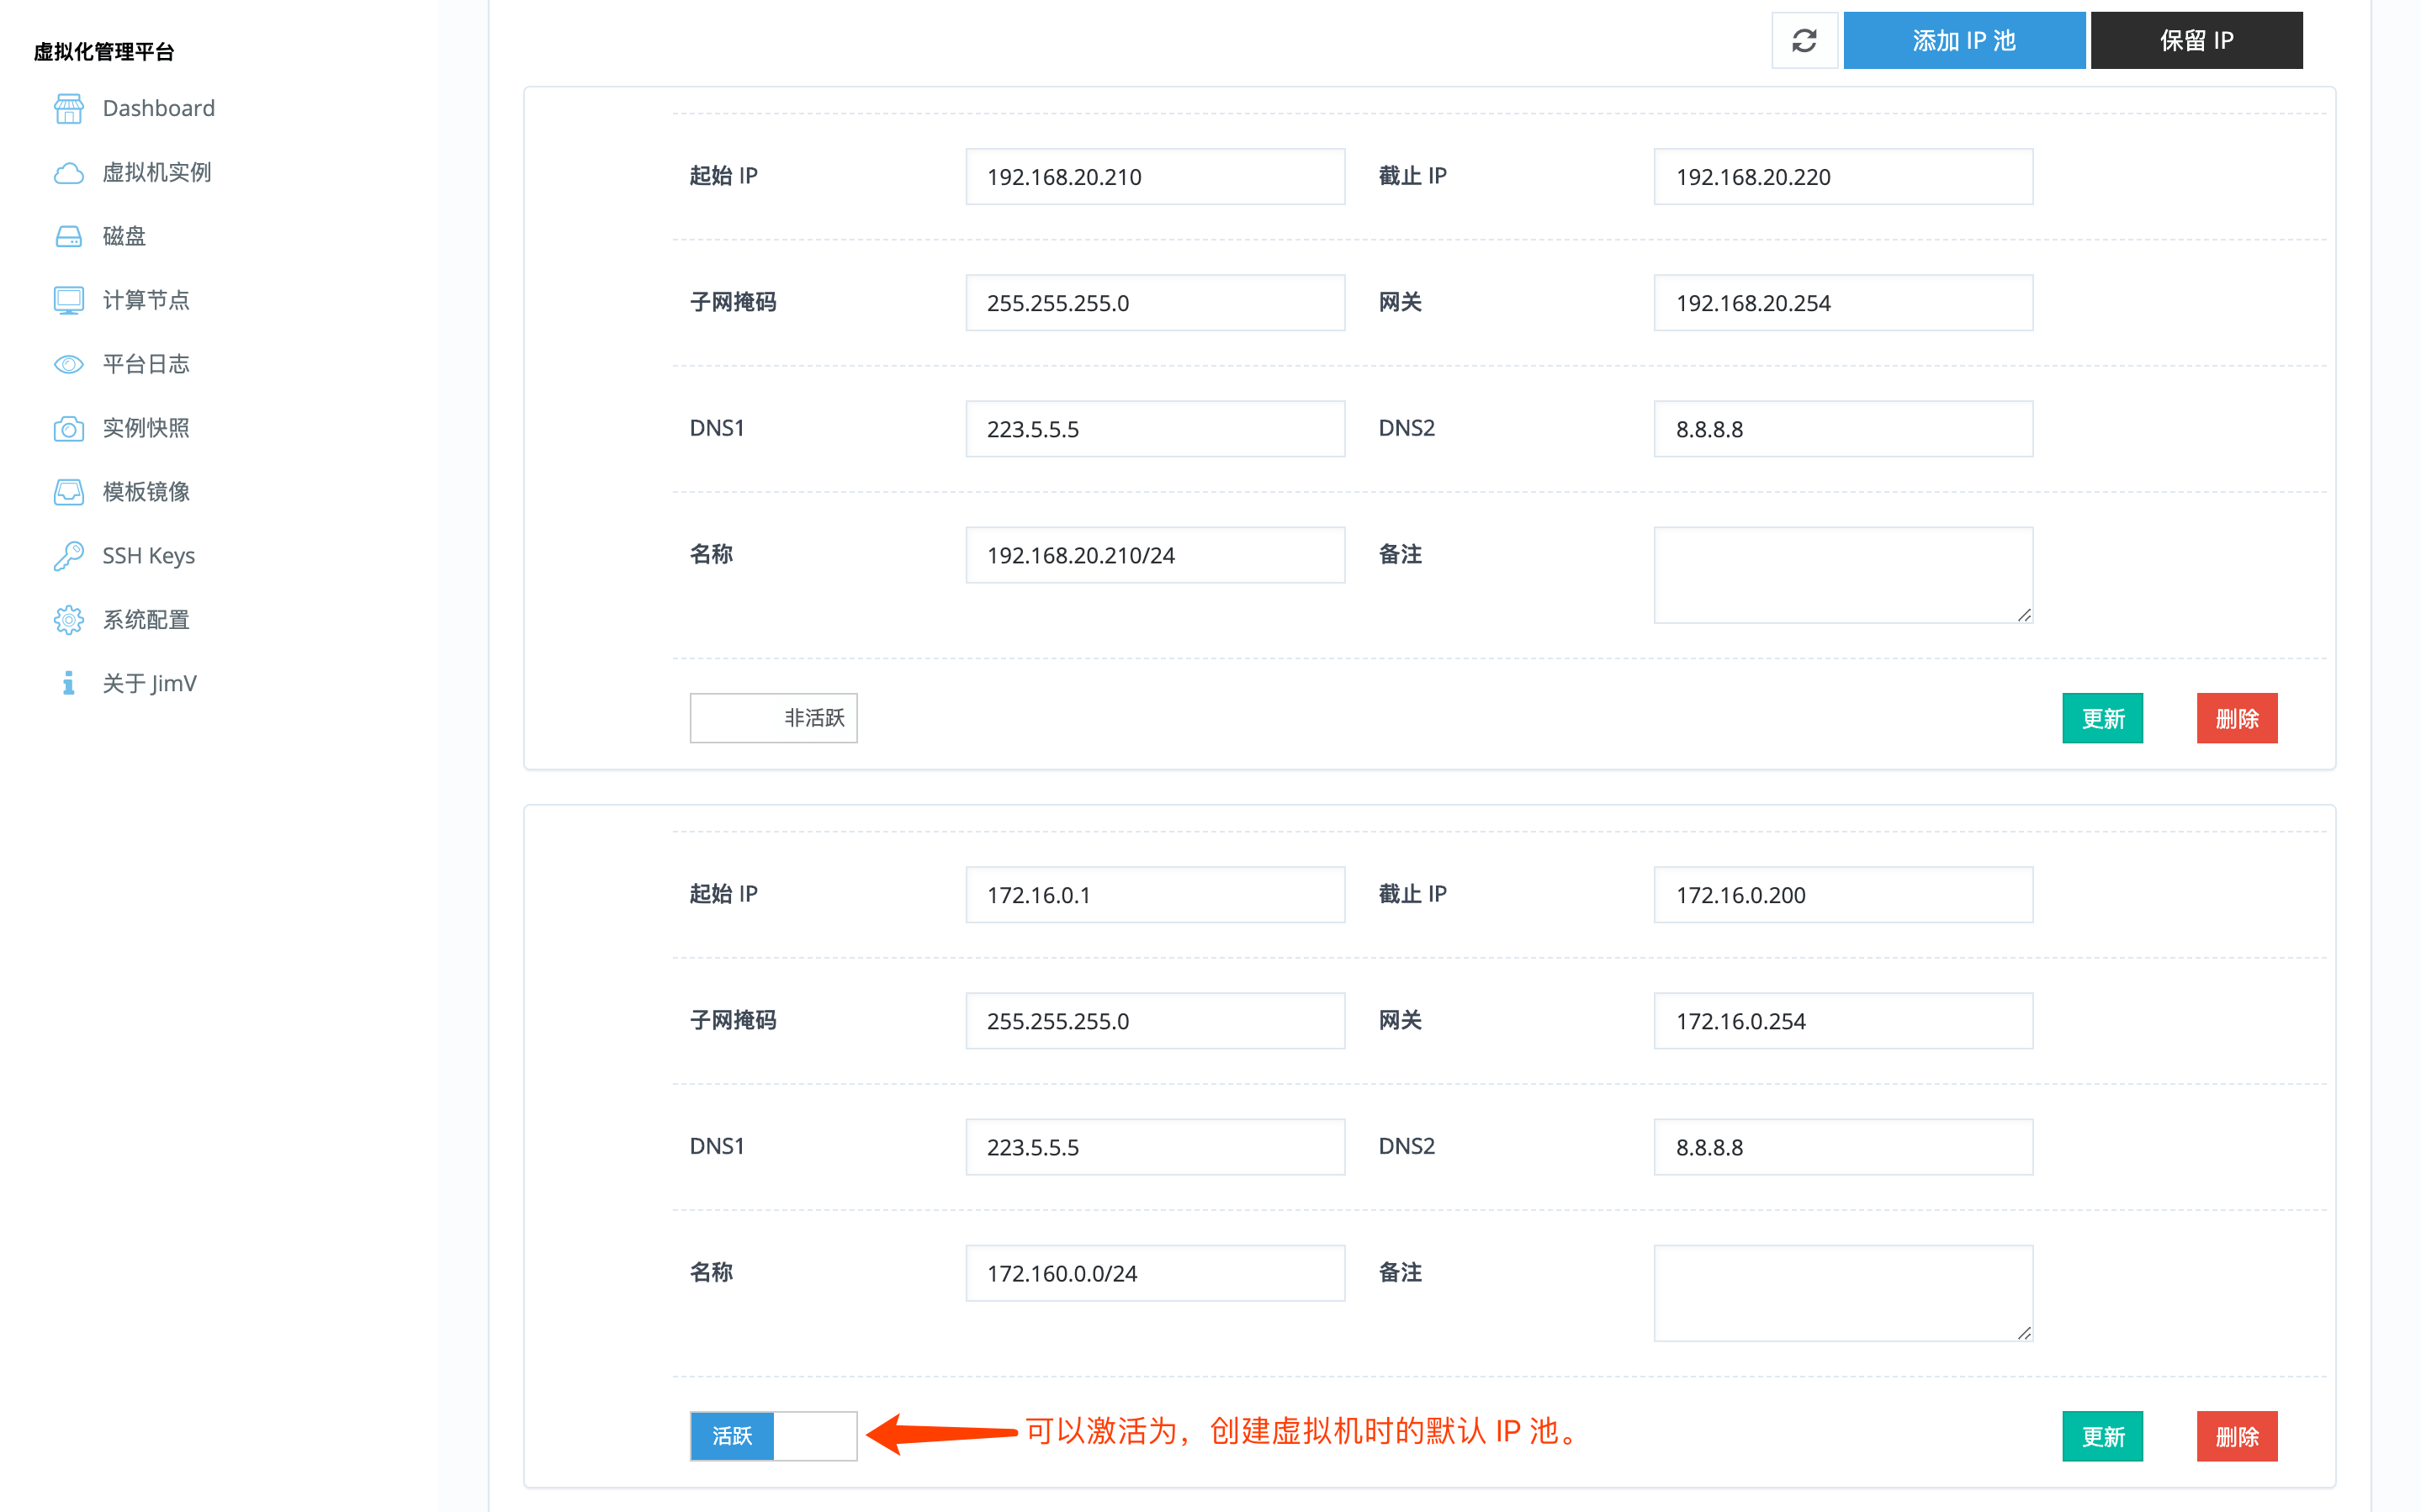
==IP 池== | ==IP 池== | ||
| − | * | + | *<img style="max-width: 1170px;" src="https://wiki.jimv.cn/images/操作指南/IP池-创建-1.png" /> |
| − | * | + | *<img style="max-width: 1170px;" src="https://wiki.jimv.cn/images/操作指南/IP池-创建-2.png" /> |
| − | * | + | *<img style="max-width: 1170px;" src="https://wiki.jimv.cn/images/操作指南/IP池-创建-3.png" /> |
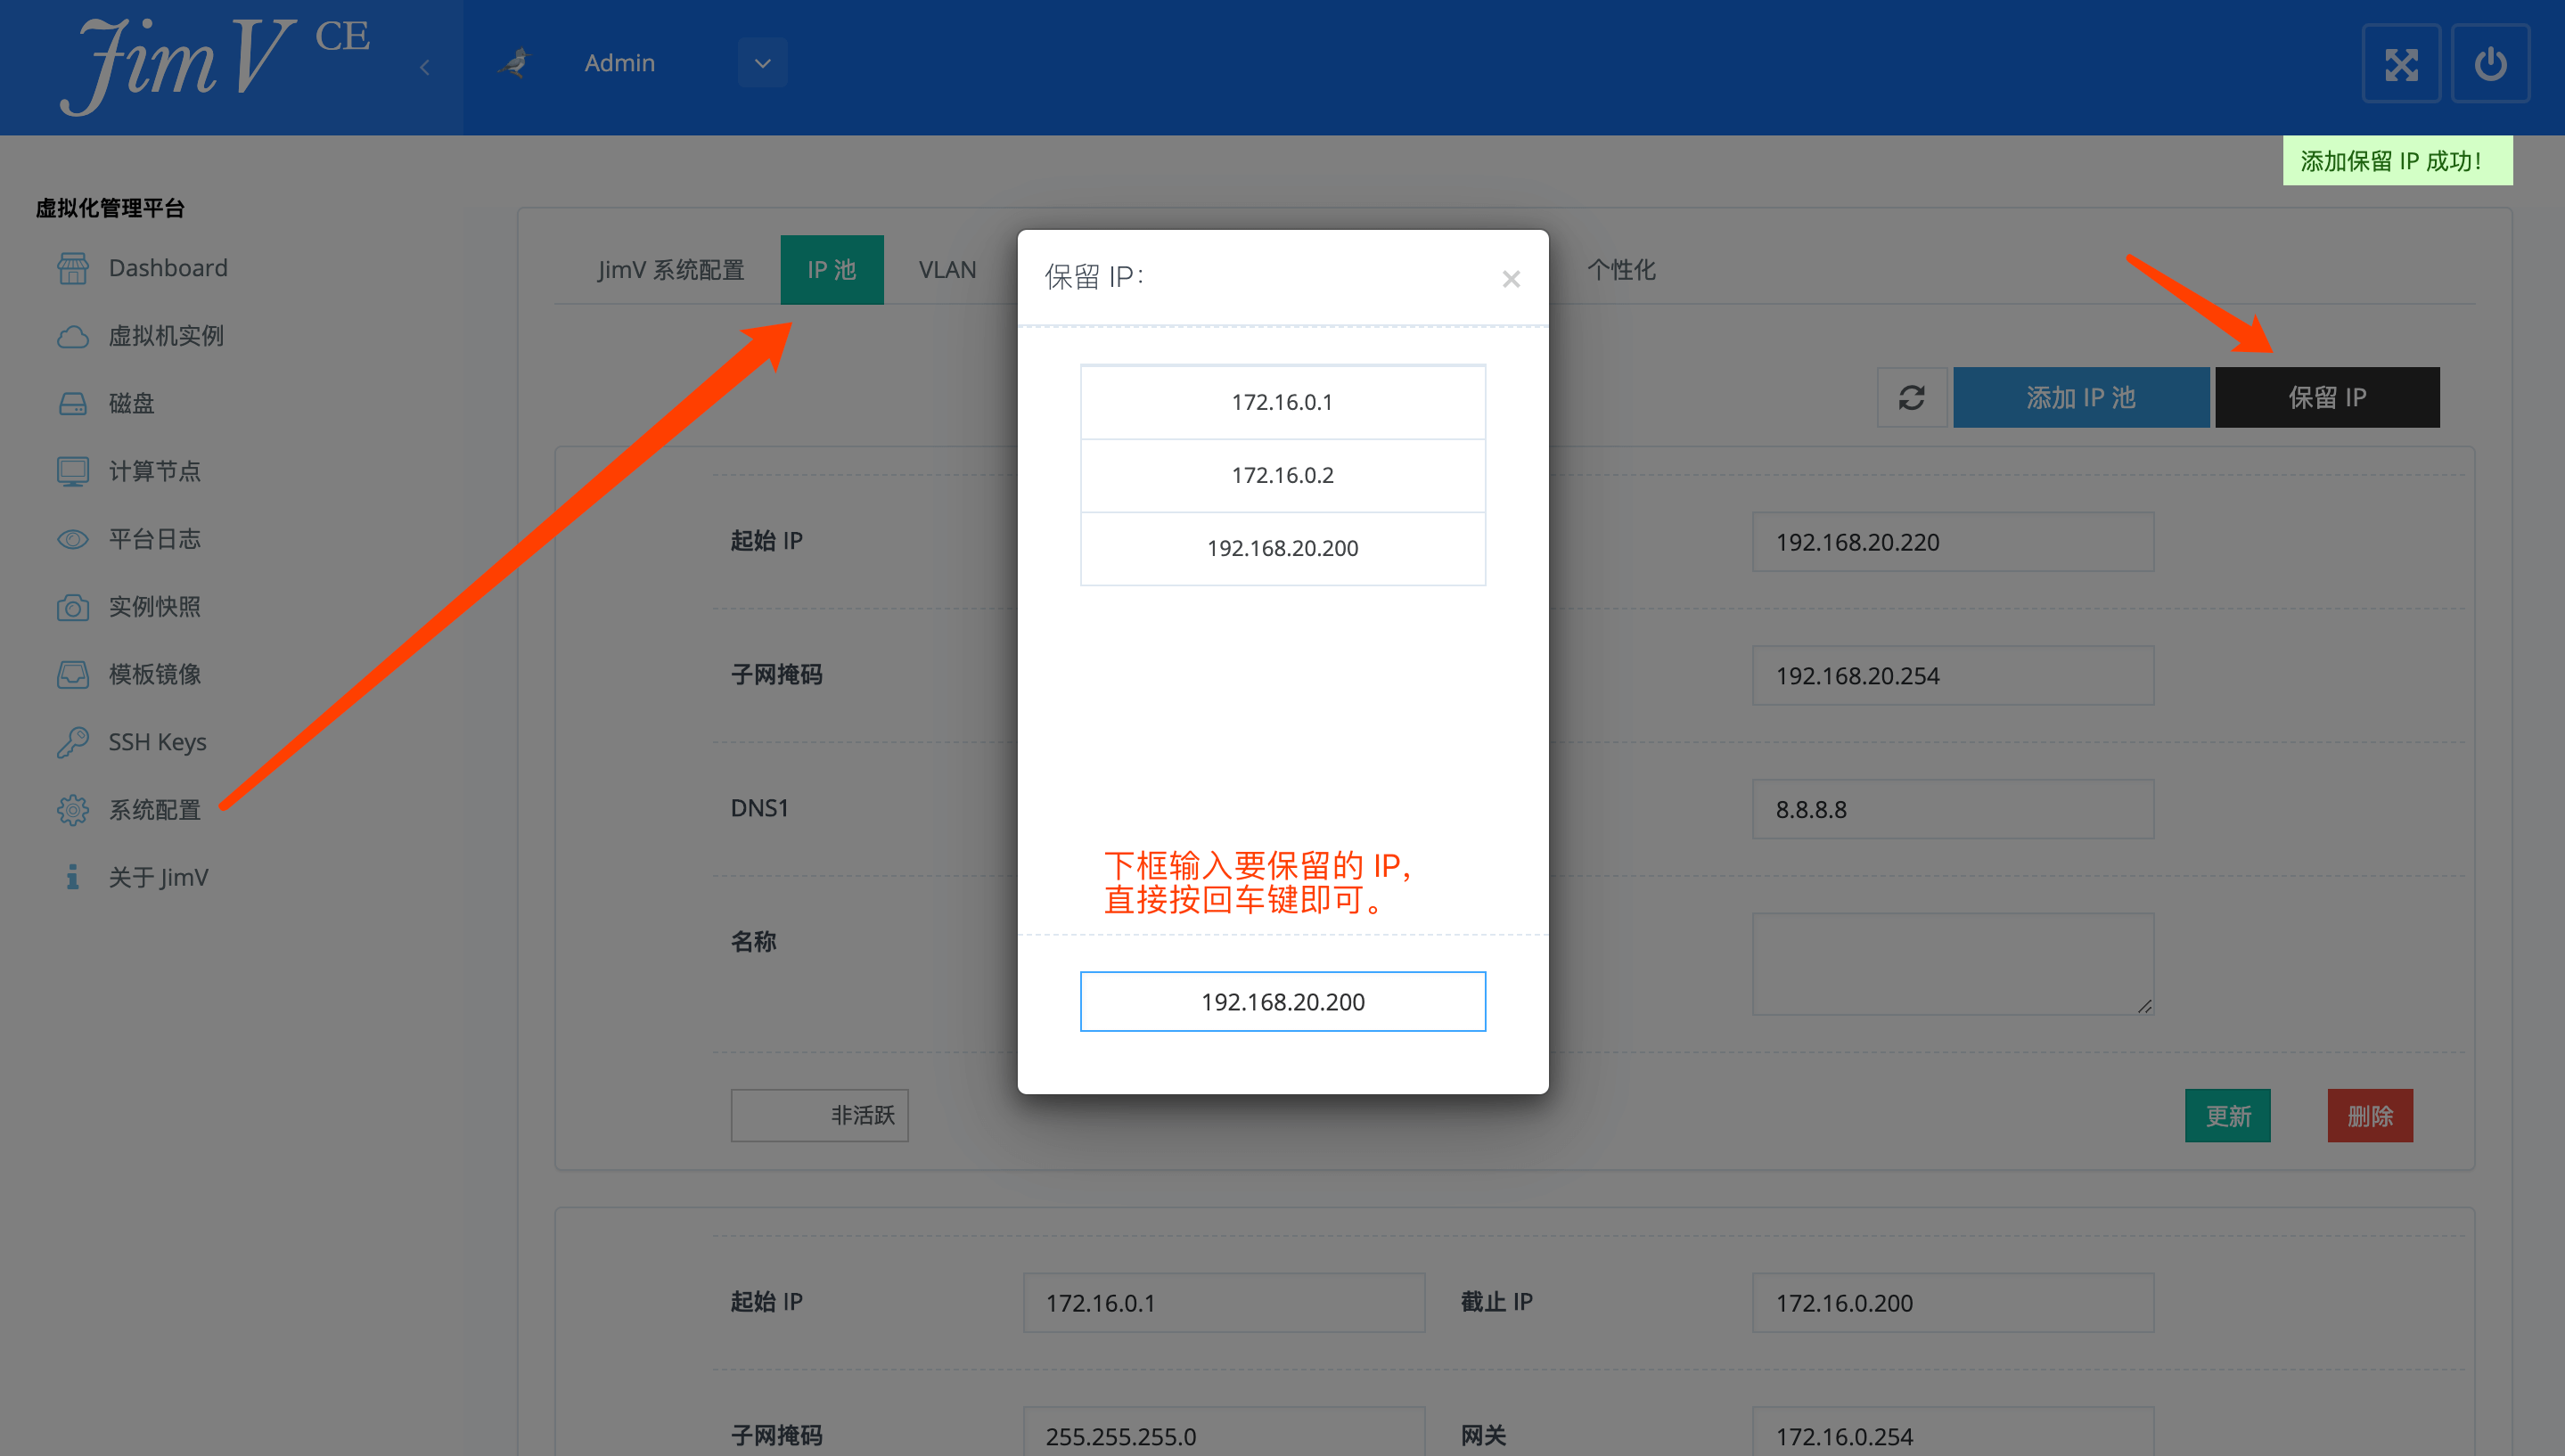
==保留 IP== | ==保留 IP== | ||
{{Note|提示:出现在保留 IP 列表里面的资源,将不会在创建虚拟机时被分配出去。|reminder}} | {{Note|提示:出现在保留 IP 列表里面的资源,将不会在创建虚拟机时被分配出去。|reminder}} | ||
| − | * | + | *<img style="max-width: 1170px;" src="https://wiki.jimv.cn/images/操作指南/保留IP.png" /> |
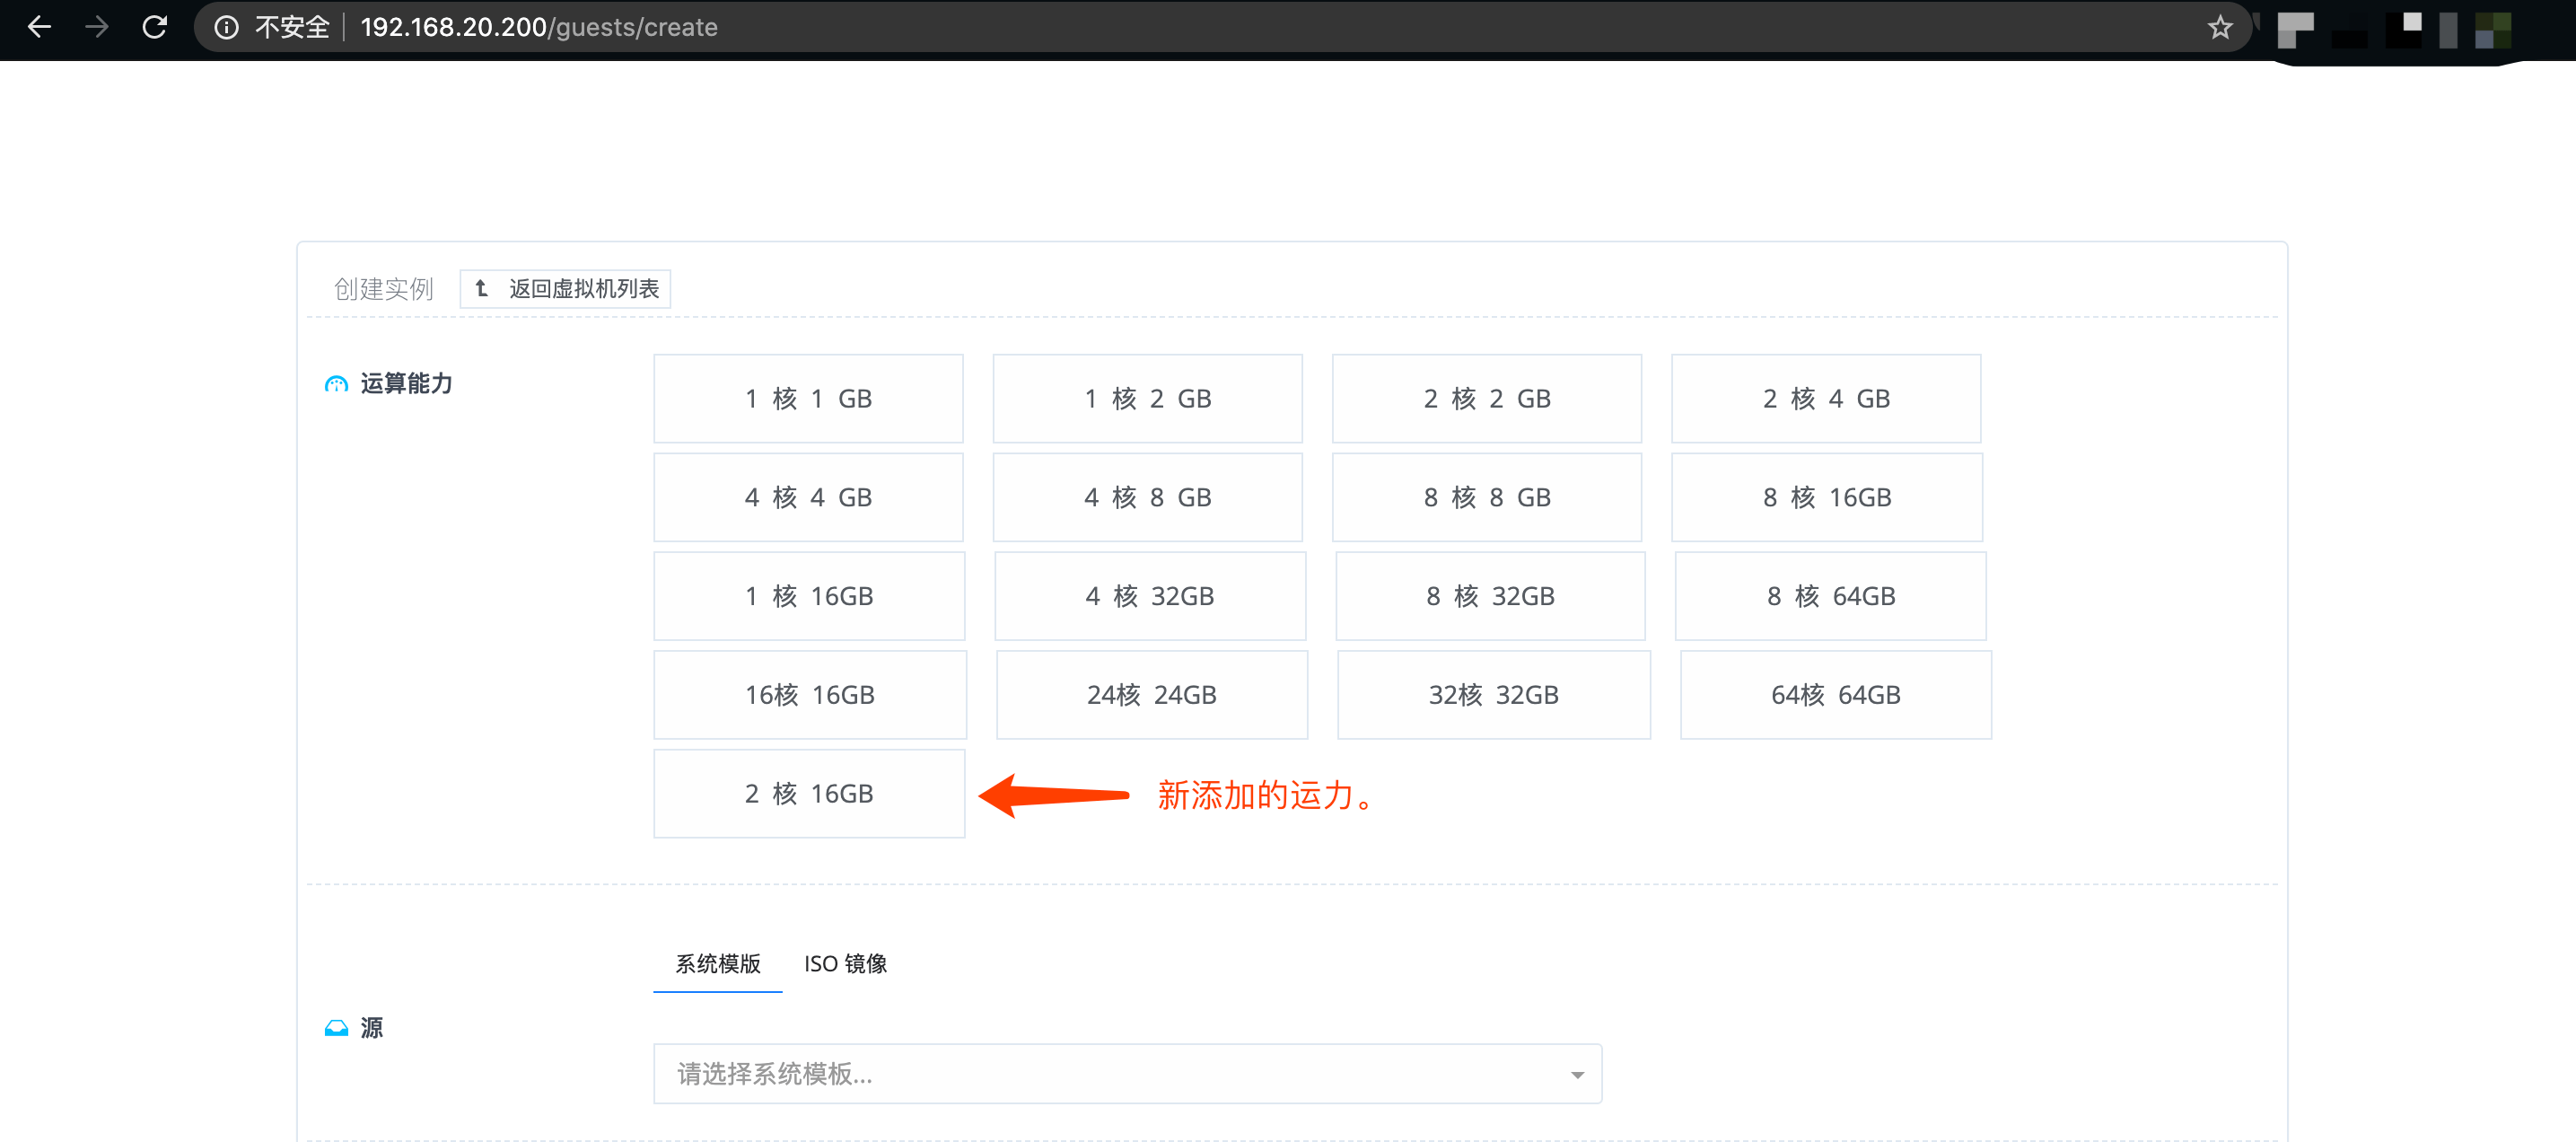
==添加运算能力== | ==添加运算能力== | ||
| − | * | + | *<img style="max-width: 1170px;" src="https://wiki.jimv.cn/images/操作指南/添加运算能力.png" /> |
| − | * | + | *<img style="max-width: 1170px;" src="https://wiki.jimv.cn/images/操作指南/添加运算能力-2.png" /> |
==模版镜像== | ==模版镜像== | ||
| 第20行: | 第20行: | ||
{{Note|提示:只有商业版的授权许可,才可以访问 JimV-Store。|reminder}} | {{Note|提示:只有商业版的授权许可,才可以访问 JimV-Store。|reminder}} | ||
====绑定设备==== | ====绑定设备==== | ||
| − | + | <img style="max-width: 1170px;" src="https://wiki.jimv.cn/images/操作指南/激活.png" /> | |
====授权商业版==== | ====授权商业版==== | ||
| − | + | <img style="max-width: 1170px;" src="https://wiki.jimv.cn/images/操作指南/激活-2.png" /> | |
====购买镜像==== | ====购买镜像==== | ||
| − | + | <img style="max-width: 1170px;" src="https://wiki.jimv.cn/images/操作指南/购买镜像.png" /> | |
====绑定购买到的镜像==== | ====绑定购买到的镜像==== | ||
| − | + | <img style="max-width: 1170px;" src="https://wiki.jimv.cn/images/操作指南/绑定购买镜像.png" /> | |
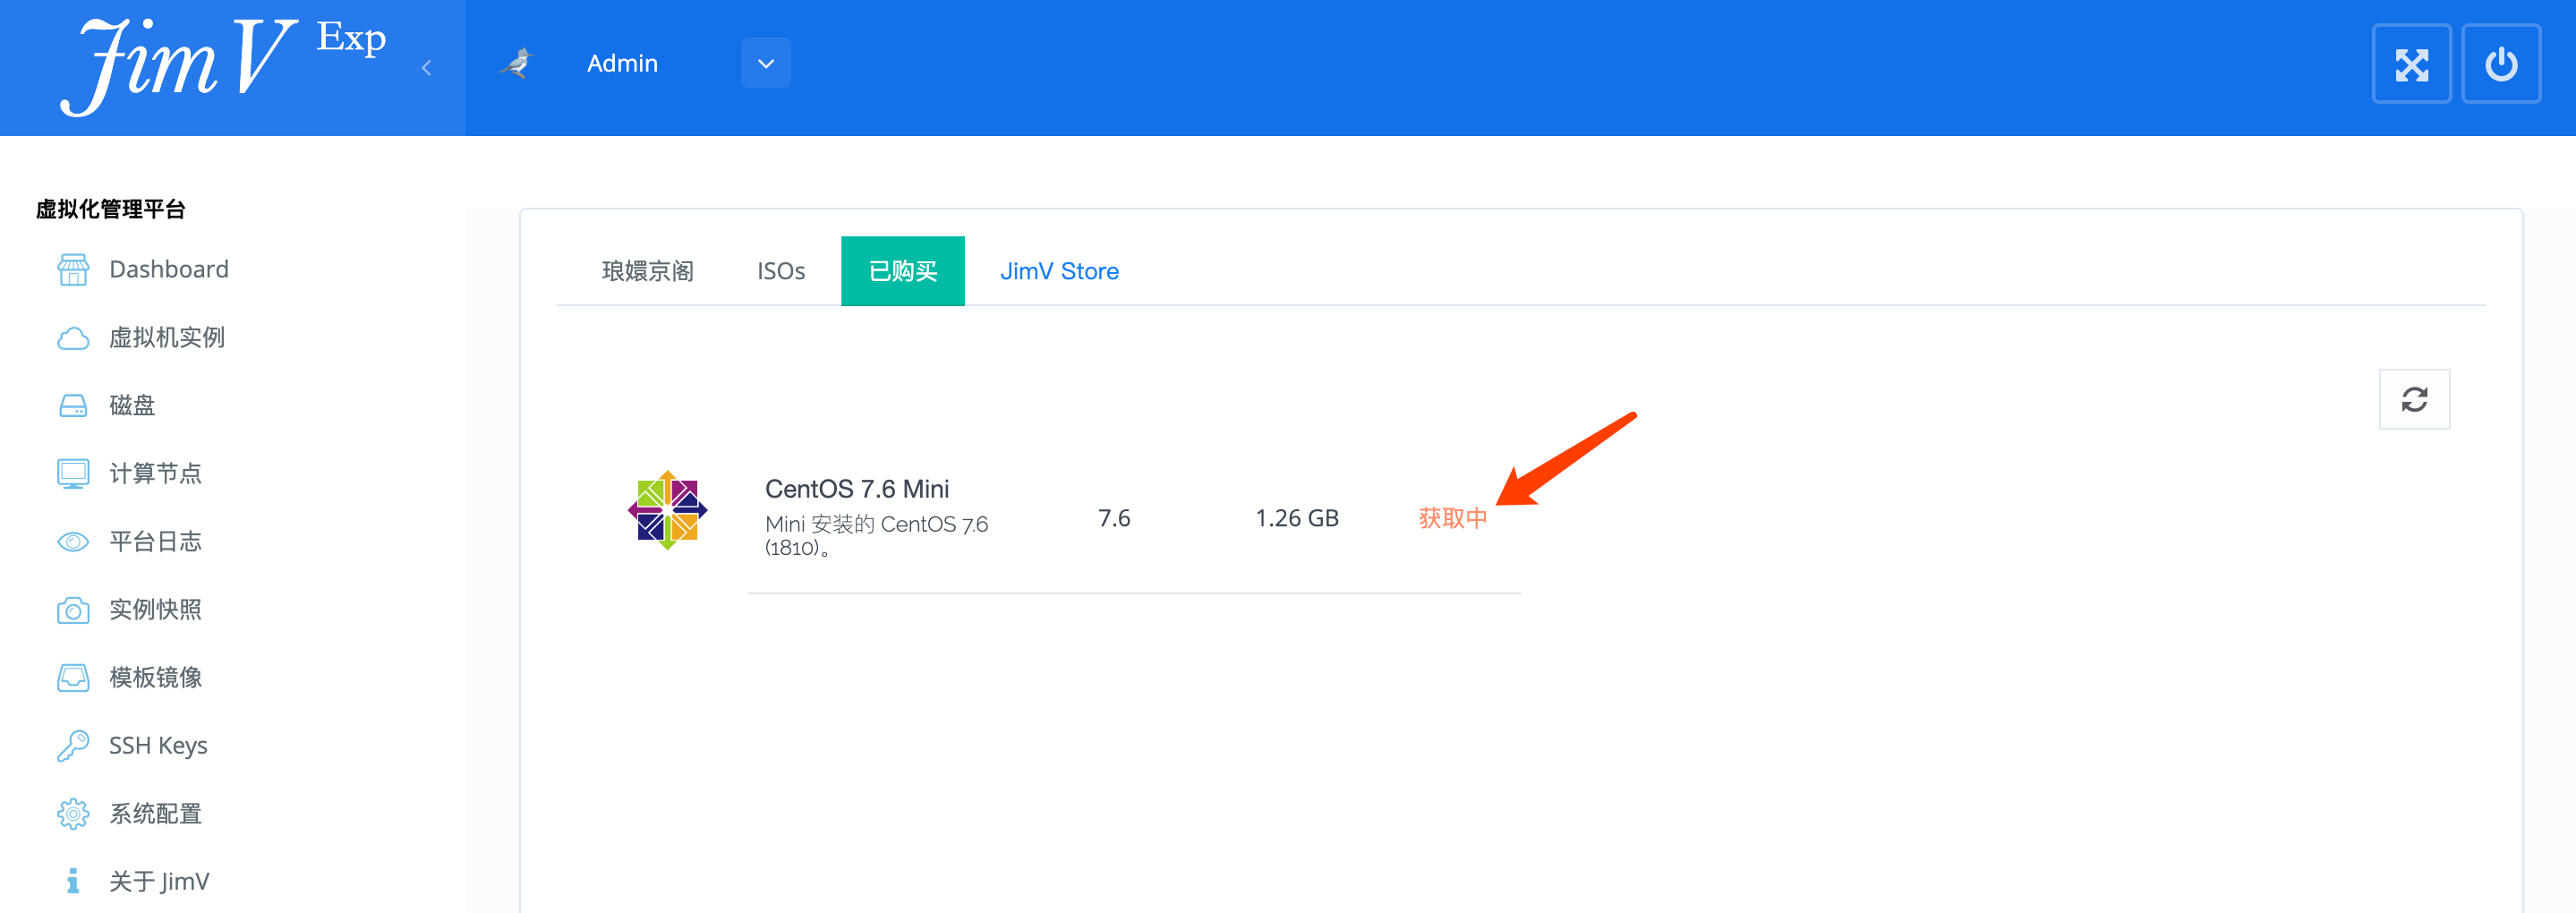
====获取购买到的镜像==== | ====获取购买到的镜像==== | ||
| − | + | <img style="max-width: 1170px;" src="https://wiki.jimv.cn/images/操作指南/获取购买镜像.png" /> | |
===从第三方导入=== | ===从第三方导入=== | ||
| 第35行: | 第35行: | ||
#前往 [https://bbs.jimv.cn/ JimV BBS] 论坛注册账号; | #前往 [https://bbs.jimv.cn/ JimV BBS] 论坛注册账号; | ||
| − | #进入「JimV镜像下载」区域获取所需模版;<br> | + | #进入「JimV镜像下载」区域获取所需模版;<br><img style="max-width: 1170px;" src="https://wiki.jimv.cn/images/操作指南/获取模版镜像.png" /> |
====搭建模版发布服务==== | ====搭建模版发布服务==== | ||
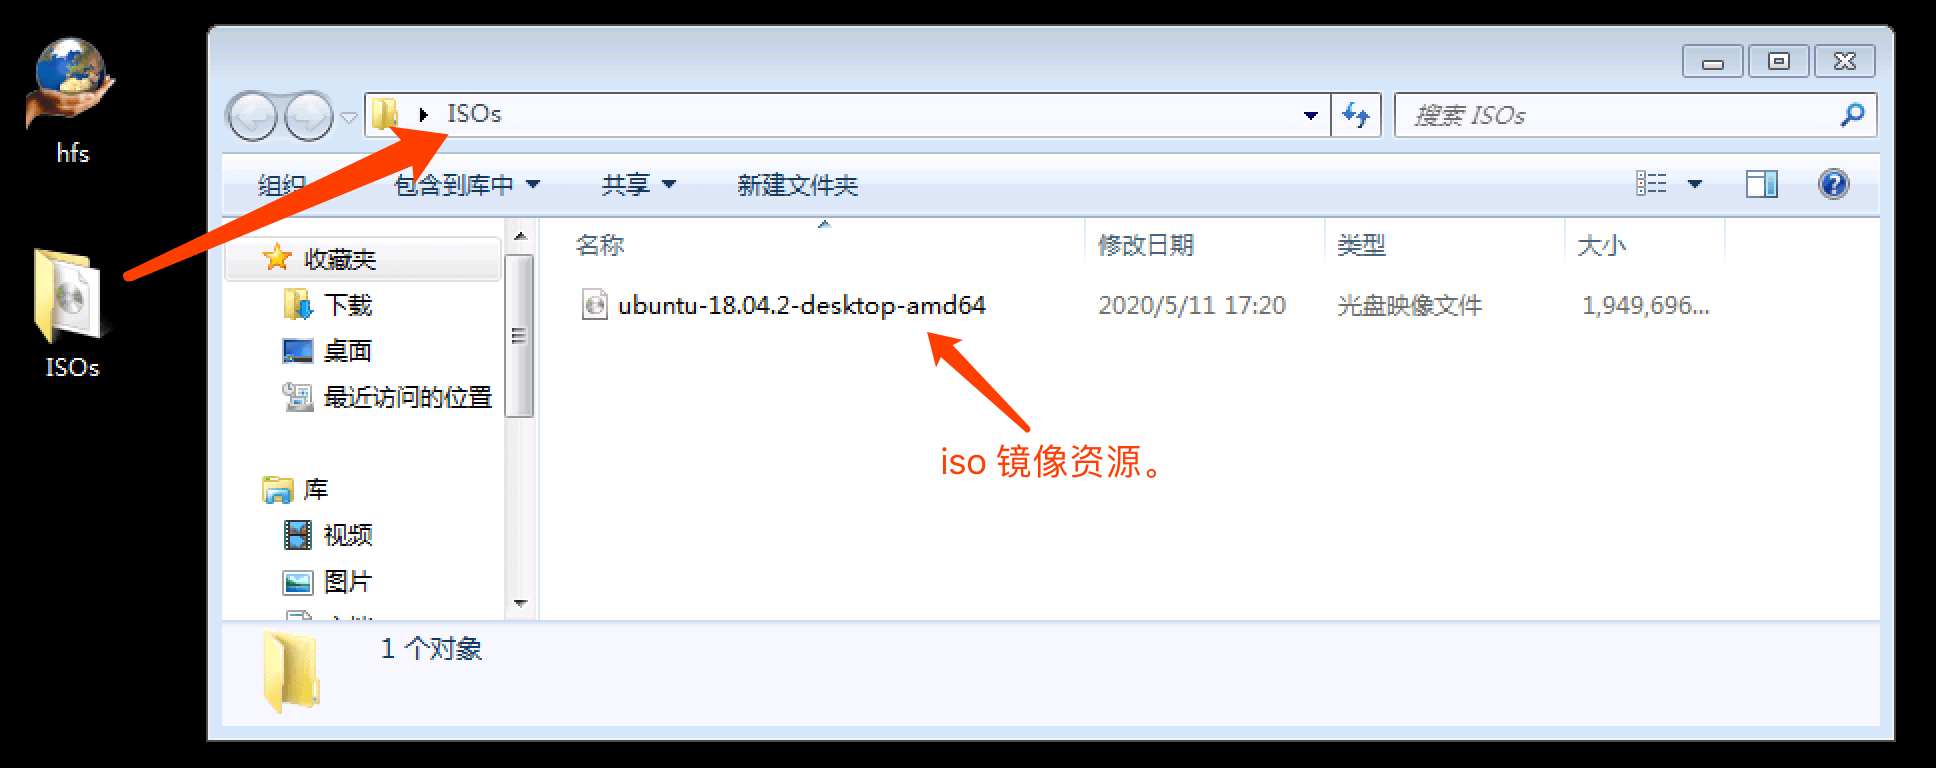
| − | #整理将要被发布的模版镜像资源目录;<br> | + | #整理将要被发布的模版镜像资源目录;<br><img style="max-width: 1170px;" src="https://wiki.jimv.cn/images/操作指南/模版镜像资源目录.png" /> |
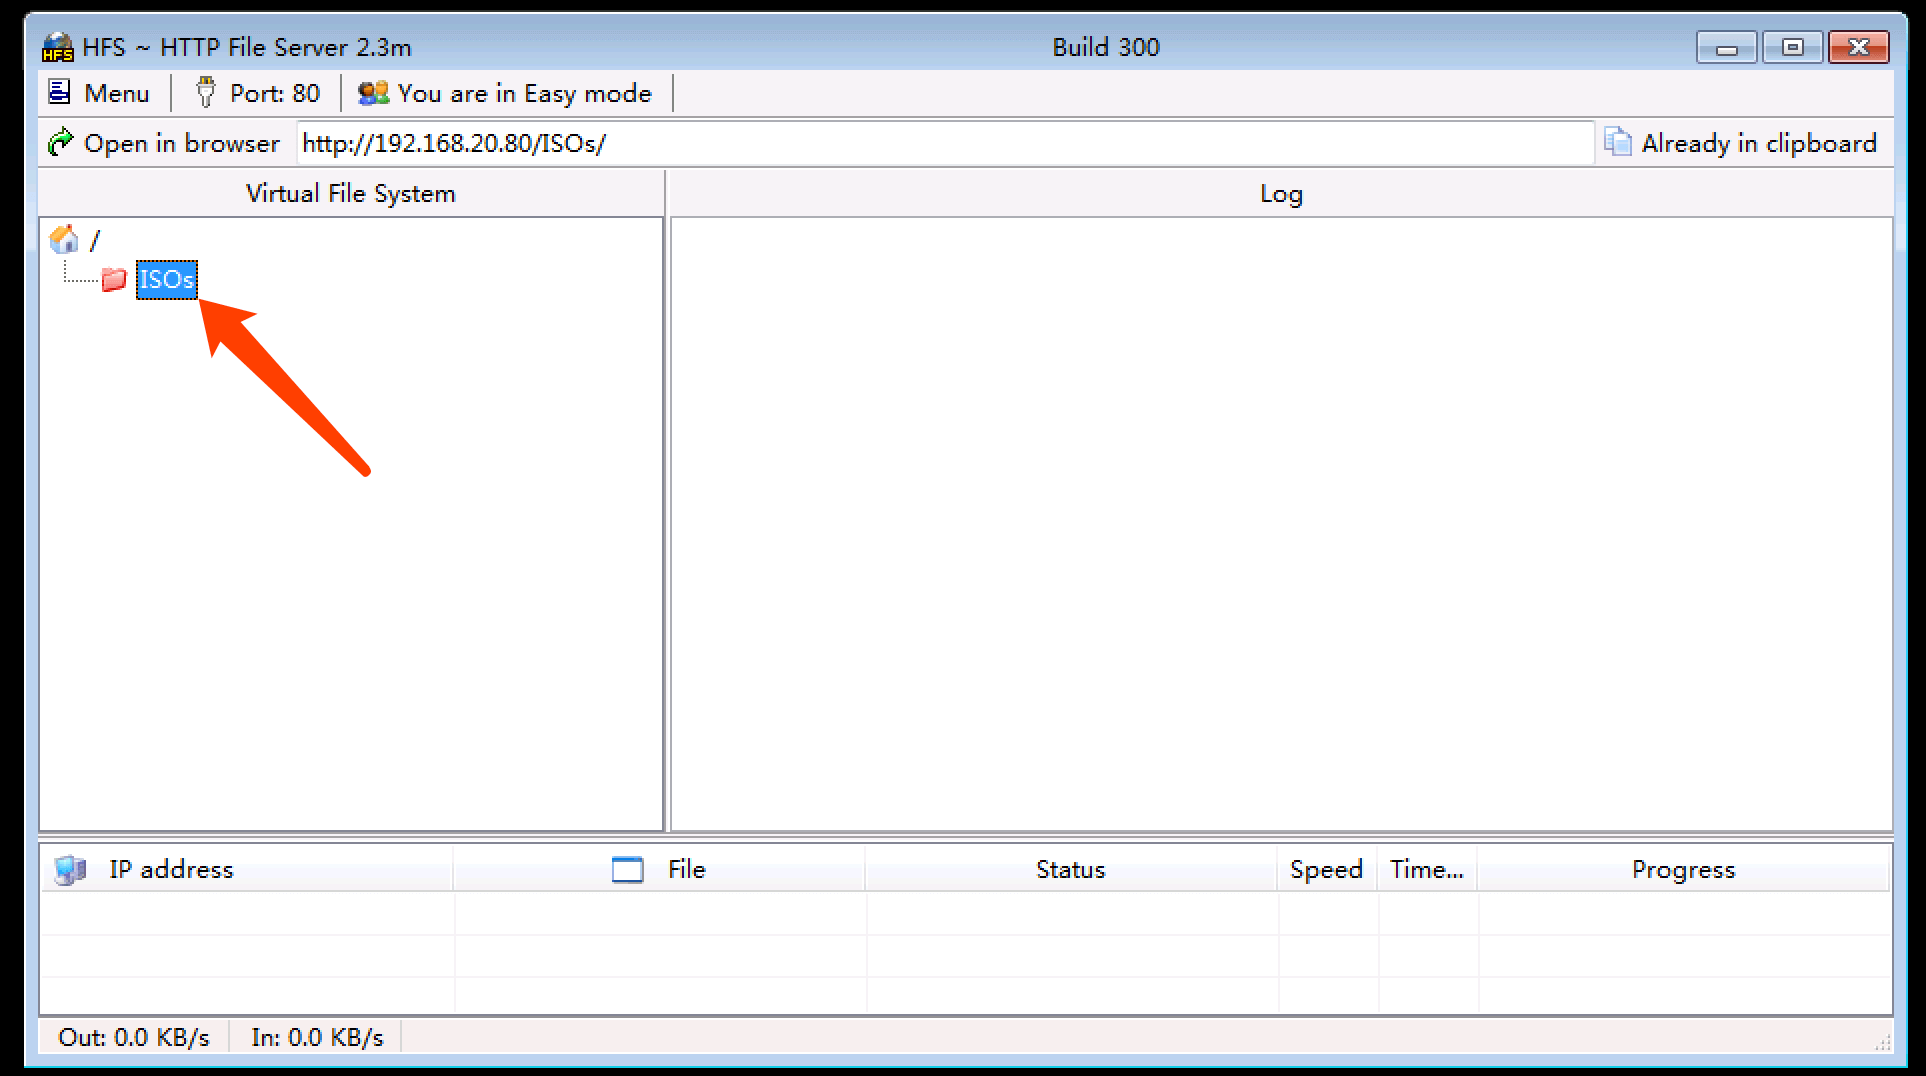
| − | #通过 HFS 把资源发布出来;<br> | + | #通过 HFS 把资源发布出来;<br><img style="max-width: 1170px;" src="https://wiki.jimv.cn/images/操作指南/HFS发布资源.png" /> |
====导入模版==== | ====导入模版==== | ||
| − | #获取模版的资源路径;<br> | + | #获取模版的资源路径;<br><img style="max-width: 1170px;" src="https://wiki.jimv.cn/images/操作指南/获取模版资源的链接地址.png" /> |
| − | #导入模版镜像;<br> | + | #导入模版镜像;<br><img style="max-width: 1170px;" src="https://wiki.jimv.cn/images/操作指南/导入模版镜像.png" /> |
===模版制作=== | ===模版制作=== | ||
| 第53行: | 第53行: | ||
===搭建 ISO 资源发布服务=== | ===搭建 ISO 资源发布服务=== | ||
| − | #整理将要被发布的 ISO 资源目录;<br> | + | #整理将要被发布的 ISO 资源目录;<br><img style="max-width: 1170px;" src="https://wiki.jimv.cn/images/操作指南/导入ISO.png" /> |
| − | #通过 HFS 把资源发布出来;<br> | + | #通过 HFS 把资源发布出来;<br><img style="max-width: 1170px;" src="https://wiki.jimv.cn/images/操作指南/发布ISO资源.png" /> |
===导入 ISO 资源=== | ===导入 ISO 资源=== | ||
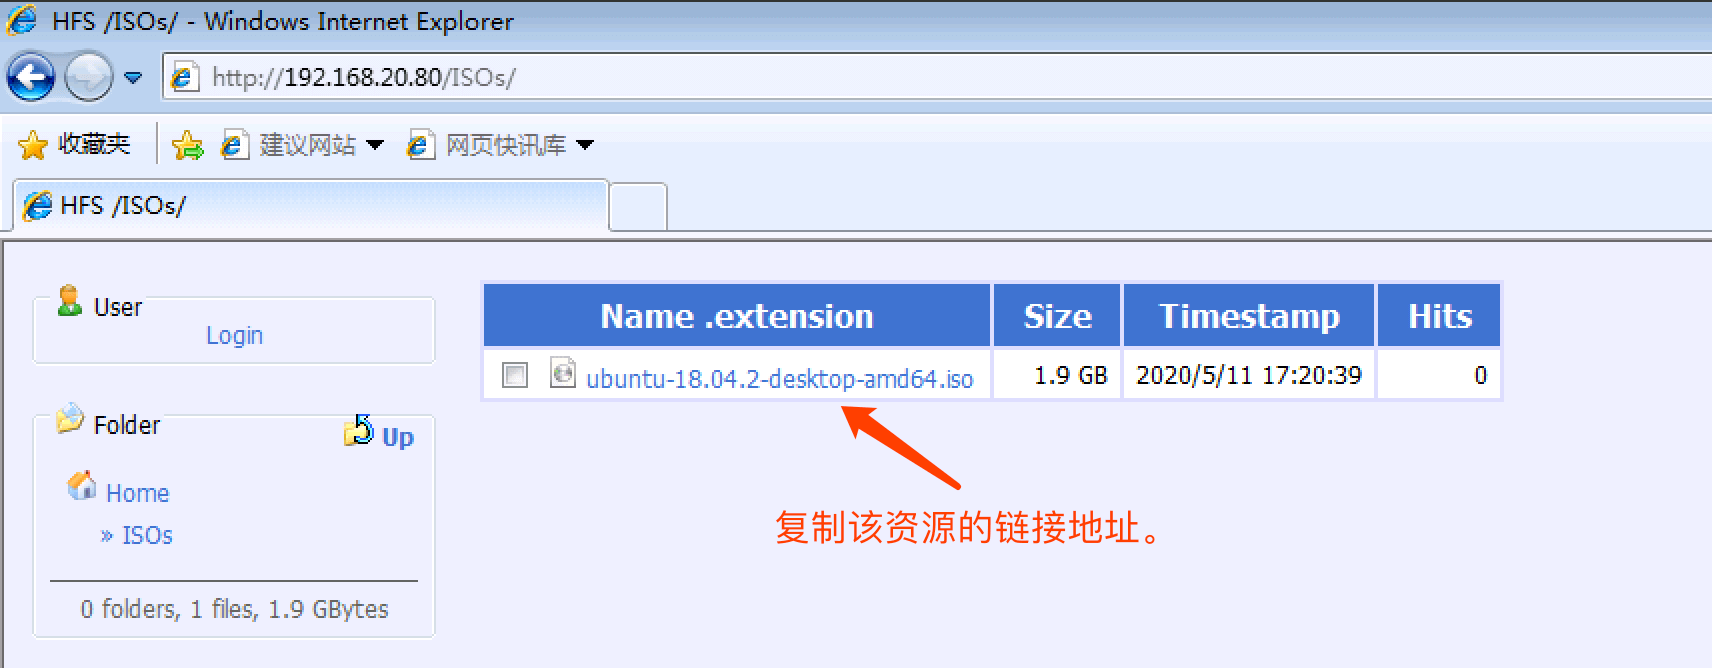
| − | #获取模版的资源路径;<br> | + | #获取模版的资源路径;<br><img style="max-width: 1170px;" src="https://wiki.jimv.cn/images/操作指南/获取模版的资源路径.png" /> |
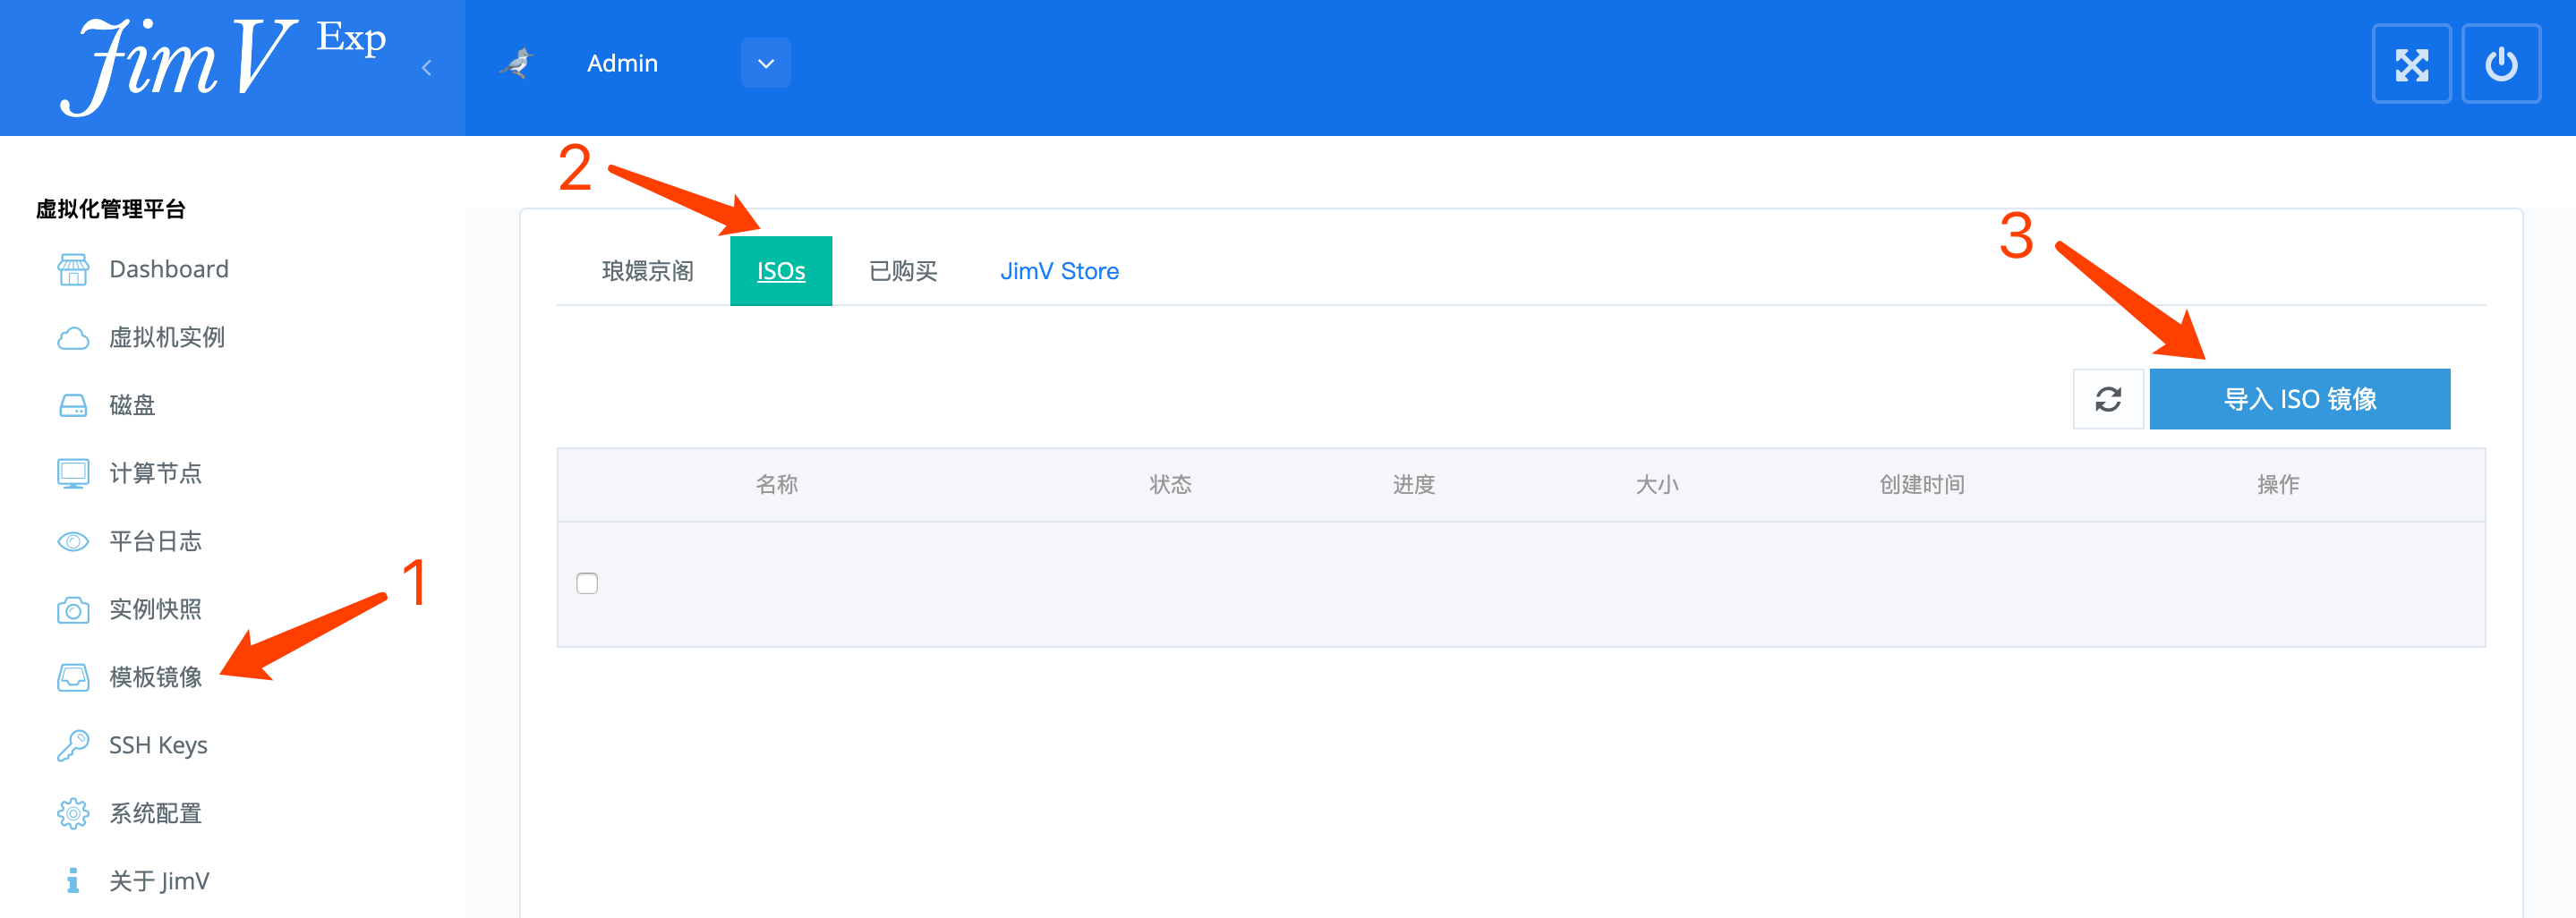
| − | #导入 ISO 镜像;<br> | + | #导入 ISO 镜像;<br><img style="max-width: 1170px;" src="https://wiki.jimv.cn/images/操作指南/导入ISO镜像.png" /> |
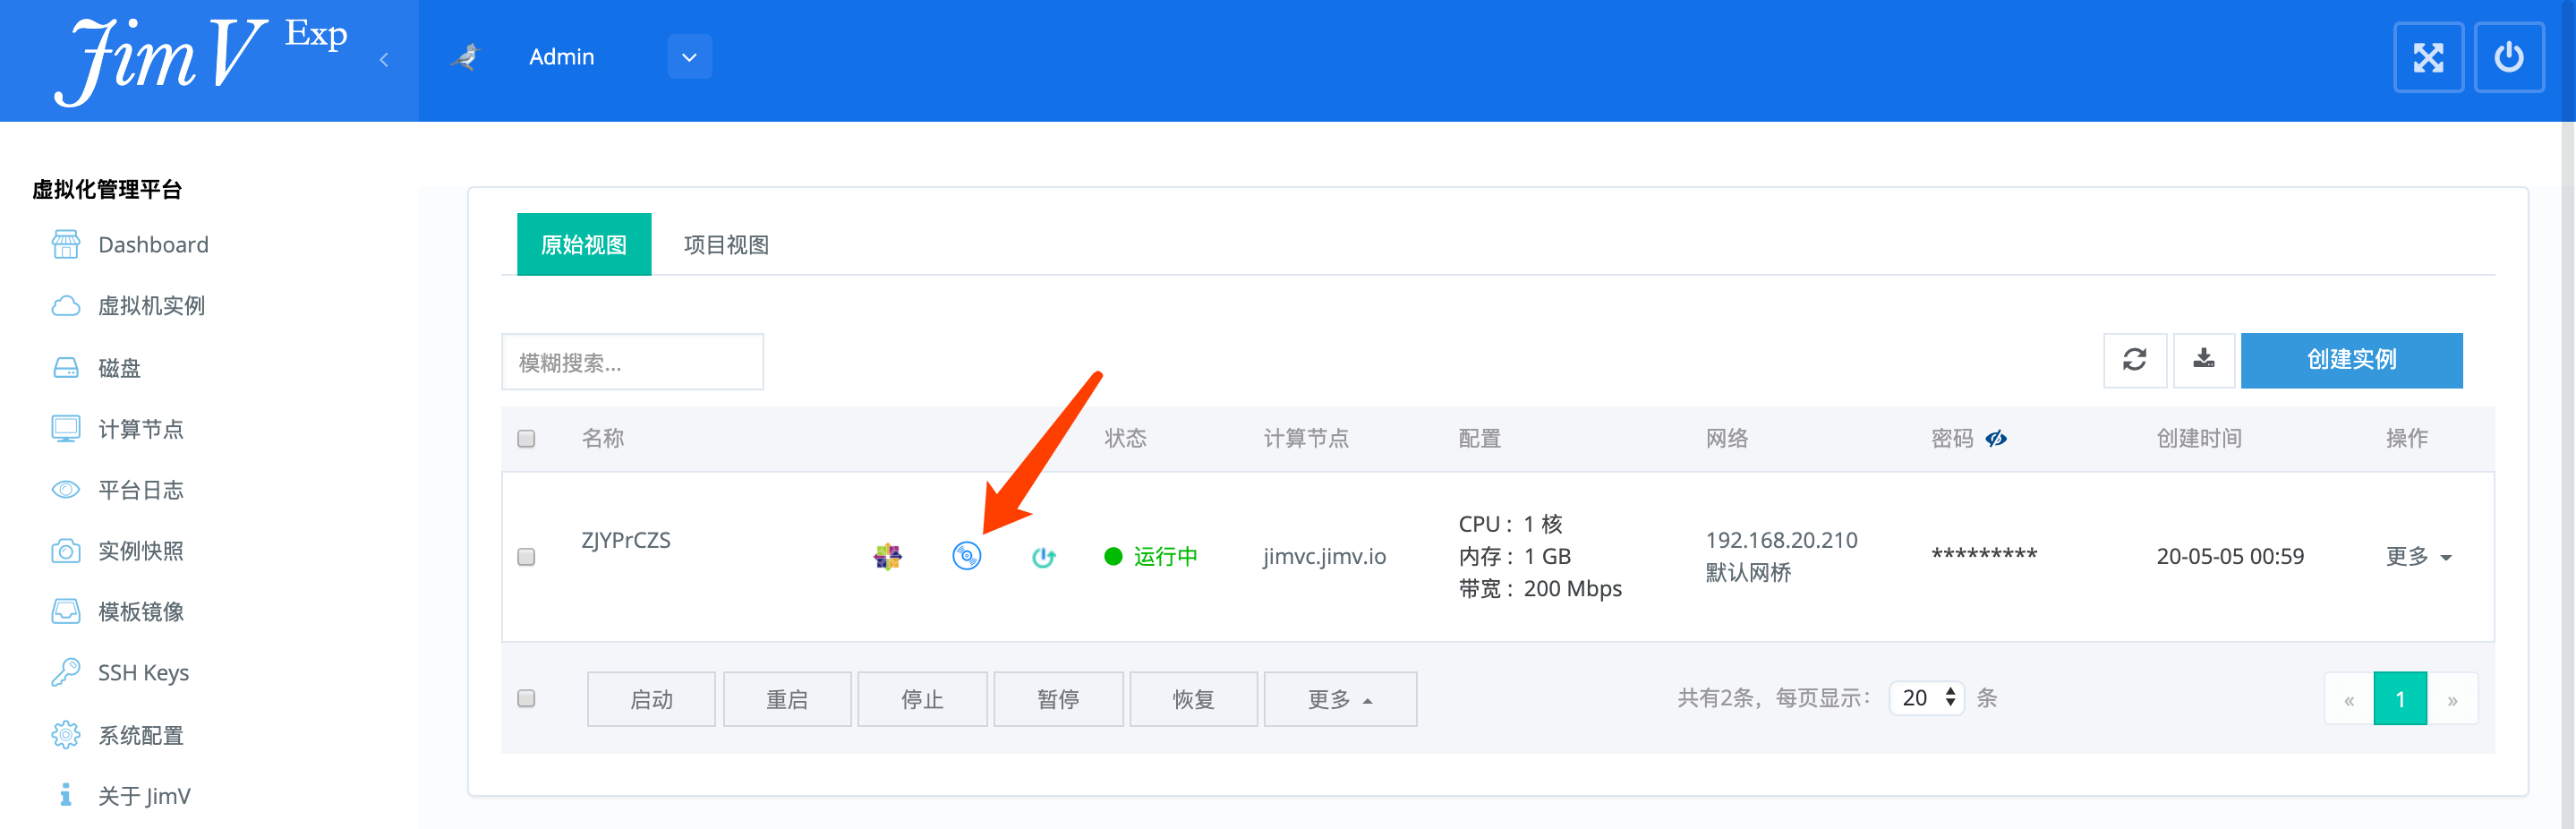
==ISO 挂载== | ==ISO 挂载== | ||
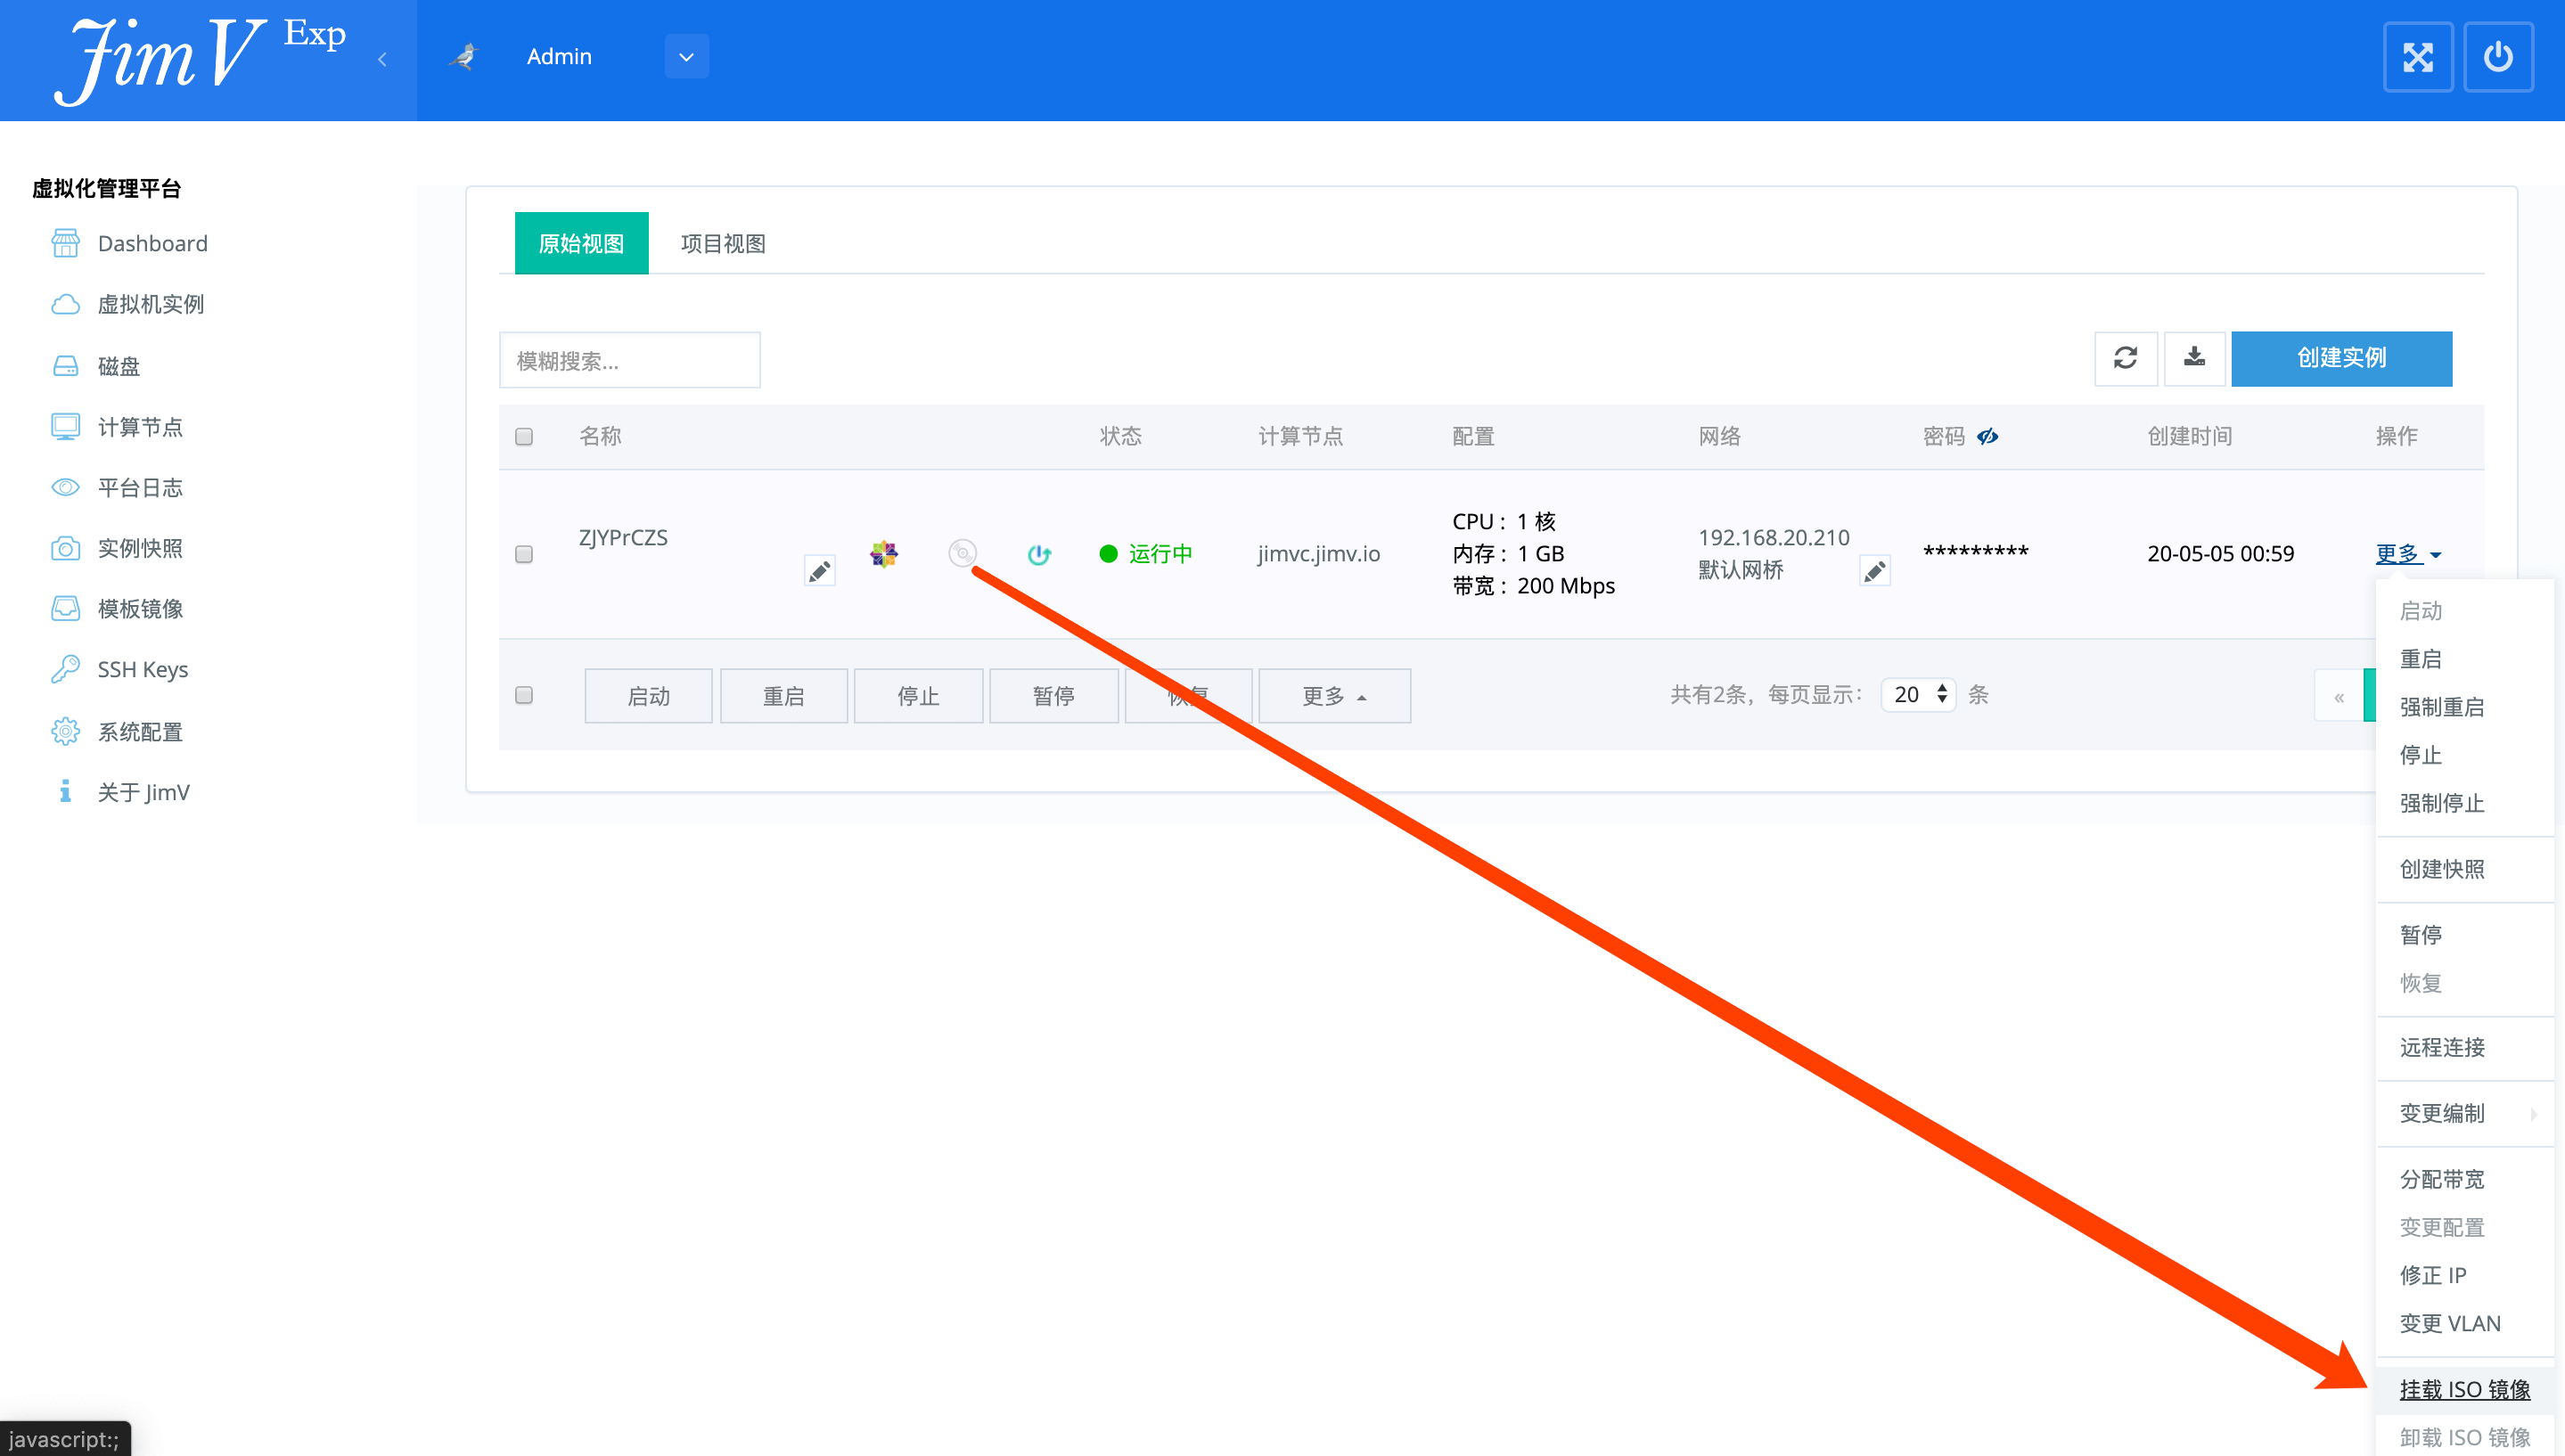
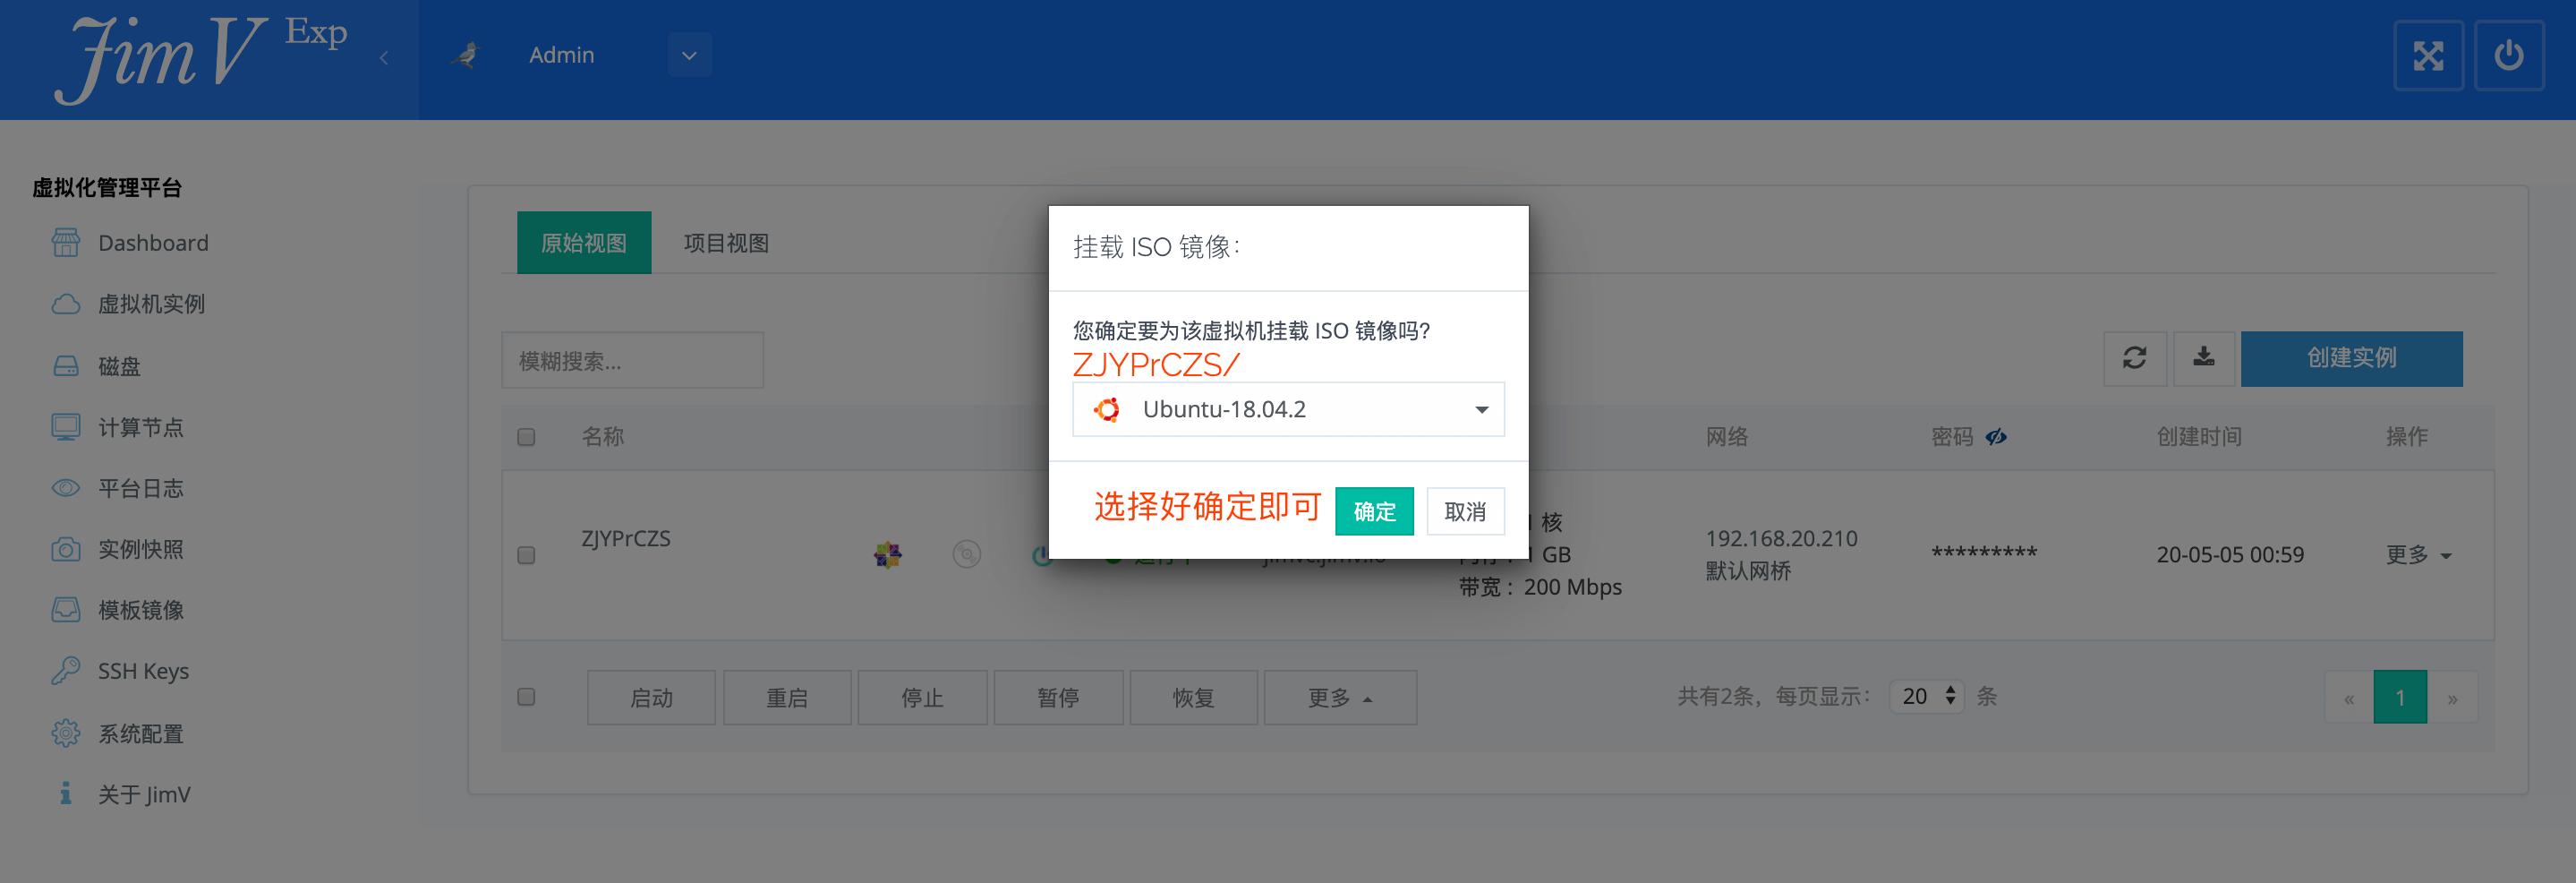
| − | * | + | *<img style="max-width: 1170px;" src="https://wiki.jimv.cn/images/操作指南/挂载ISO到虚拟机.png" /> |
| − | * | + | *<img style="max-width: 1170px;" src="https://wiki.jimv.cn/images/操作指南/挂载ISO到虚拟机-2.png" /> |
| − | * | + | *<img style="max-width: 1170px;" src="https://wiki.jimv.cn/images/操作指南/挂载ISO到虚拟机-3.png" /> |
| − | * | + | *<img style="max-width: 1170px;" src="https://wiki.jimv.cn/images/操作指南/挂载ISO到虚拟机-4.png" /> |
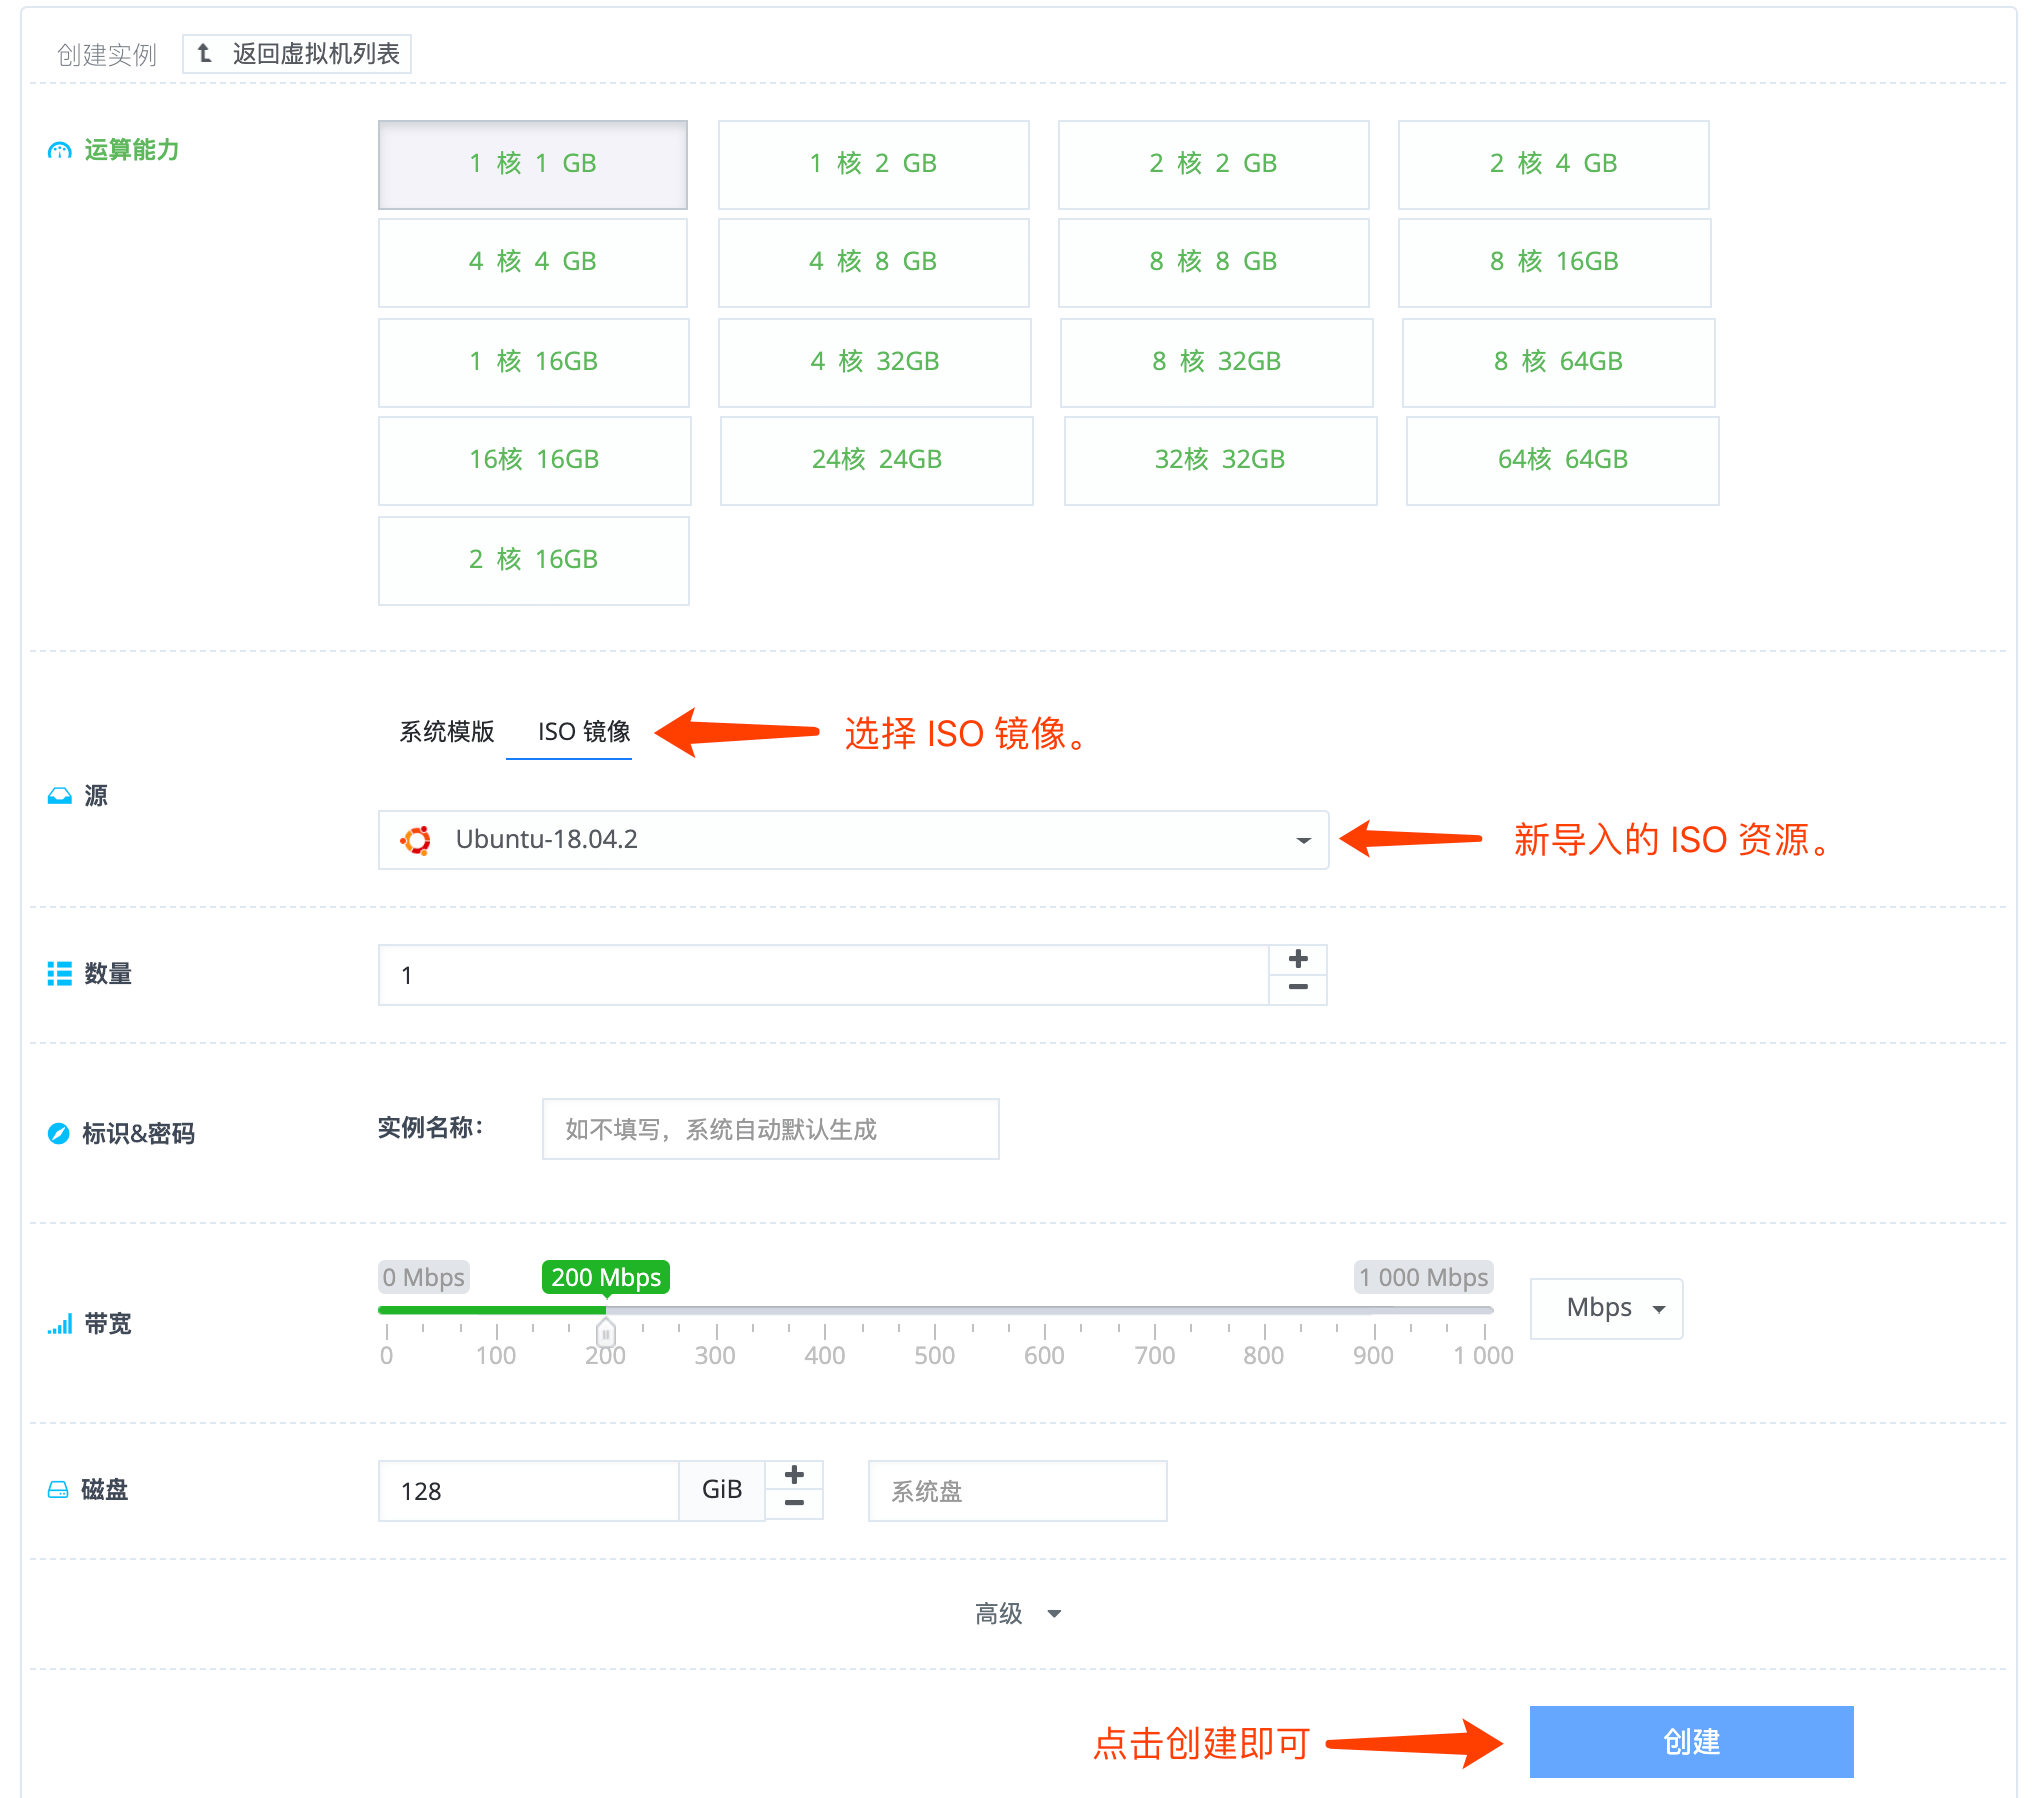
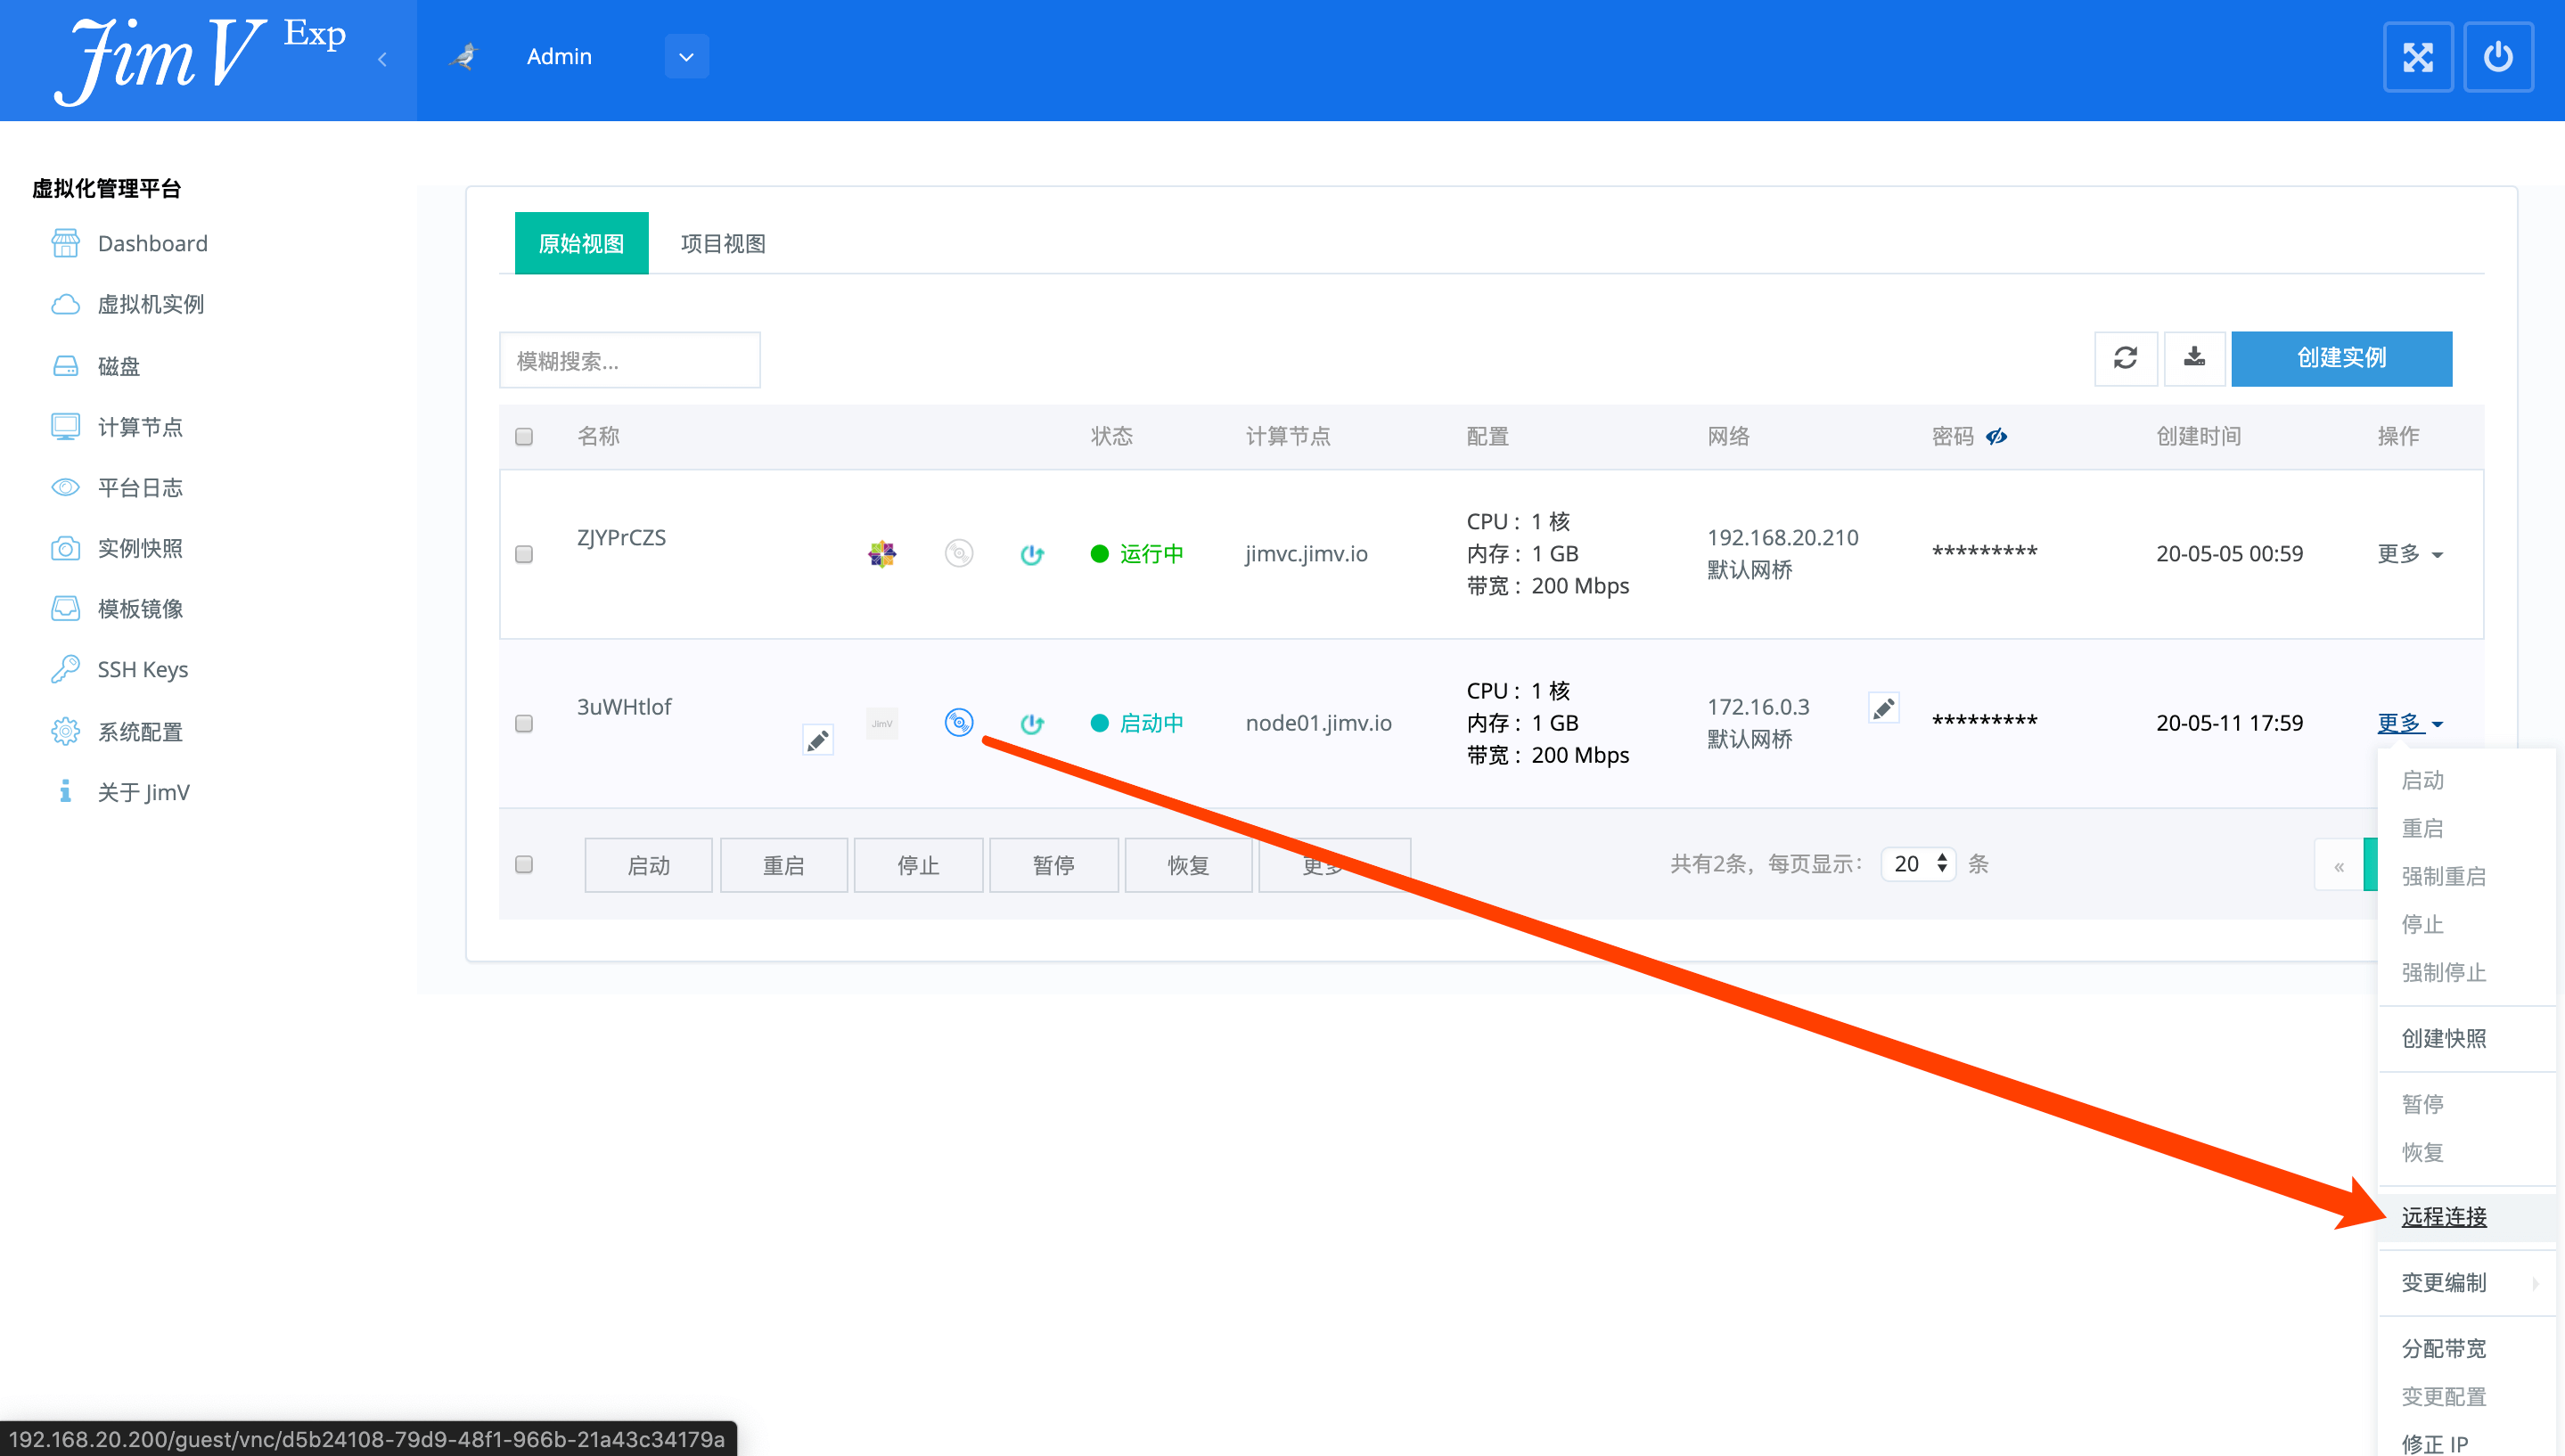
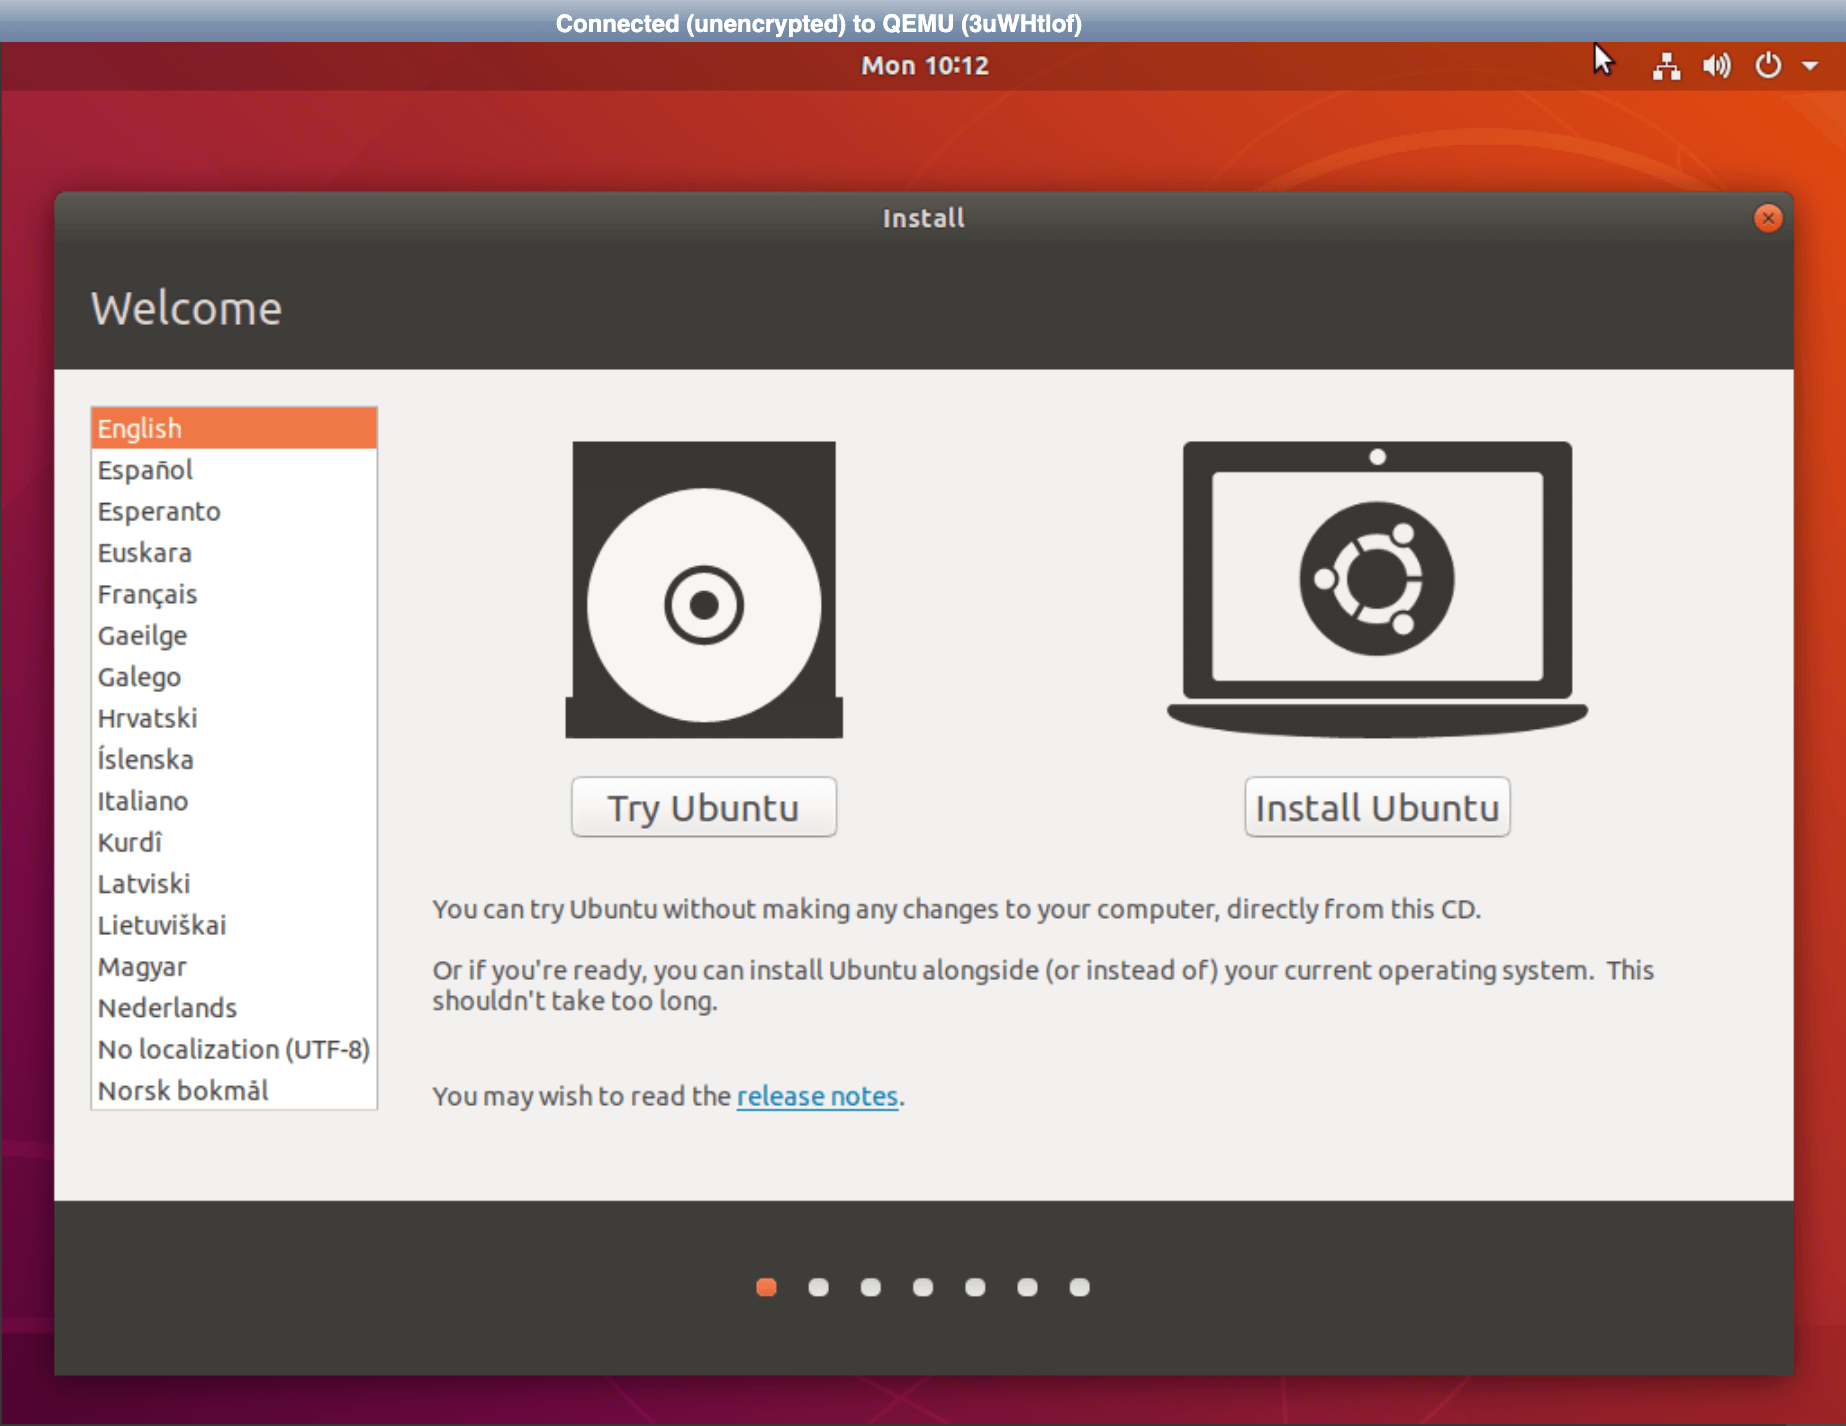
==从 ISO 创建虚拟机== | ==从 ISO 创建虚拟机== | ||
| − | * | + | *<img style="max-width: 1170px;" src="https://wiki.jimv.cn/images/操作指南/从ISO创建虚拟机.png" /> |
| − | * | + | *<img style="max-width: 1170px;" src="https://wiki.jimv.cn/images/操作指南/从ISO创建虚拟机-2.png" /> |
| − | * | + | *<img style="max-width: 1170px;" src="https://wiki.jimv.cn/images/操作指南/从ISO创建虚拟机-3.png" /> |
==磁盘性能配额== | ==磁盘性能配额== | ||
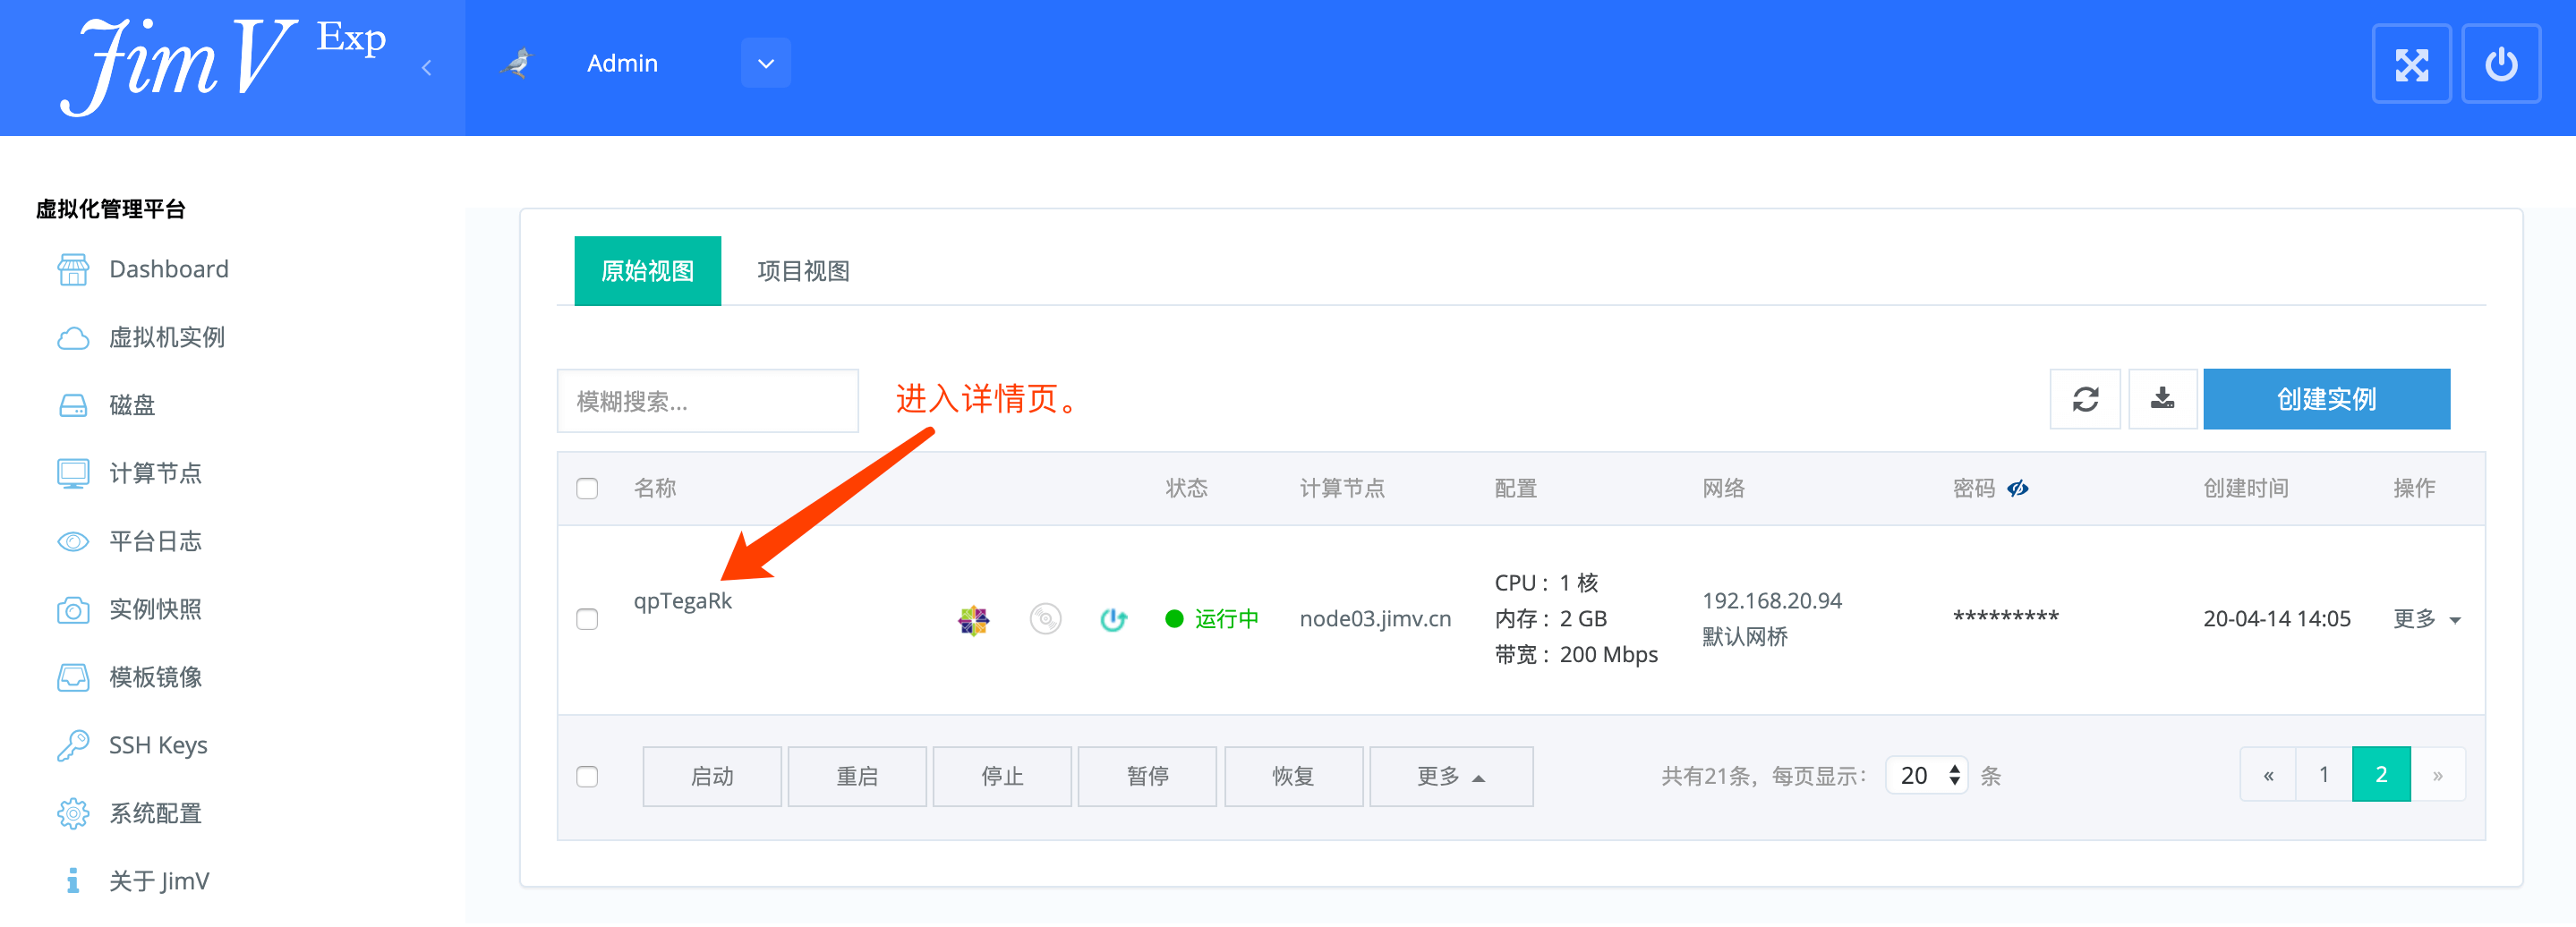
| − | #进入详情页;<br> | + | #进入详情页;<br><img style="max-width: 1170px;" src="https://wiki.jimv.cn/images/操作指南/磁盘性能配额.png" /> |
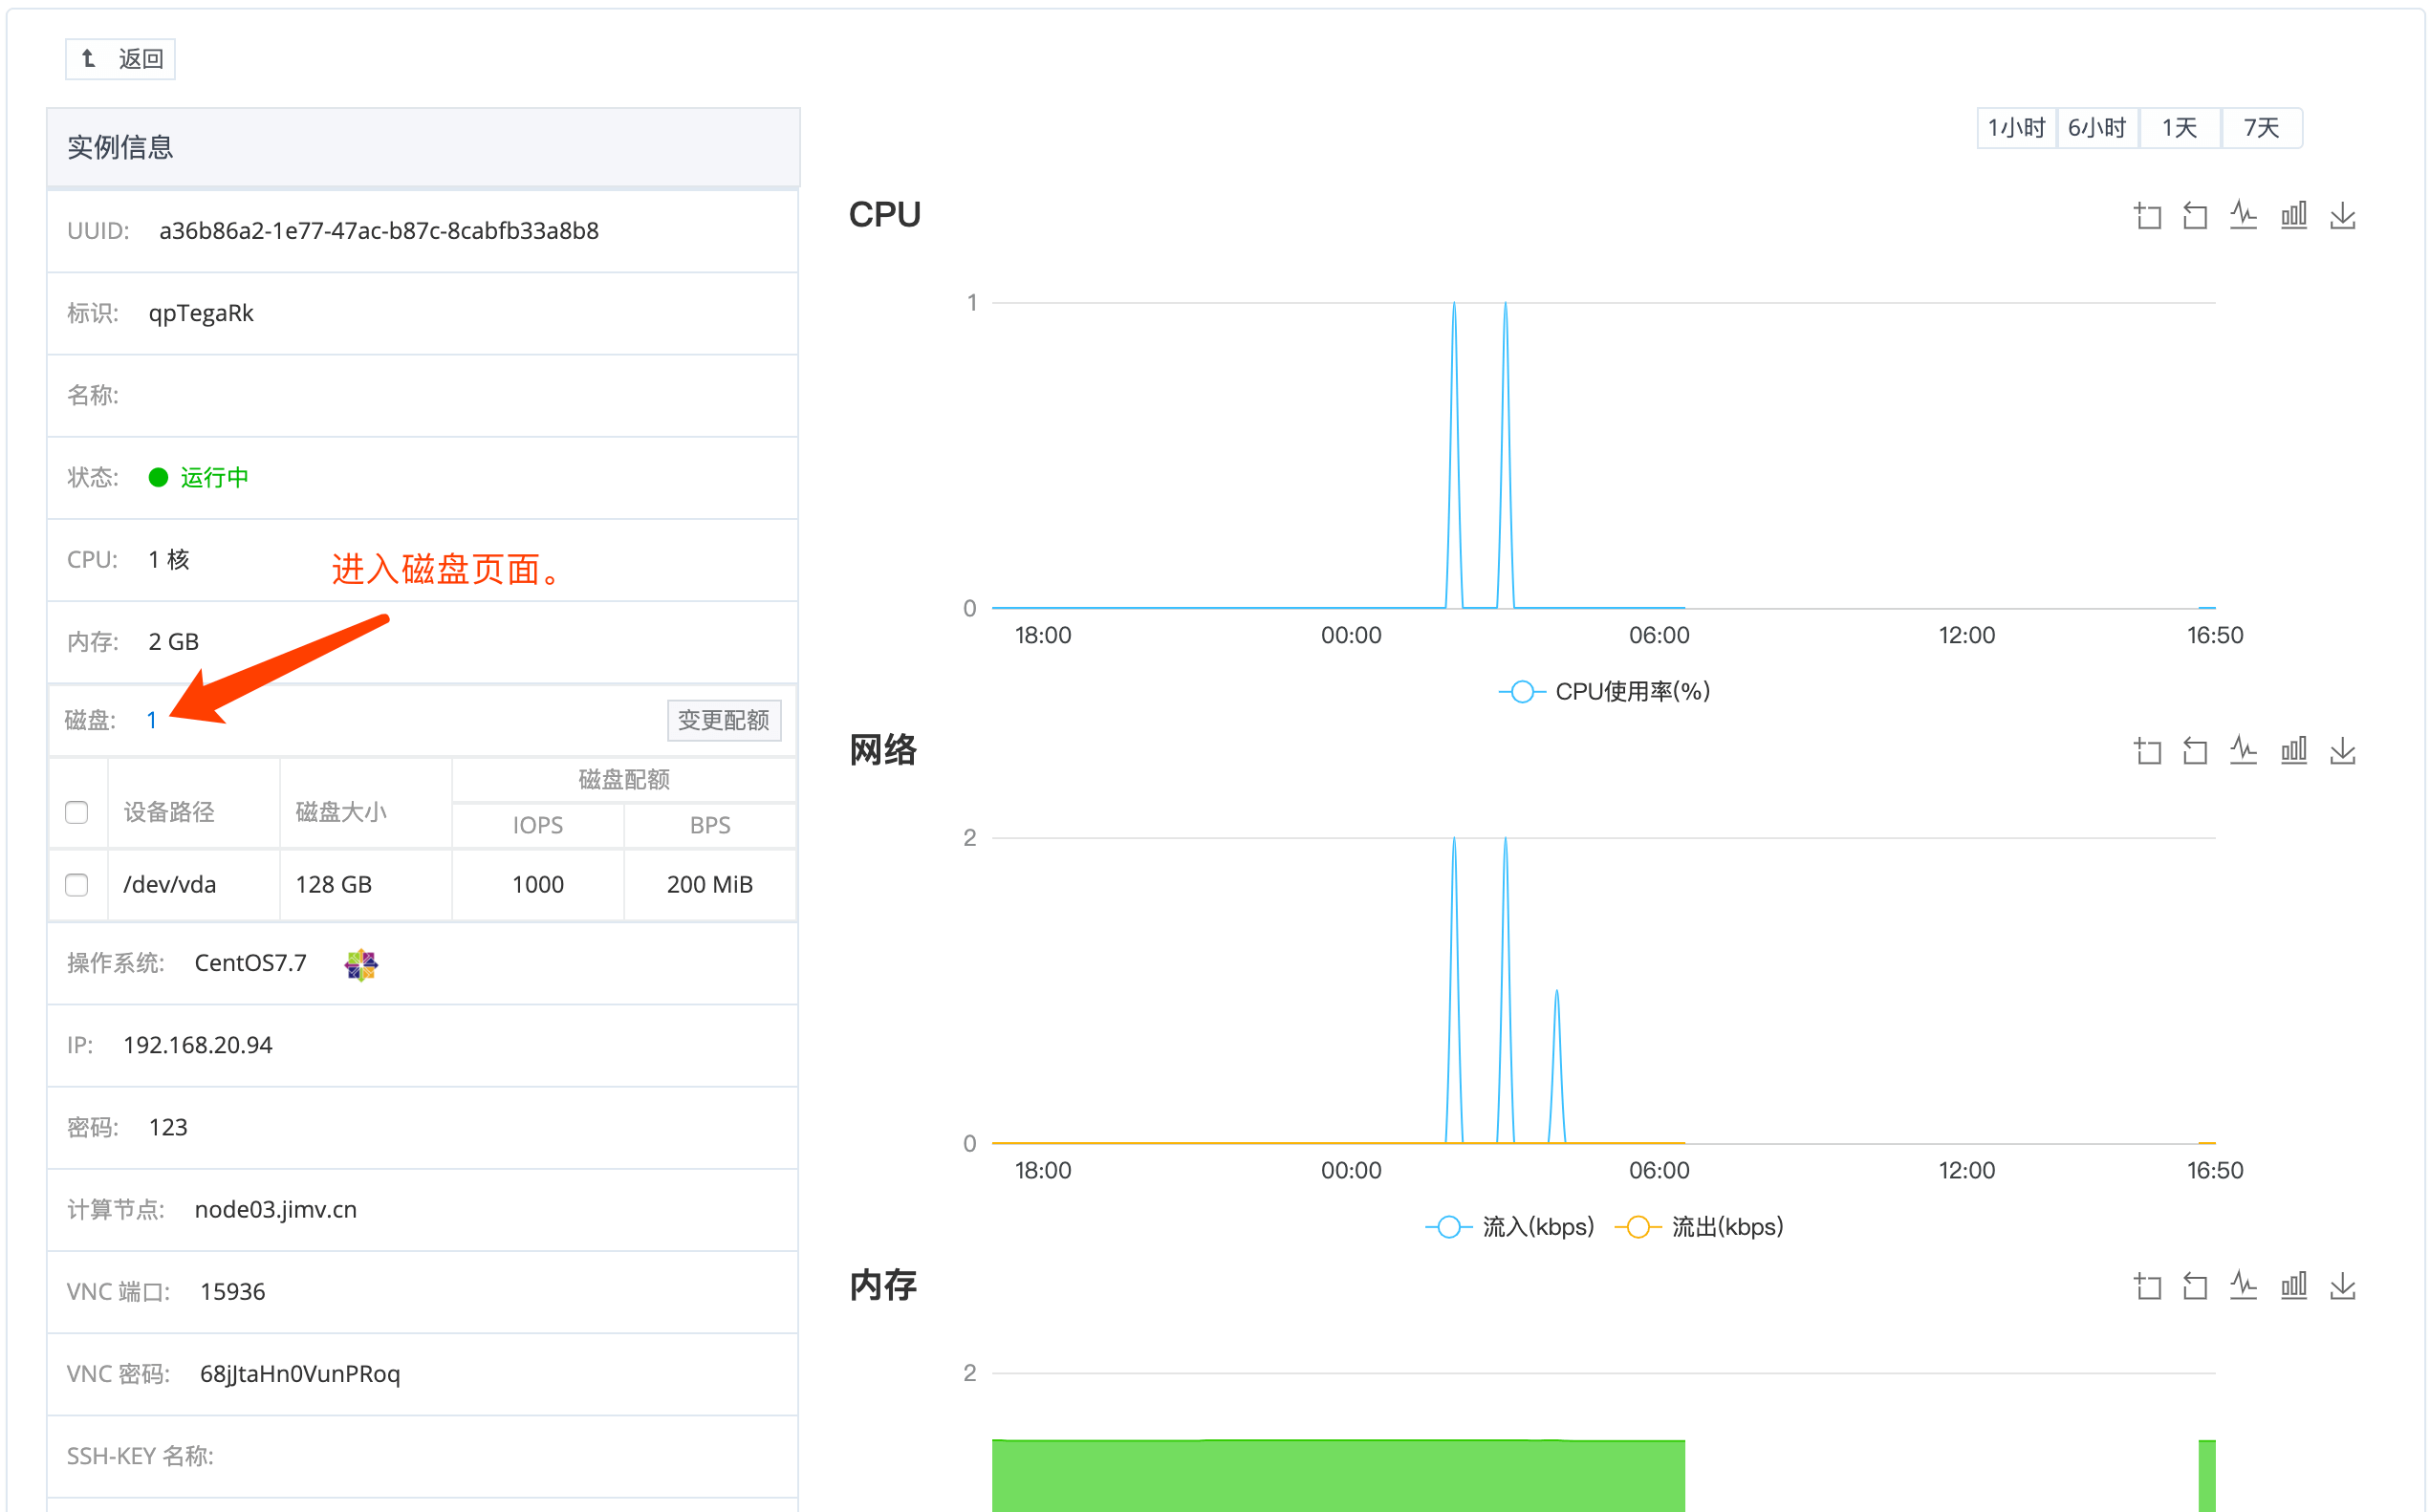
| − | #进入磁盘详情页;<br> | + | #进入磁盘详情页;<br><img style="max-width: 1170px;" src="https://wiki.jimv.cn/images/操作指南/磁盘性能配额-2.png" /> |
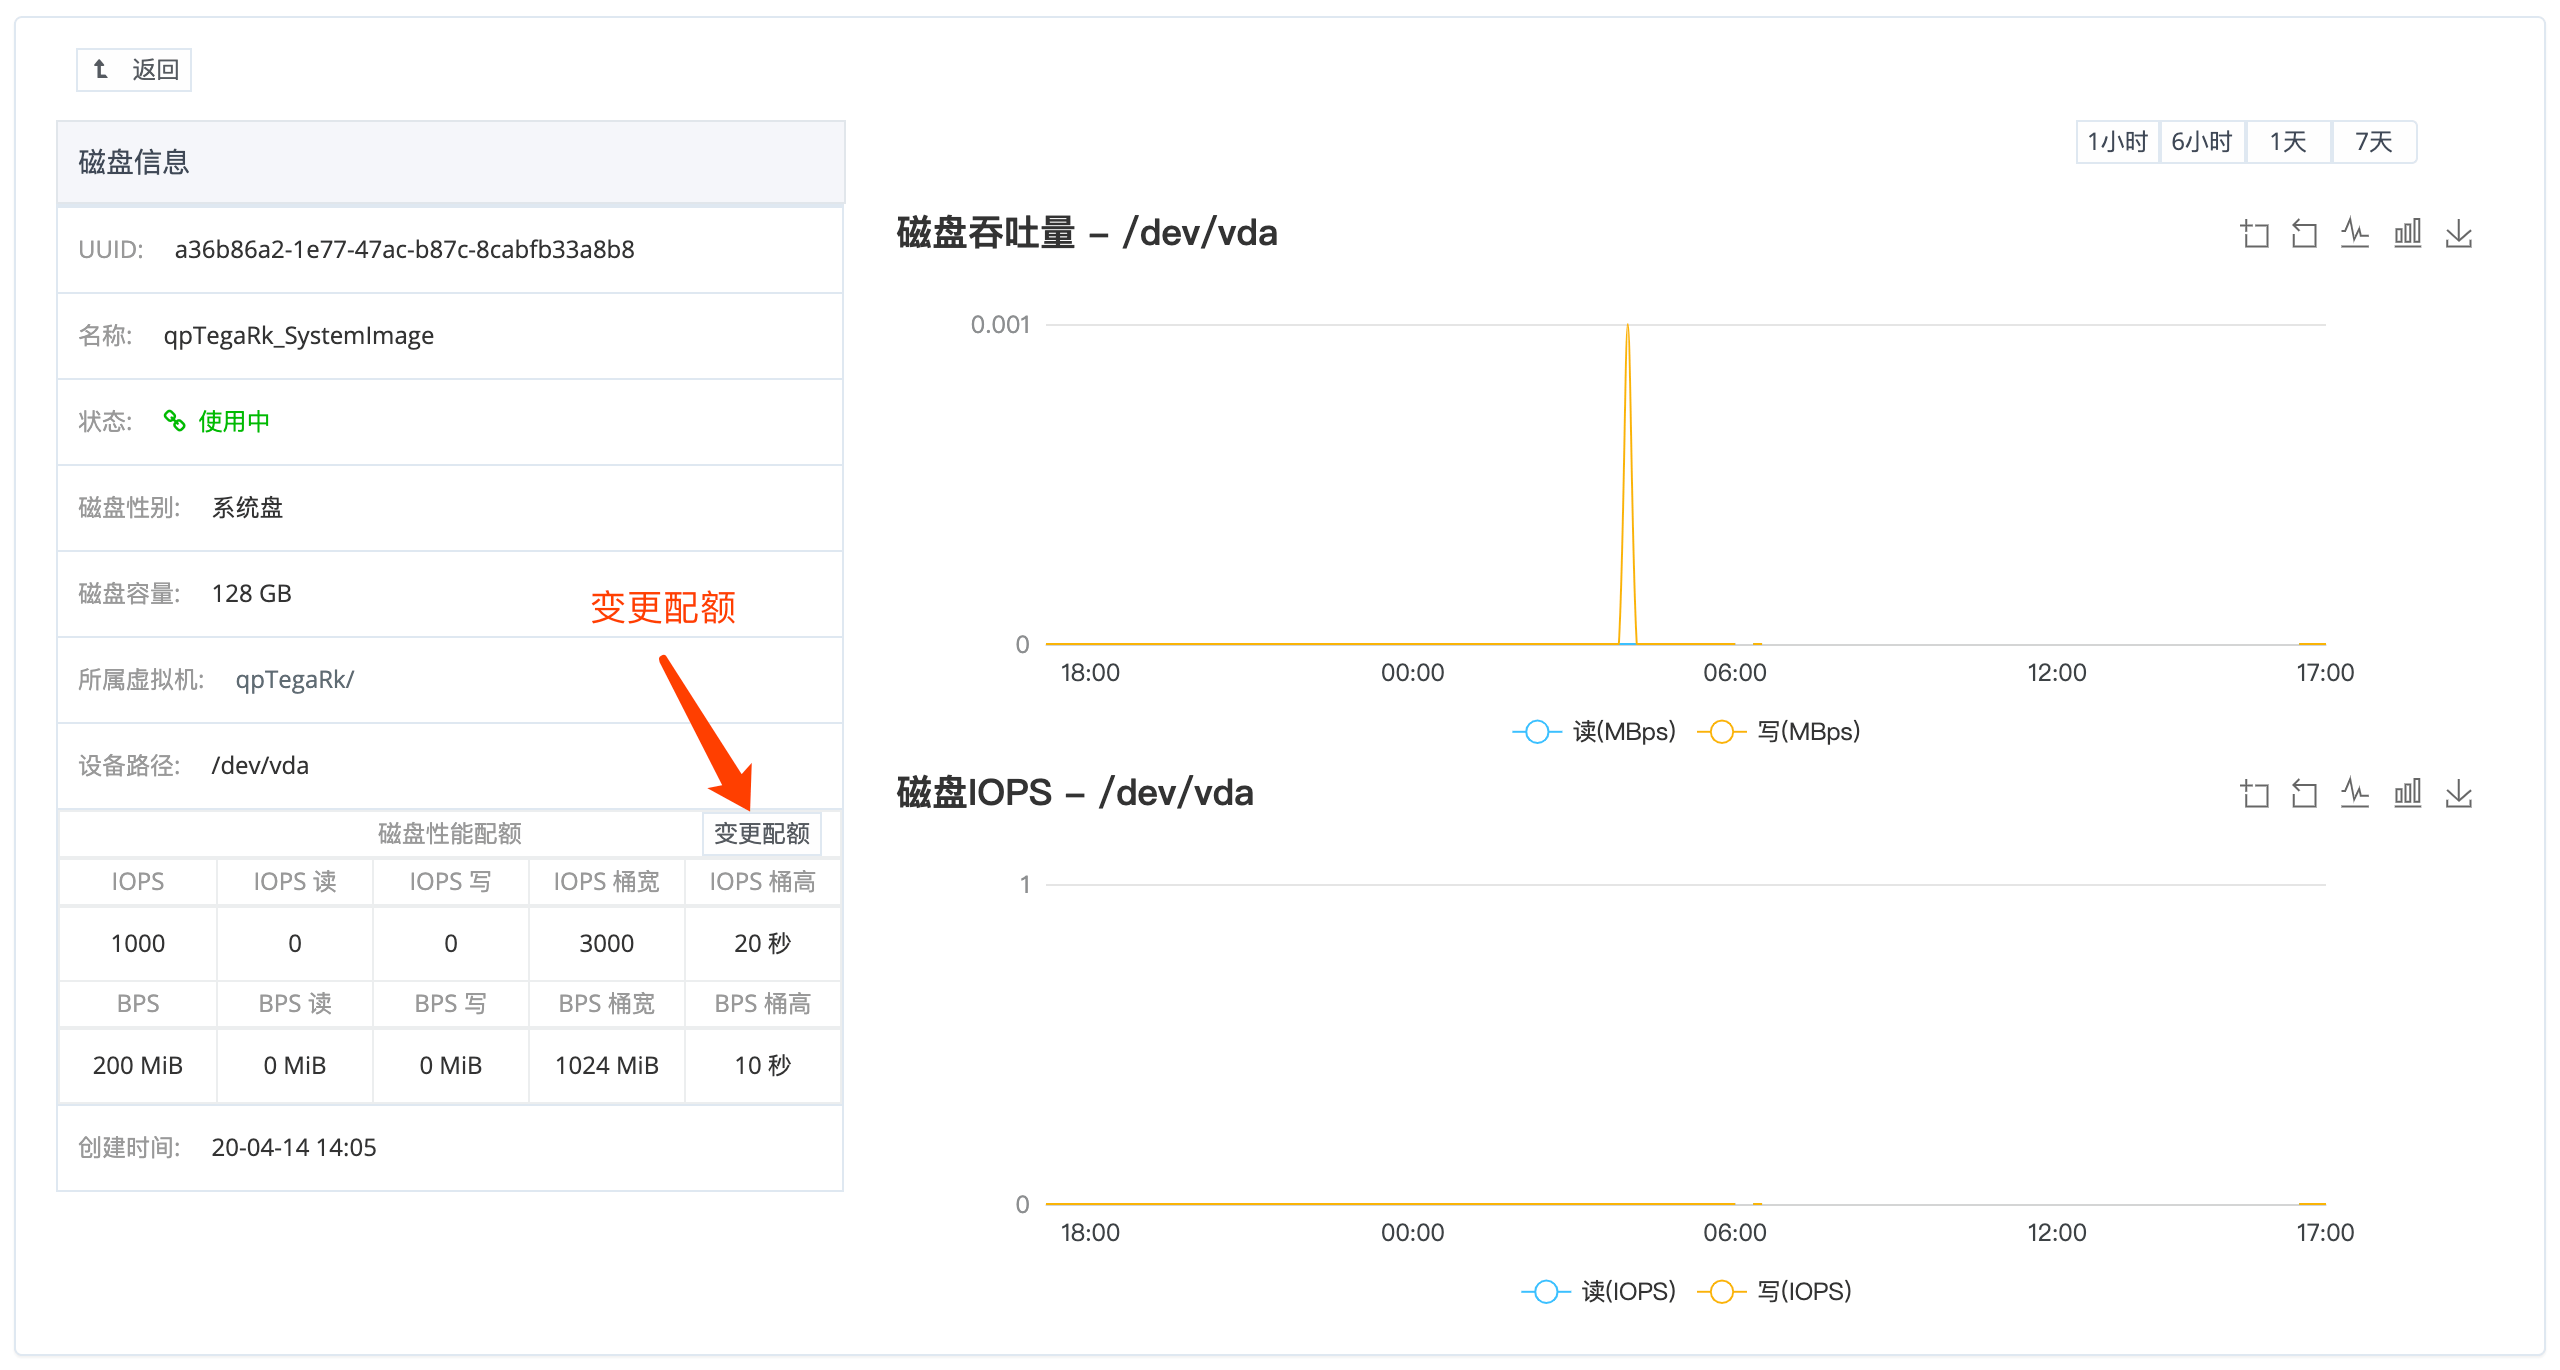
| − | #变更配额;<br> | + | #变更配额;<br><img style="max-width: 1170px;" src="https://wiki.jimv.cn/images/操作指南/磁盘性能配额-4.png" /> |
===IOPS 性能配额测试=== | ===IOPS 性能配额测试=== | ||
| 第84行: | 第84行: | ||
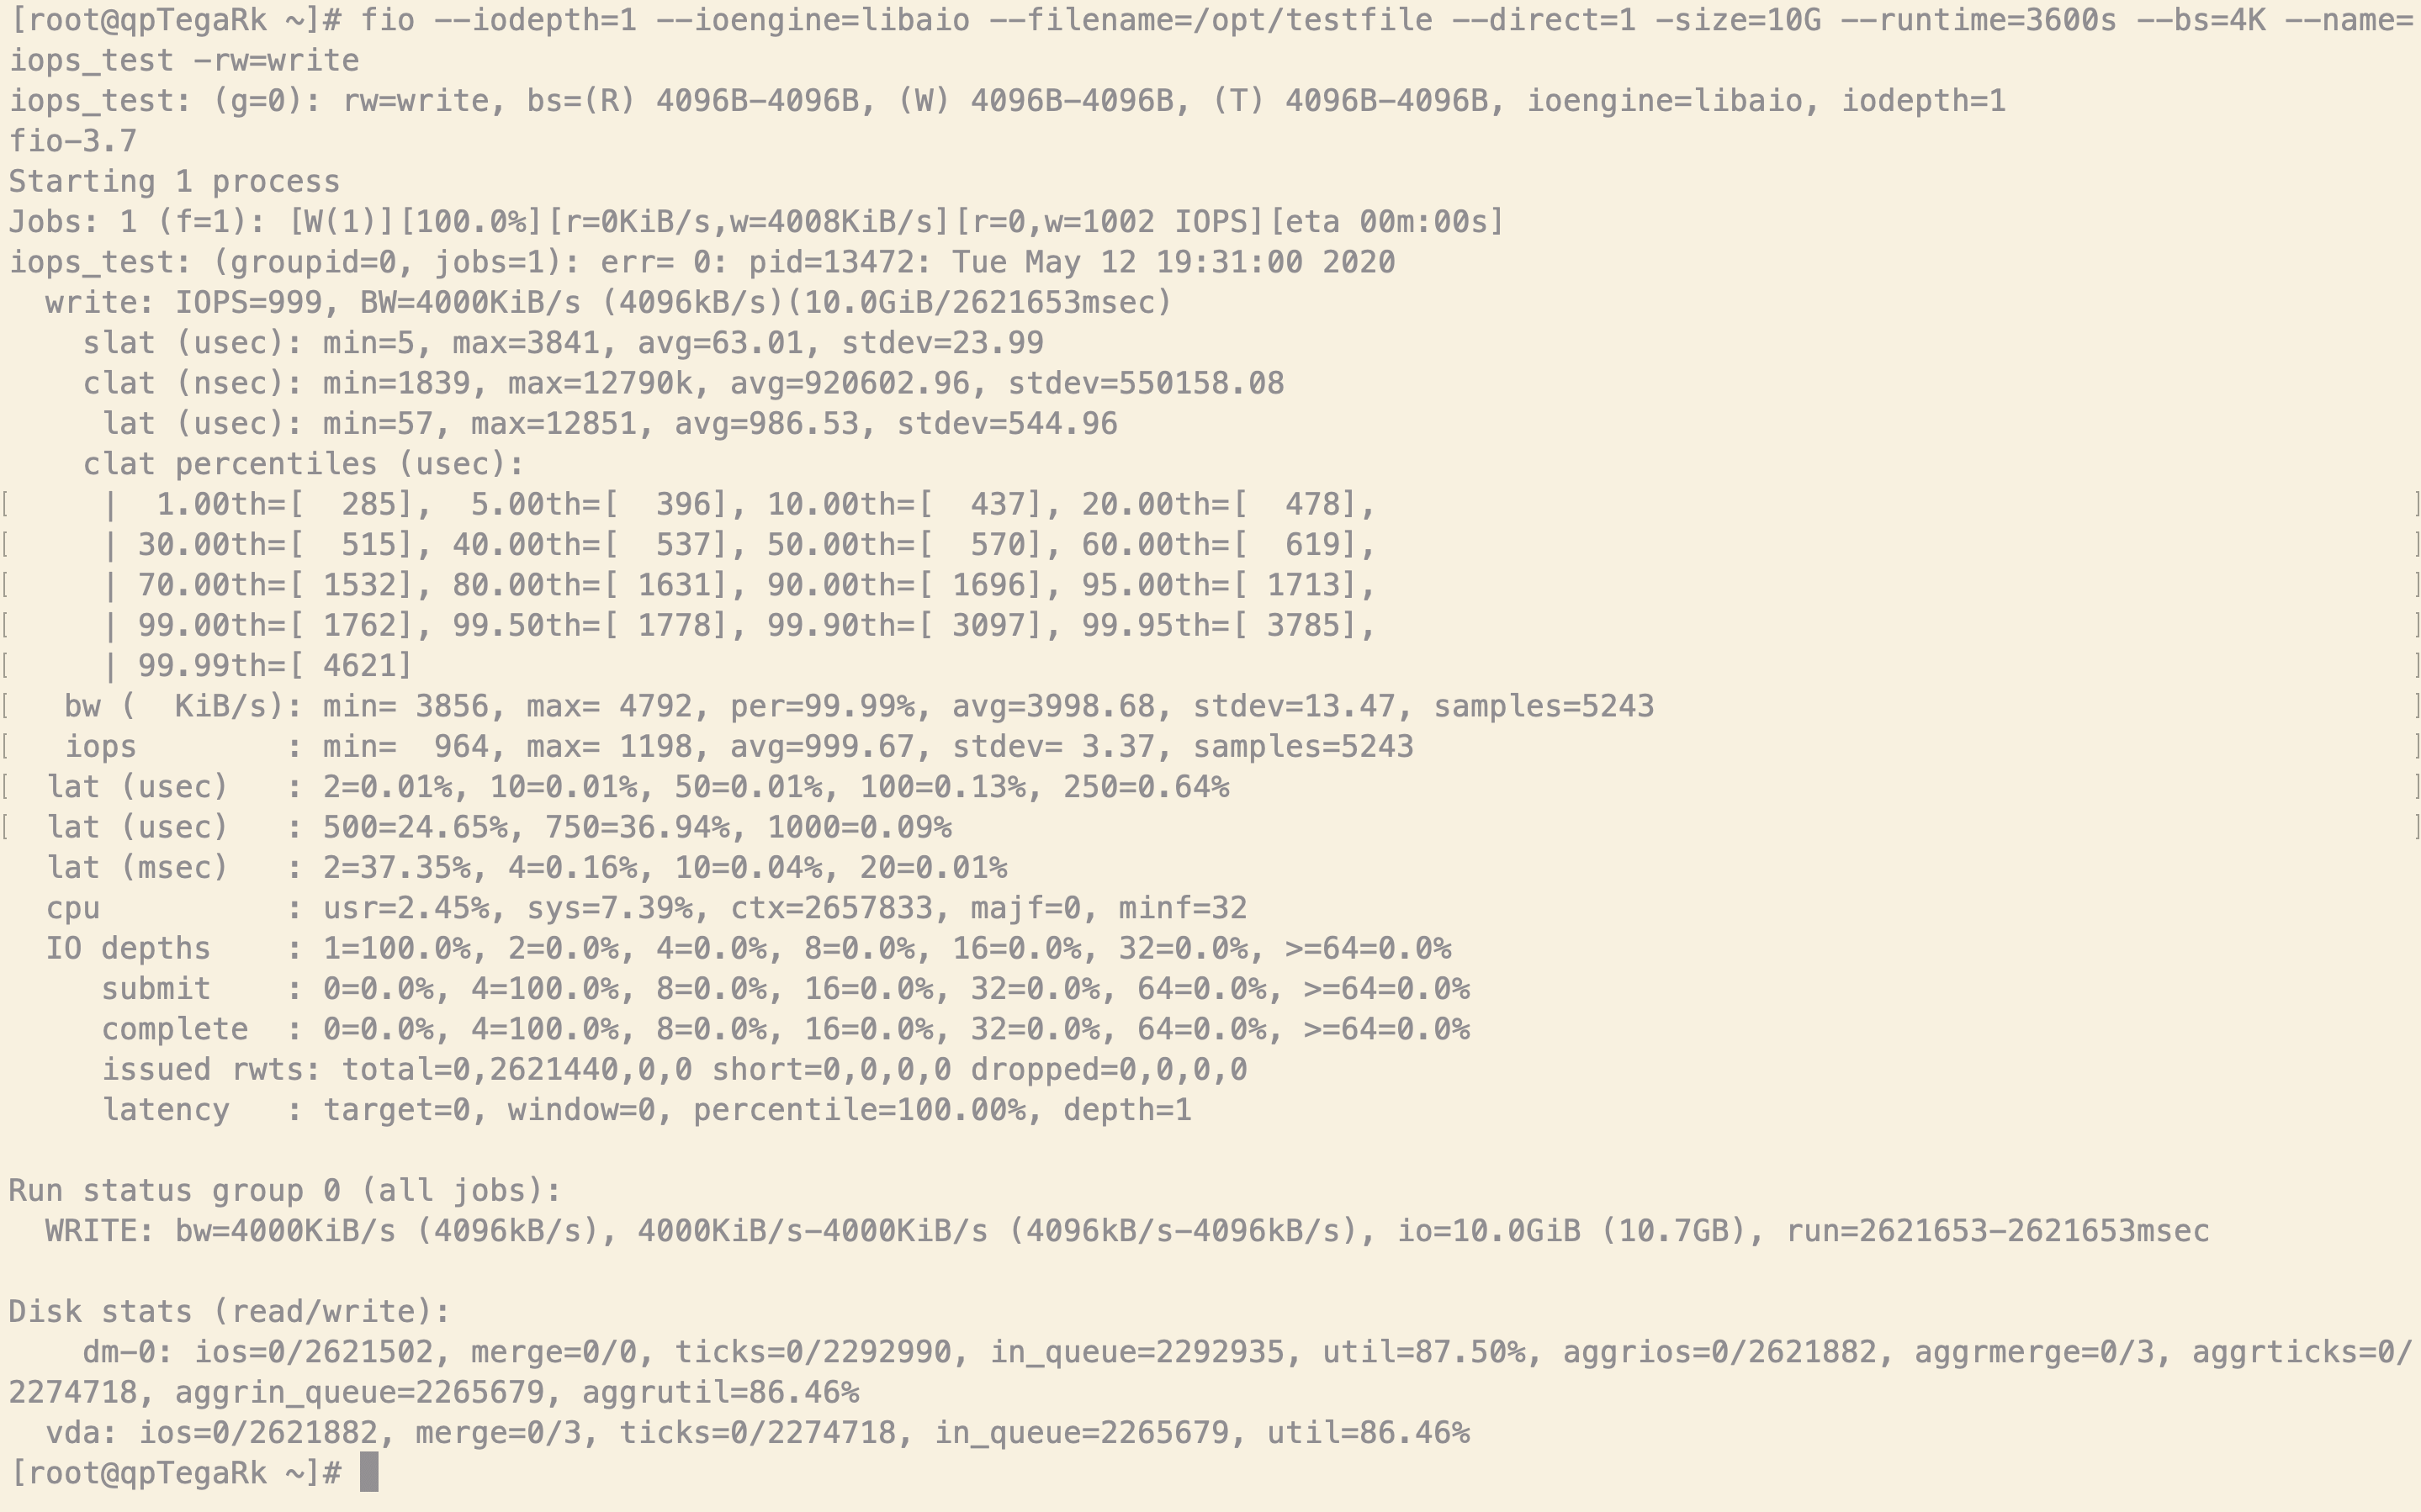
#fio 工具测试 IOPS;<br><syntaxhighlight lang="bash"> | #fio 工具测试 IOPS;<br><syntaxhighlight lang="bash"> | ||
[root@qpTegaRk ~]# fio --iodepth=1 --ioengine=libaio --filename=/opt/testfile --direct=1 -size=10G --runtime=3600s --bs=4K --name=iops_test -rw=write | [root@qpTegaRk ~]# fio --iodepth=1 --ioengine=libaio --filename=/opt/testfile --direct=1 -size=10G --runtime=3600s --bs=4K --name=iops_test -rw=write | ||
| − | </syntaxhighlight> | + | </syntaxhighlight><img style="max-width: 1170px;" src="https://wiki.jimv.cn/images/操作指南/IOPS测试中.png" /> |
| − | #测试结果;<br> | + | #测试结果;<br><img style="max-width: 1170px;" src="https://wiki.jimv.cn/images/操作指南/IOPS测试中-2.png" /> |
===吞吐量性能配额测试=== | ===吞吐量性能配额测试=== | ||
| 第91行: | 第91行: | ||
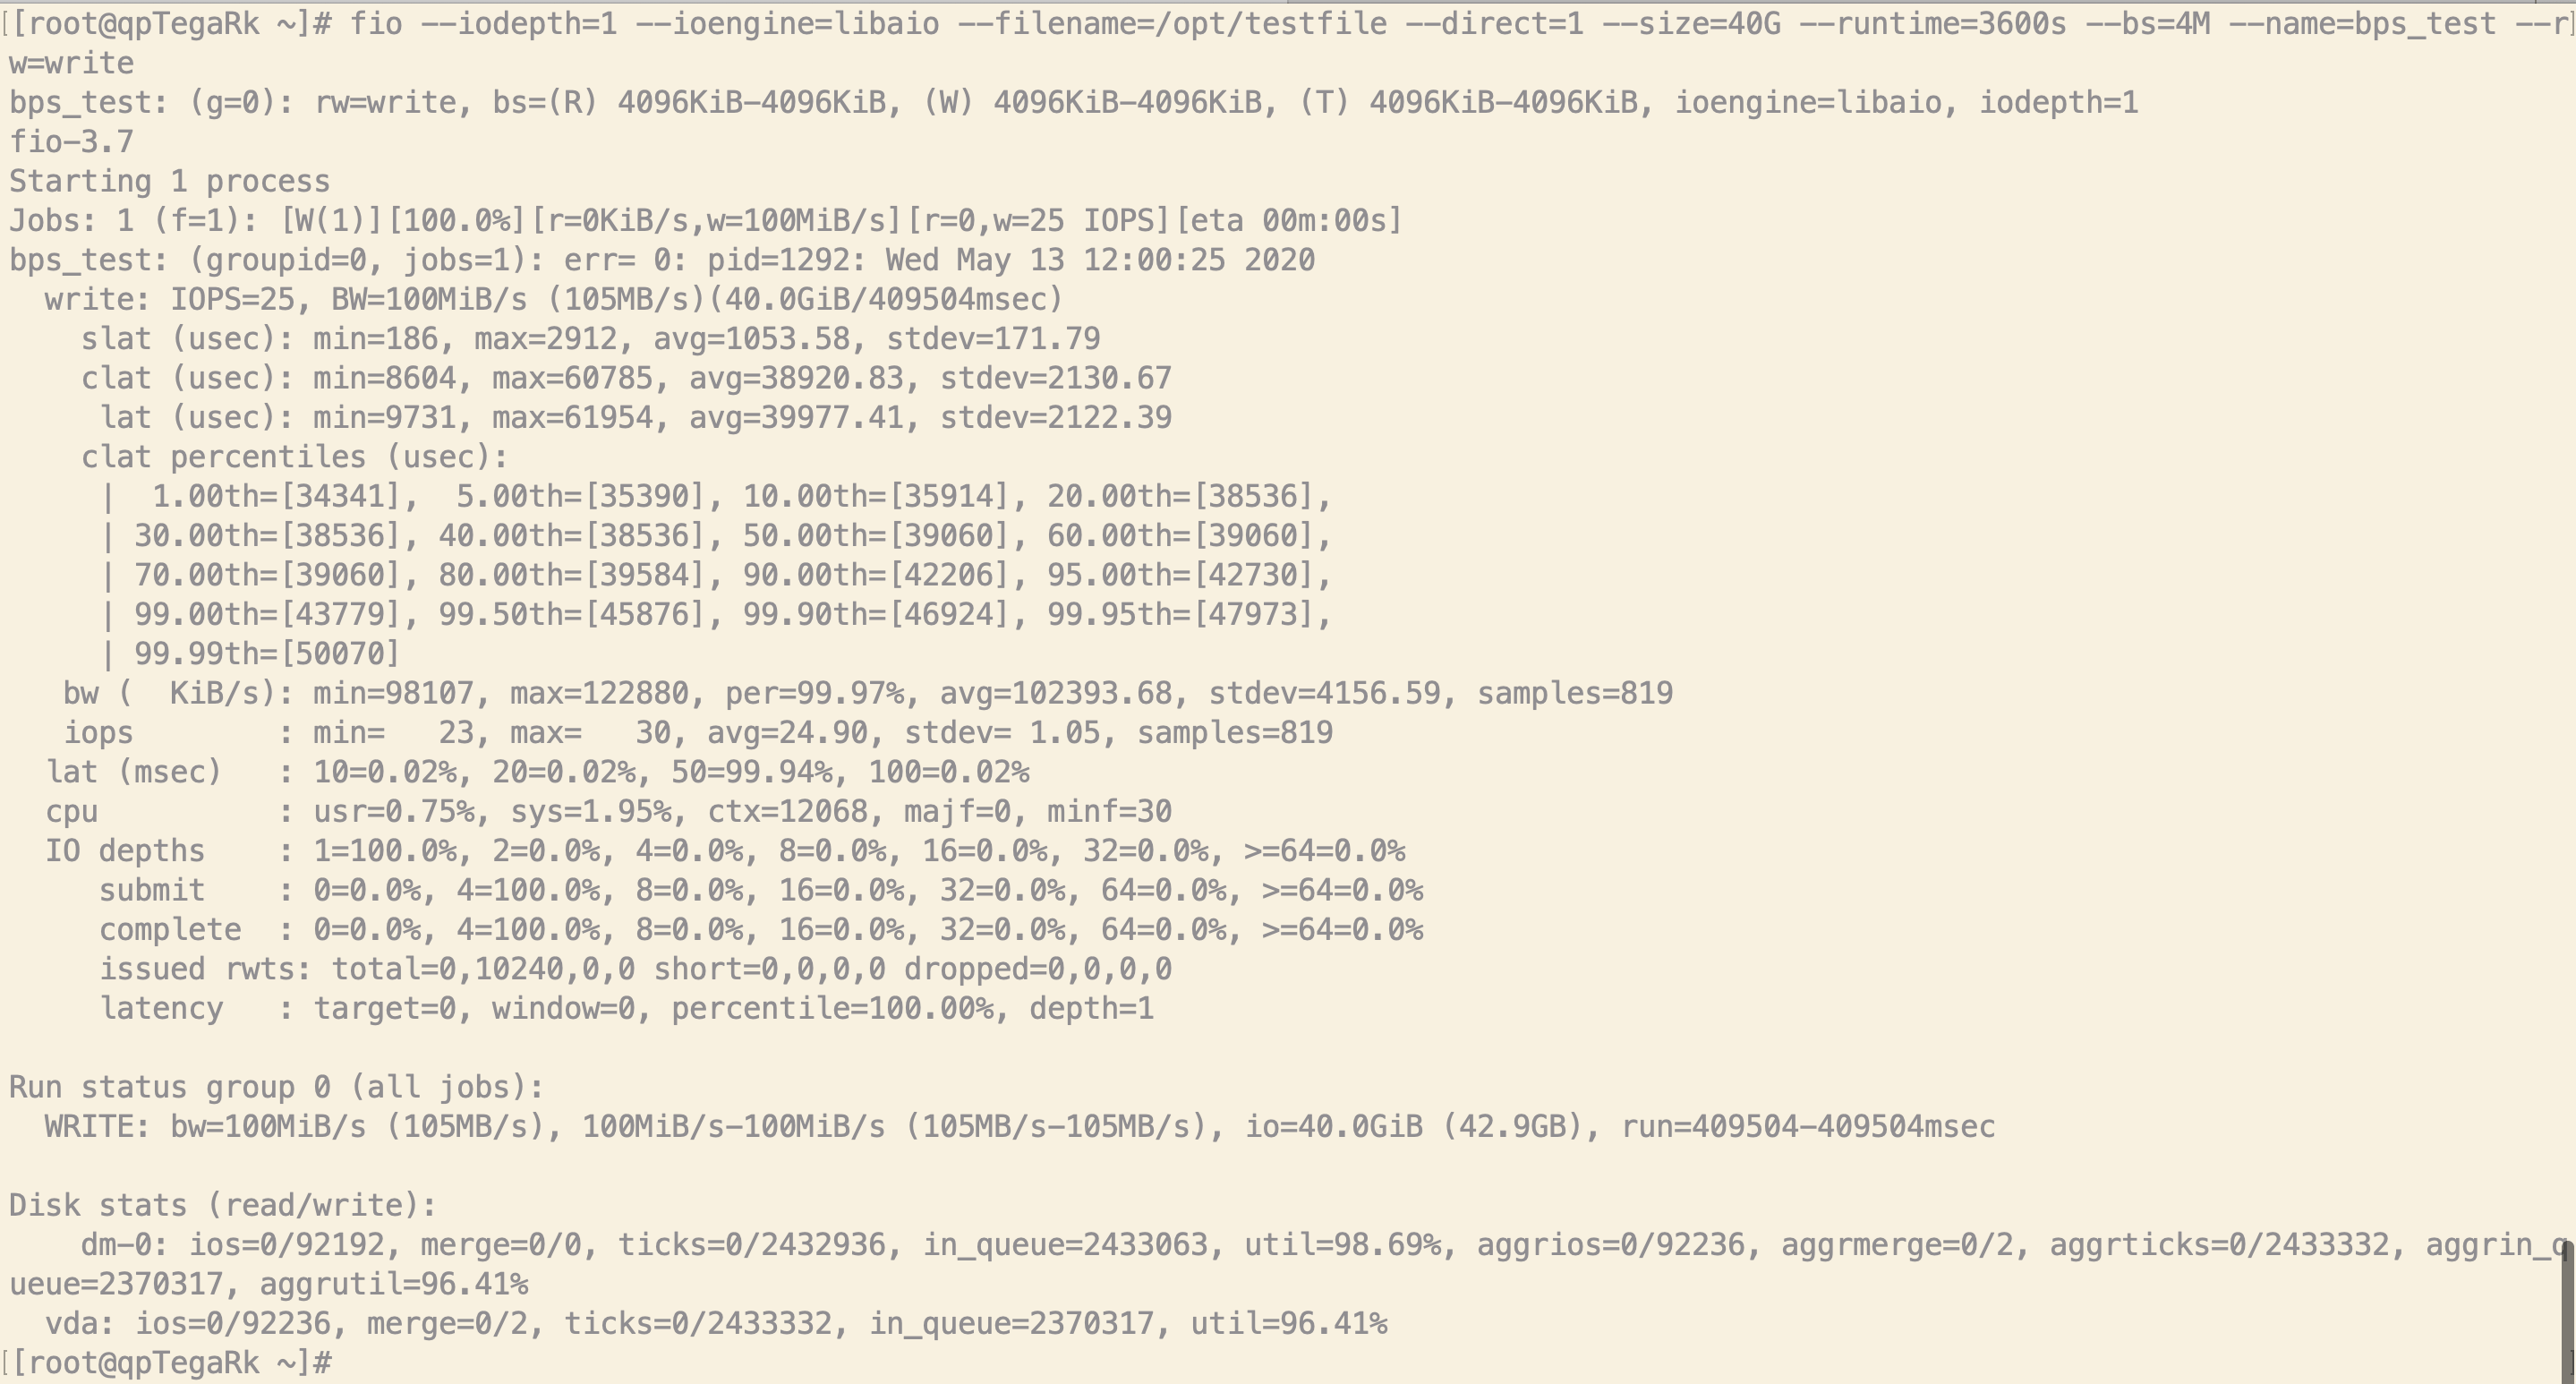
#fio 工具测试 BPS;<br><syntaxhighlight lang="bash"> | #fio 工具测试 BPS;<br><syntaxhighlight lang="bash"> | ||
[root@qpTegaRk ~]# fio --iodepth=1 --ioengine=libaio --filename=/opt/testfile --direct=1 --size=40G --runtime=3600s --bs=4M --name=bps_test --rw=write | [root@qpTegaRk ~]# fio --iodepth=1 --ioengine=libaio --filename=/opt/testfile --direct=1 --size=40G --runtime=3600s --bs=4M --name=bps_test --rw=write | ||
| − | </syntaxhighlight> | + | </syntaxhighlight><img style="max-width: 1170px;" src="https://wiki.jimv.cn/images/操作指南/BPS测试中.png" /> |
| − | #测试结果;<br> | + | #测试结果;<br><img style="max-width: 1170px;" src="https://wiki.jimv.cn/images/操作指南/BPS测试结果.png" /> |
===「桶」的概念=== | ===「桶」的概念=== | ||
| − | * | + | *<img style="max-width: 1170px;" src="https://wiki.jimv.cn/images/操作指南/JimV桶的示意图.png" /> |
{{Note|提示:如下几个公式,可以方便用户快速计算出所需的技术指标。<br> '''桶满时间 = 桶宽 * 桶高 / (桶宽 - 管宽)'''<br> '''快速通道容积 = 桶宽 * 桶满时间'''<br> '''数据穿越时间 = (数据体积 - 桶宽 * 桶满时间) / 管宽 + 桶满时间'''|reminder}} | {{Note|提示:如下几个公式,可以方便用户快速计算出所需的技术指标。<br> '''桶满时间 = 桶宽 * 桶高 / (桶宽 - 管宽)'''<br> '''快速通道容积 = 桶宽 * 桶满时间'''<br> '''数据穿越时间 = (数据体积 - 桶宽 * 桶满时间) / 管宽 + 桶满时间'''|reminder}} | ||
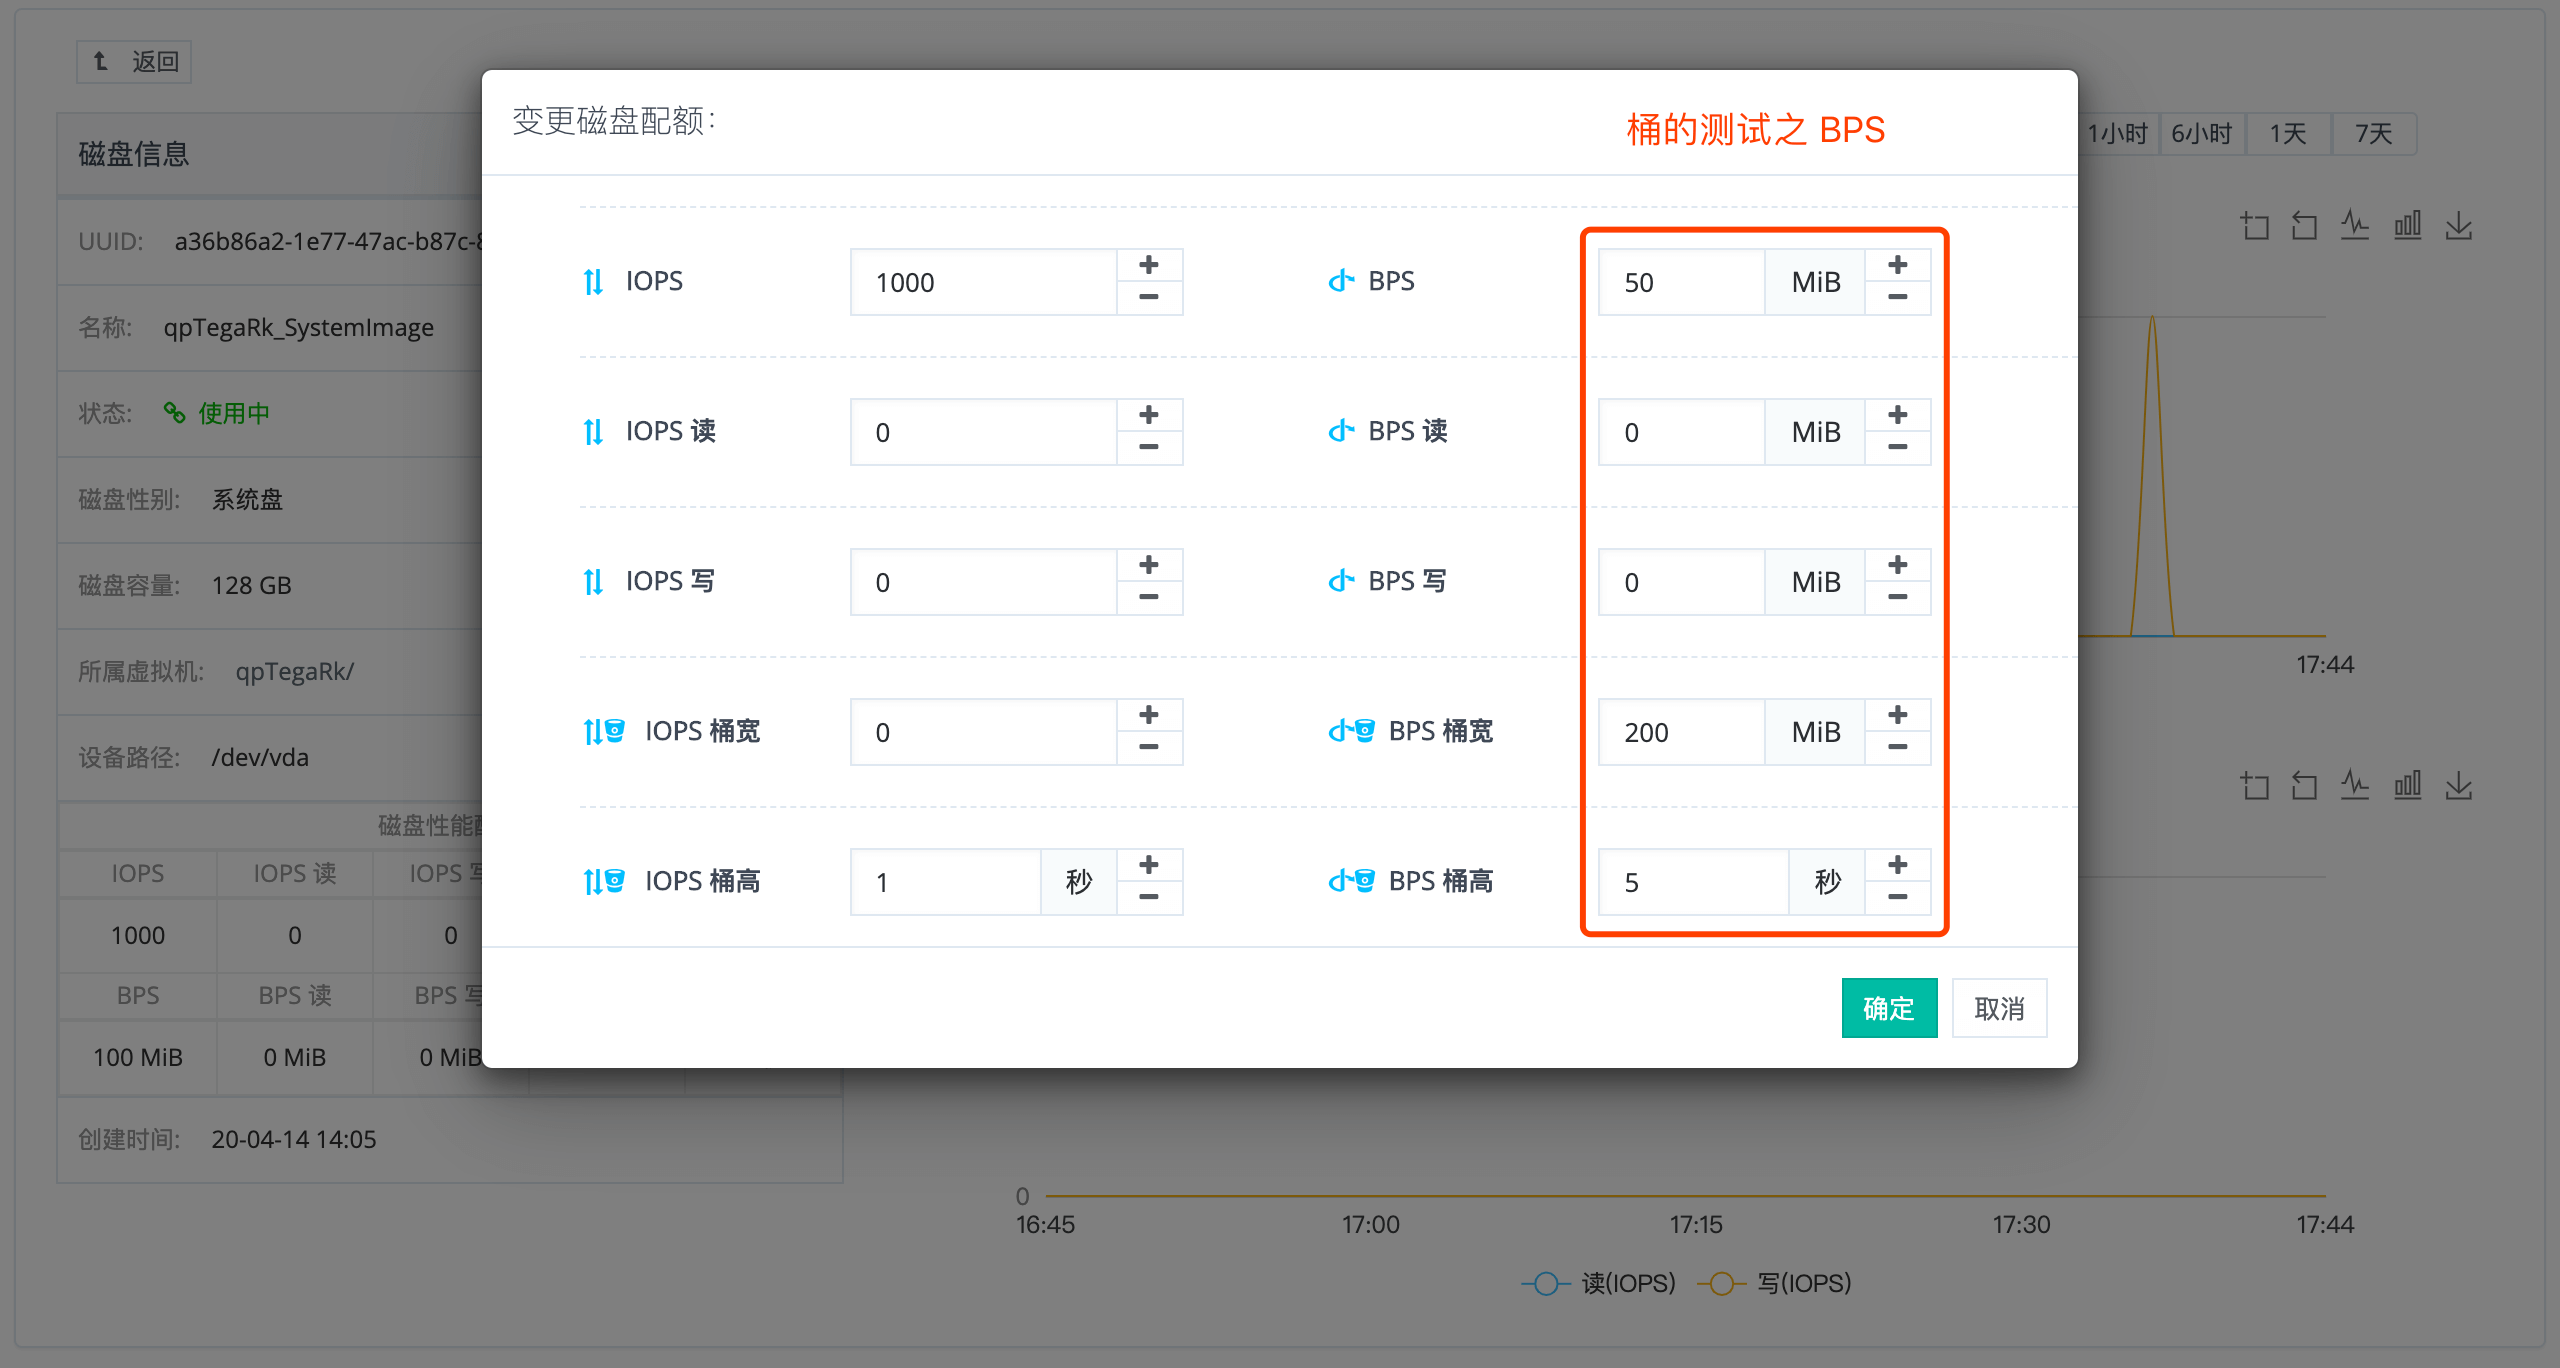
====桶的测试之 BPS==== | ====桶的测试之 BPS==== | ||
| − | #设置桶的尺寸;<br> | + | #设置桶的尺寸;<br><img style="max-width: 1170px;" src="https://wiki.jimv.cn/images/操作指南/桶的测试之BPS.png" /> |
| − | #预测数据穿越时间;<br> | + | #预测数据穿越时间;<br><img style="max-width: 1170px;" src="https://wiki.jimv.cn/images/操作指南/桶的测试之BPS数据穿越时间预测.png|400px|桶的测试之BPS数据穿越时间预测]]<br><syntaxhighlight lang="text"> |
预期写入的 BPS 序列 | 预期写入的 BPS 序列 | ||
200 200 200 200 200 200 150 50 50 50 50 50 50 50 50 50 50 50 50 50 48 | 200 200 200 200 200 200 150 50 50 50 50 50 50 50 50 50 50 50 50 50 48 | ||
</syntaxhighlight> | </syntaxhighlight> | ||
| − | #数据穿越实践;<br> | + | #数据穿越实践;<br><img style="max-width: 1170px;" src="https://wiki.jimv.cn/images/操作指南/桶的测试之BPS数据穿越实践.png" /> |
==在线磁盘扩容== | ==在线磁盘扩容== | ||
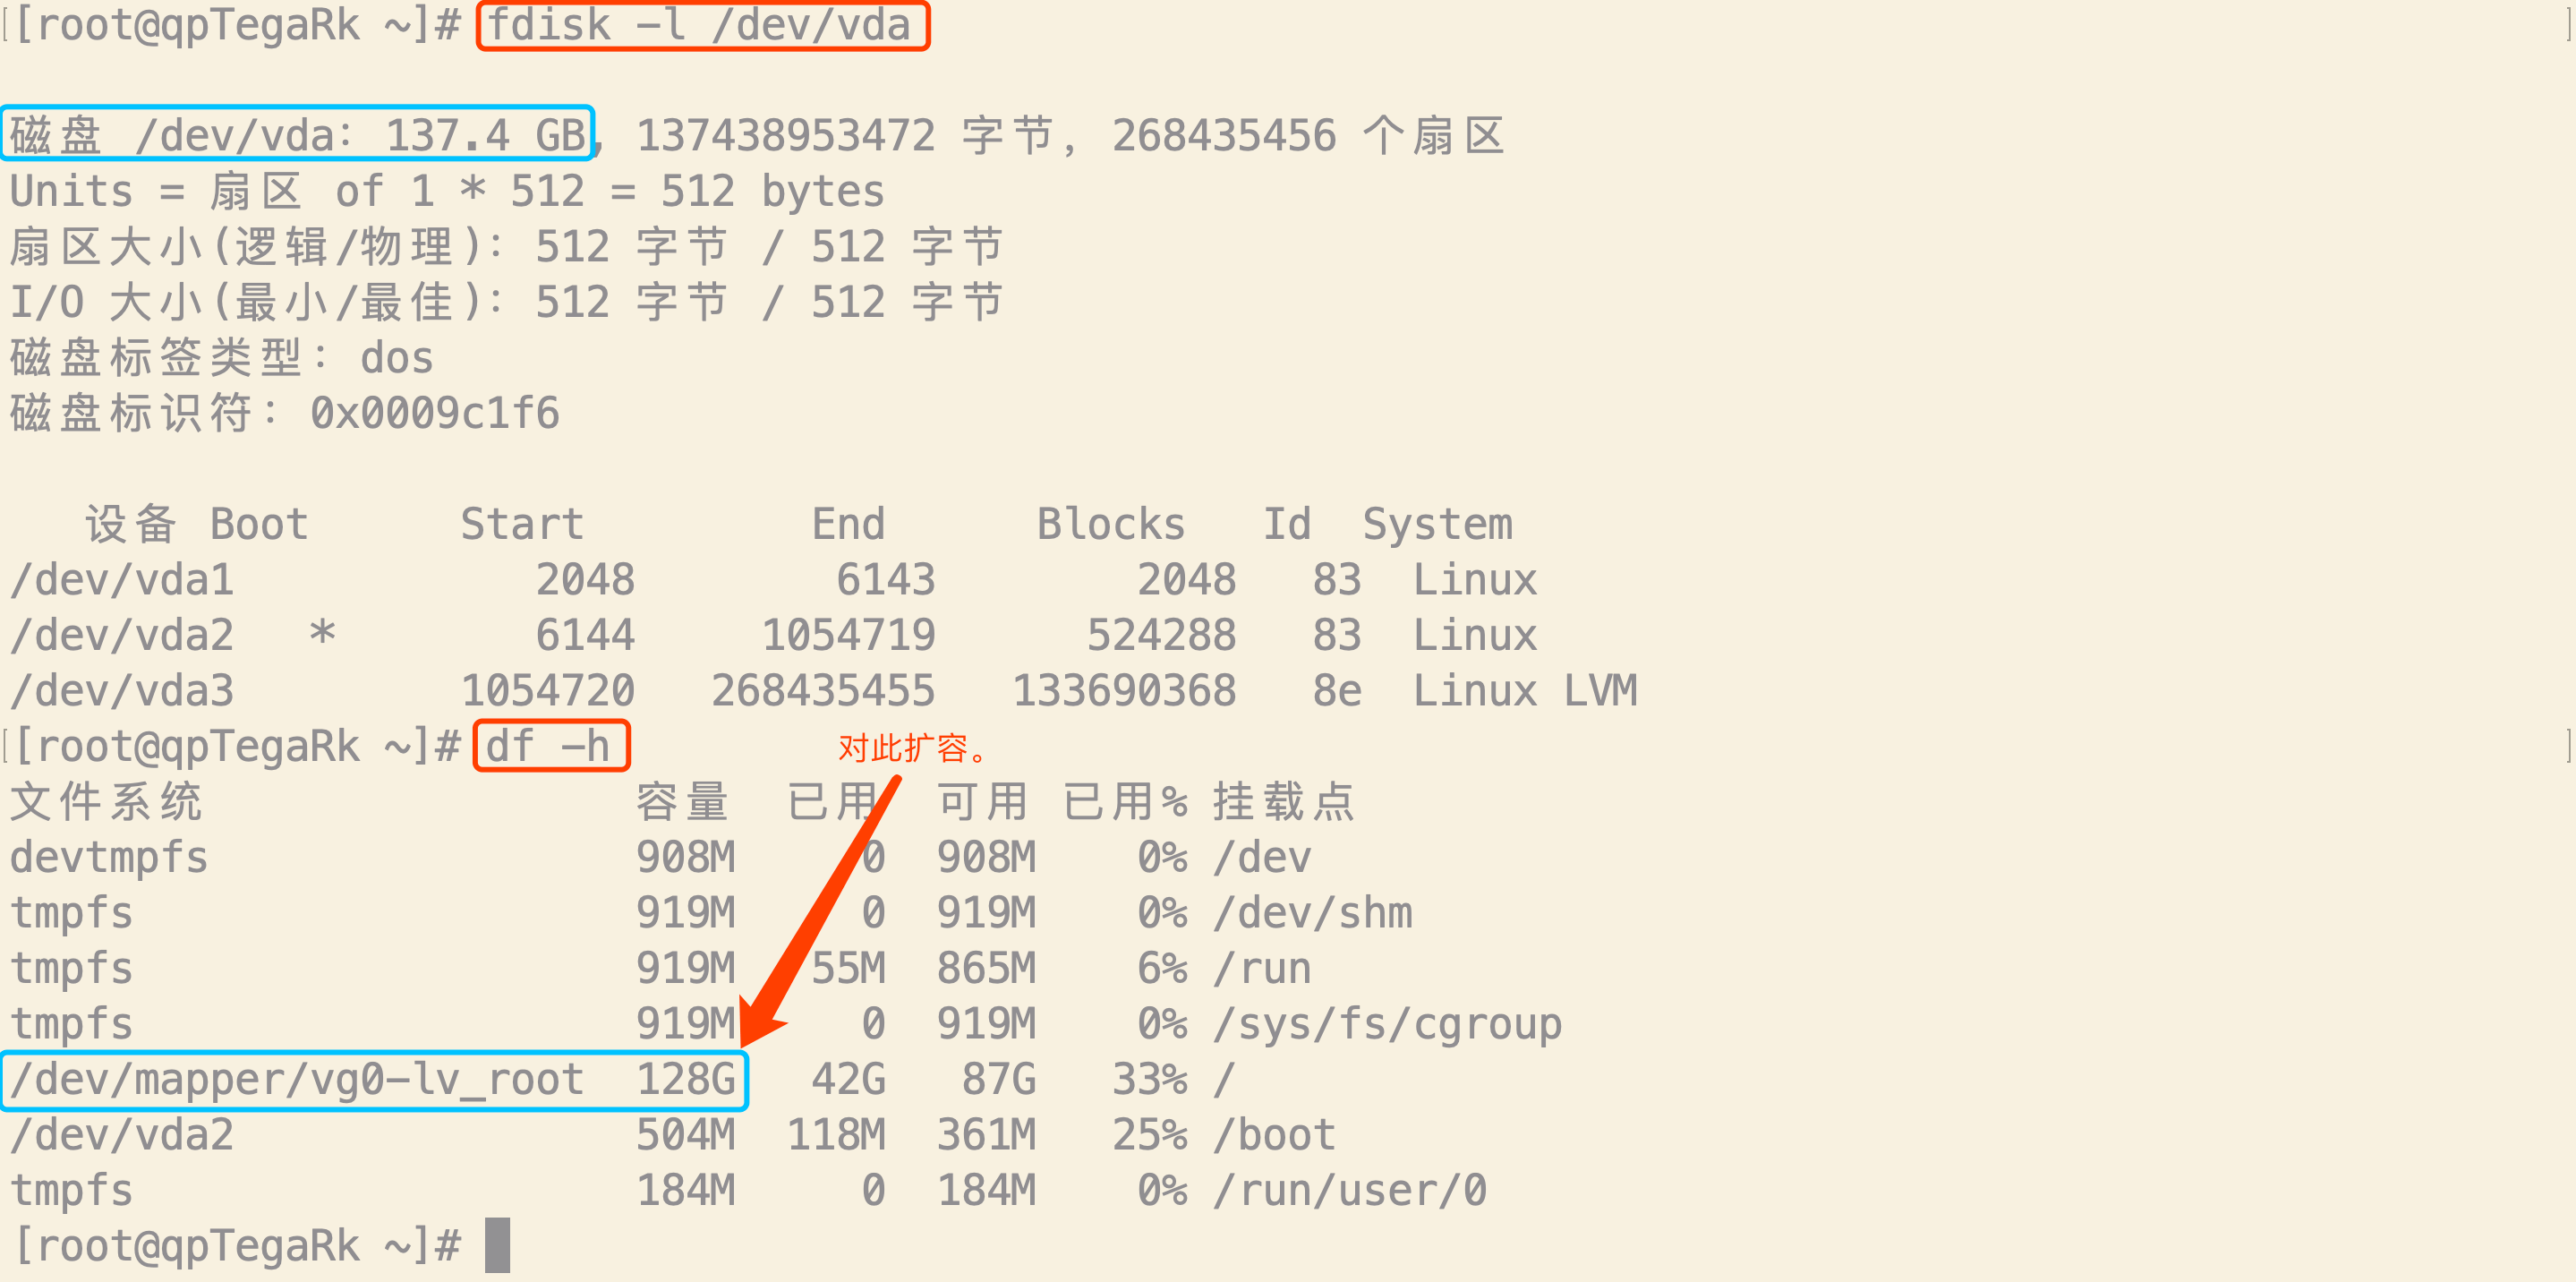
===查看当前磁盘状态=== | ===查看当前磁盘状态=== | ||
| − | * | + | *<img style="max-width: 1170px;" src="https://wiki.jimv.cn/images/操作指南/磁盘扩容-查看当前磁盘容量.png" /> |
===找到目标磁盘并扩容=== | ===找到目标磁盘并扩容=== | ||
| − | #找到目标磁盘;<br> | + | #找到目标磁盘;<br><img style="max-width: 1170px;" src="https://wiki.jimv.cn/images/操作指南/磁盘扩容-找到磁盘.png" /> |
| − | #磁盘扩容;<br> | + | #磁盘扩容;<br><img style="max-width: 1170px;" src="https://wiki.jimv.cn/images/操作指南/磁盘扩容-磁盘扩容.png" /> |
| − | #LVM 卷扩容;<br> | + | #LVM 卷扩容;<br><img style="max-width: 1170px;" src="https://wiki.jimv.cn/images/操作指南/磁盘扩容-LVM扩容.png" /> |
| − | #文件系统扩容;<br> | + | #文件系统扩容;<br><img style="max-width: 1170px;" src="https://wiki.jimv.cn/images/操作指南/磁盘扩容-文件系统扩容.png" /> |
==云盘创建== | ==云盘创建== | ||
{{Note|提示:非共享存储模式下。欲挂载的磁盘,需与目标虚拟机处于'''同一个计算节点'''。|reminder}} | {{Note|提示:非共享存储模式下。欲挂载的磁盘,需与目标虚拟机处于'''同一个计算节点'''。|reminder}} | ||
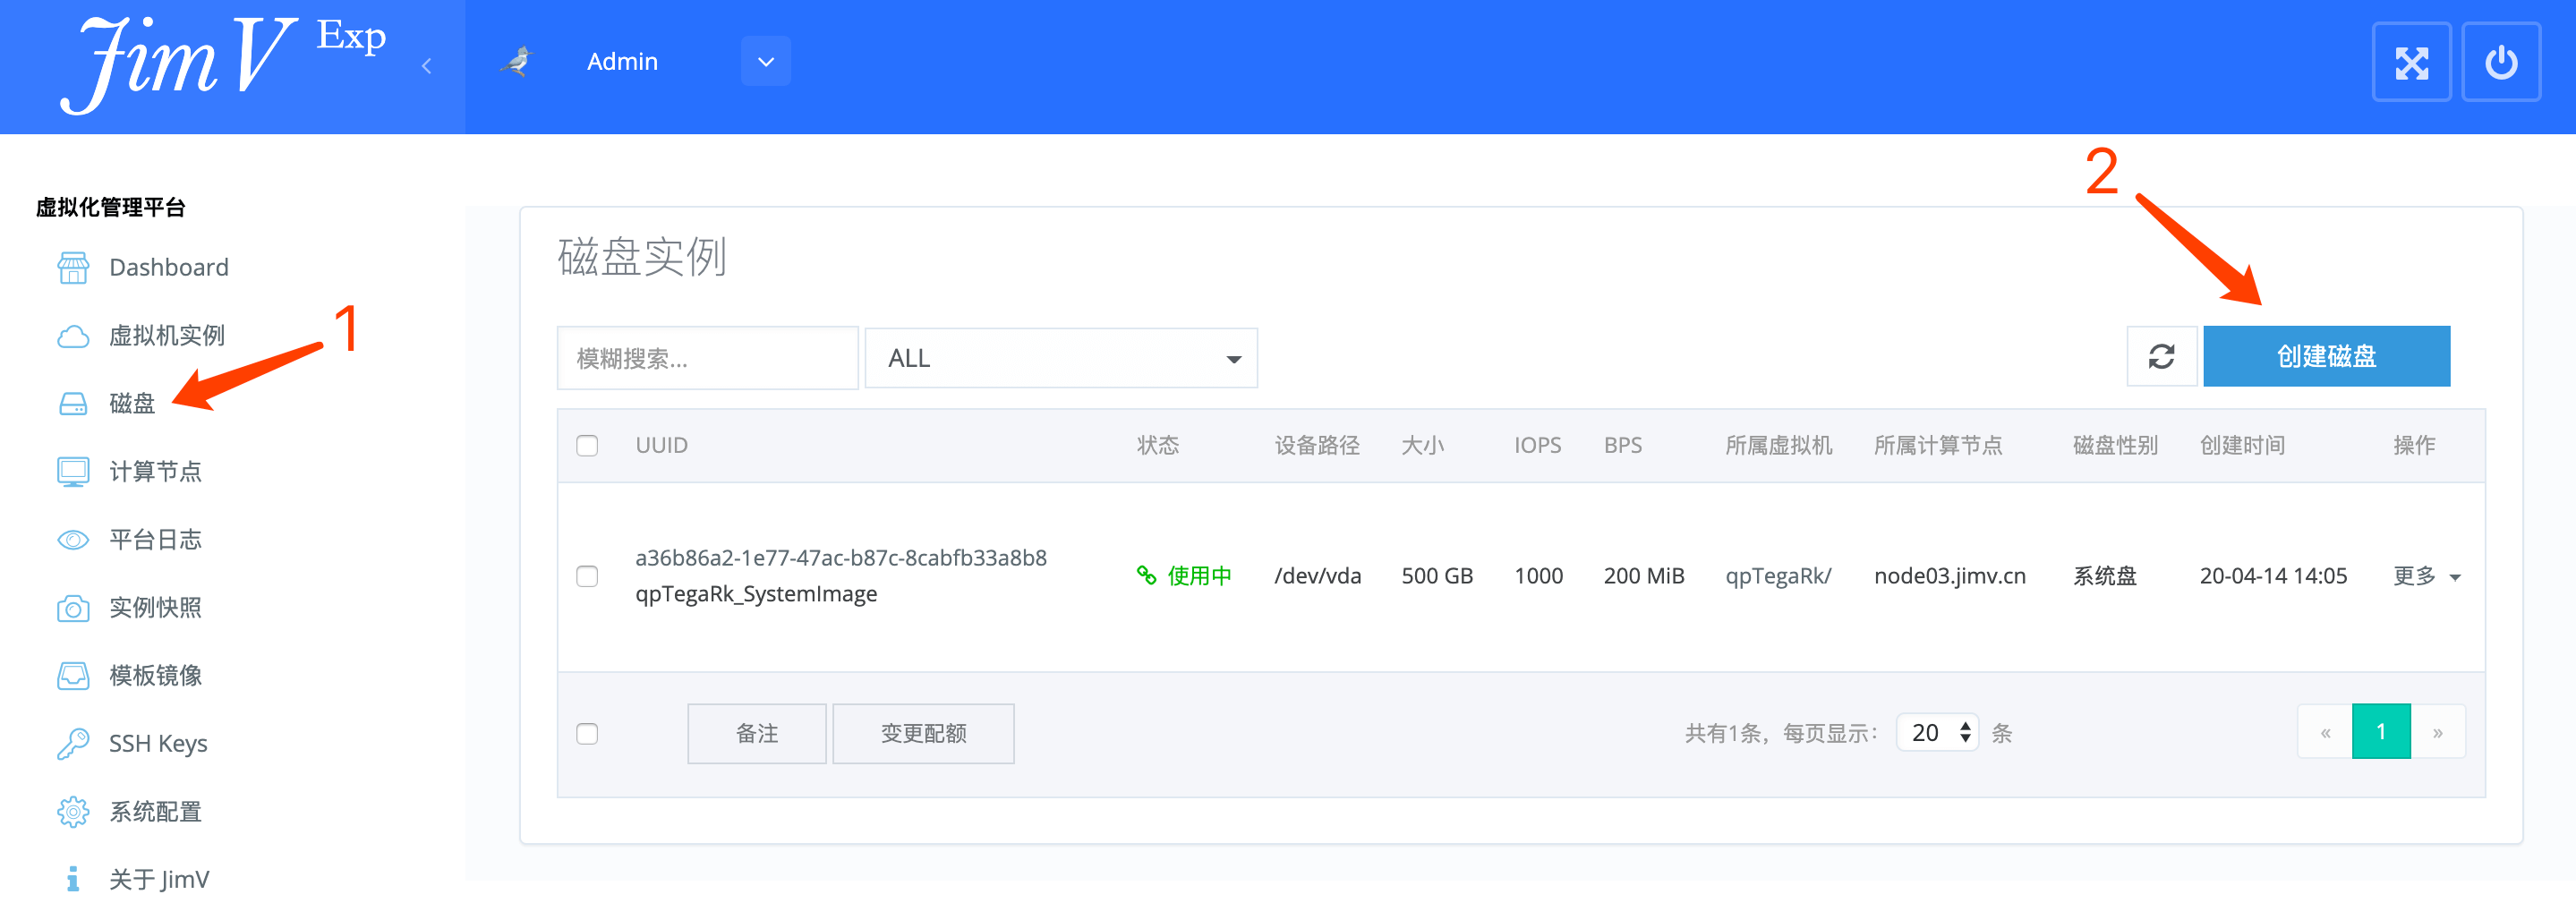
| − | * | + | *<img style="max-width: 1170px;" src="https://wiki.jimv.cn/images/操作指南/云盘创建.png" /> |
| − | * | + | *<img style="max-width: 1170px;" src="https://wiki.jimv.cn/images/操作指南/云盘创建-2.png" /> |
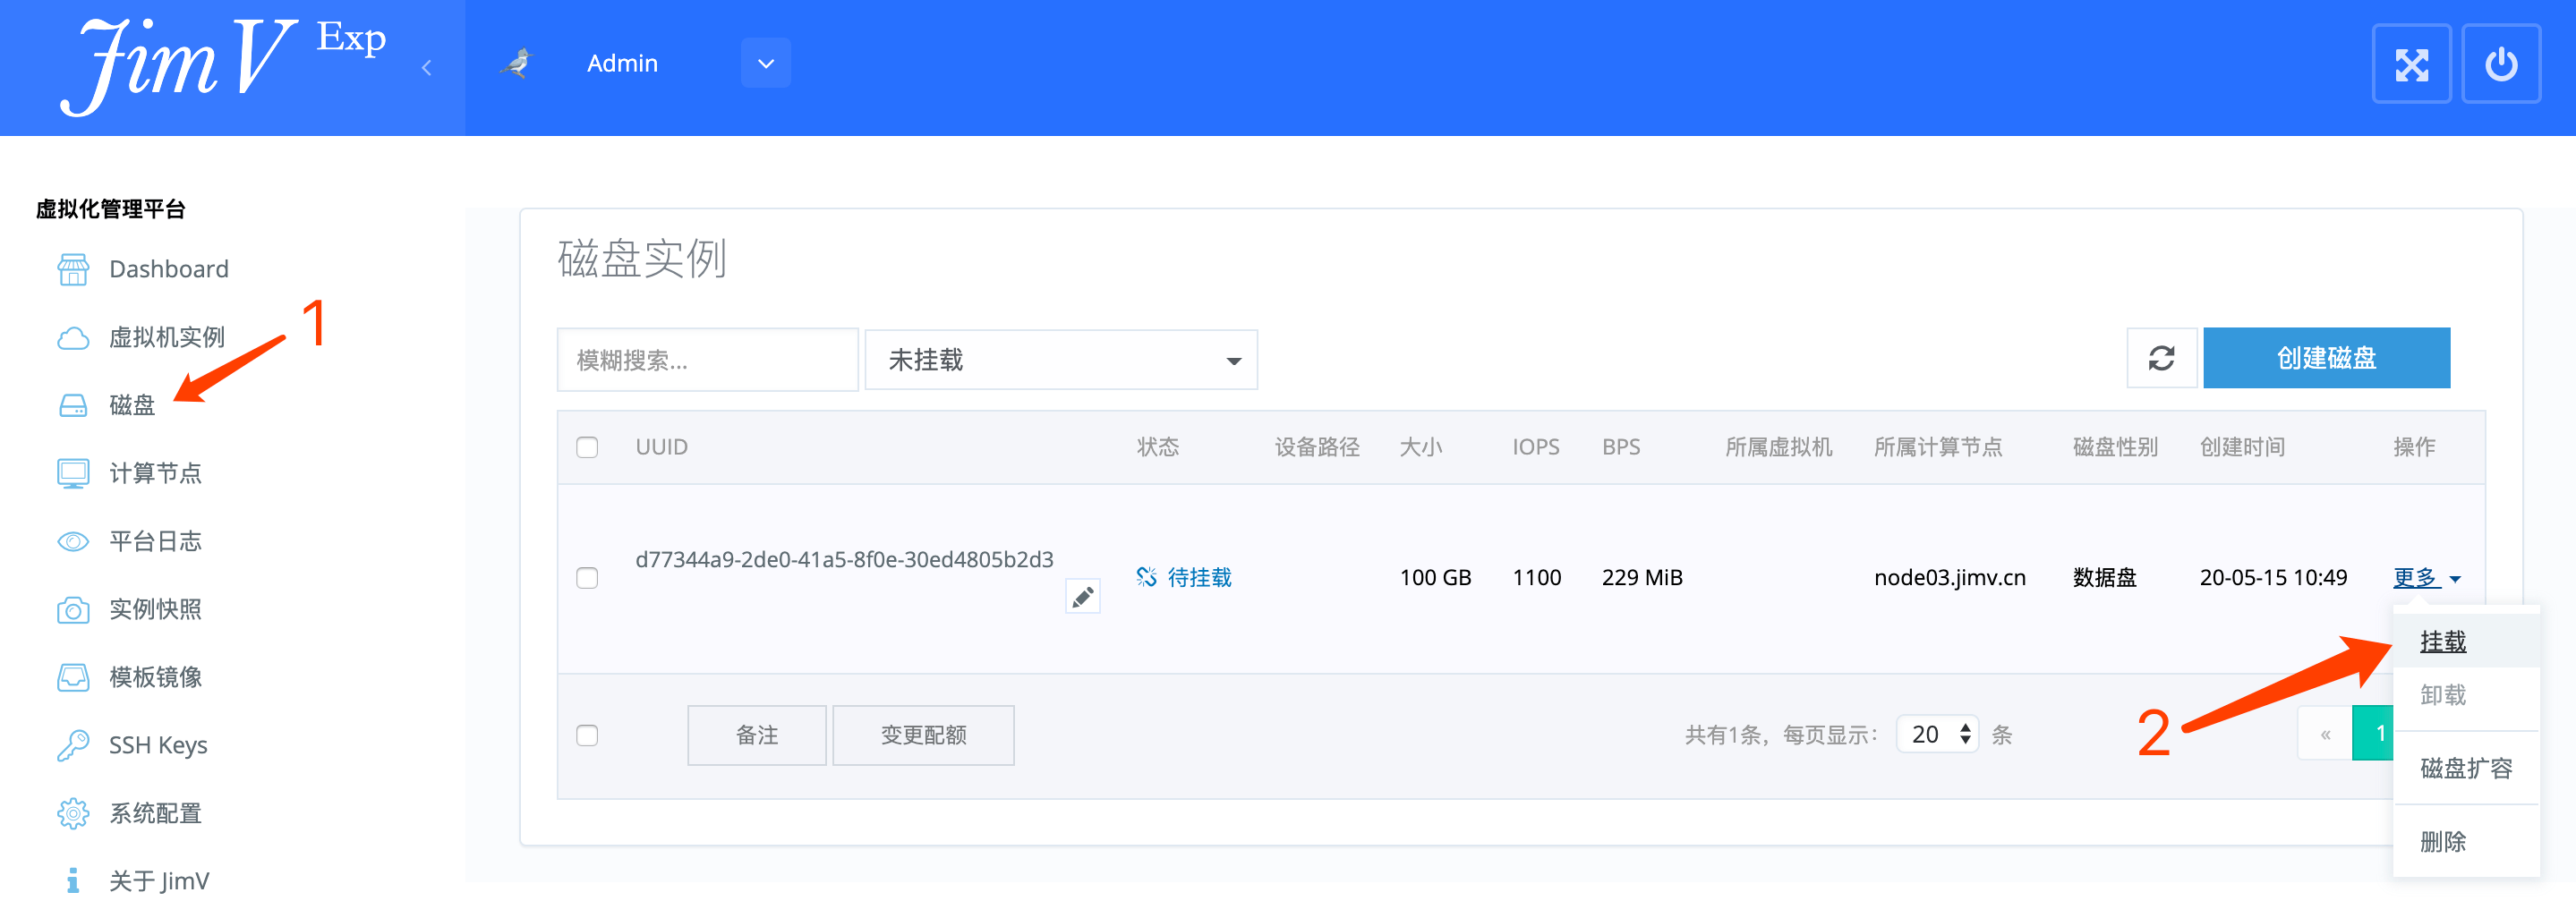
==云盘挂载== | ==云盘挂载== | ||
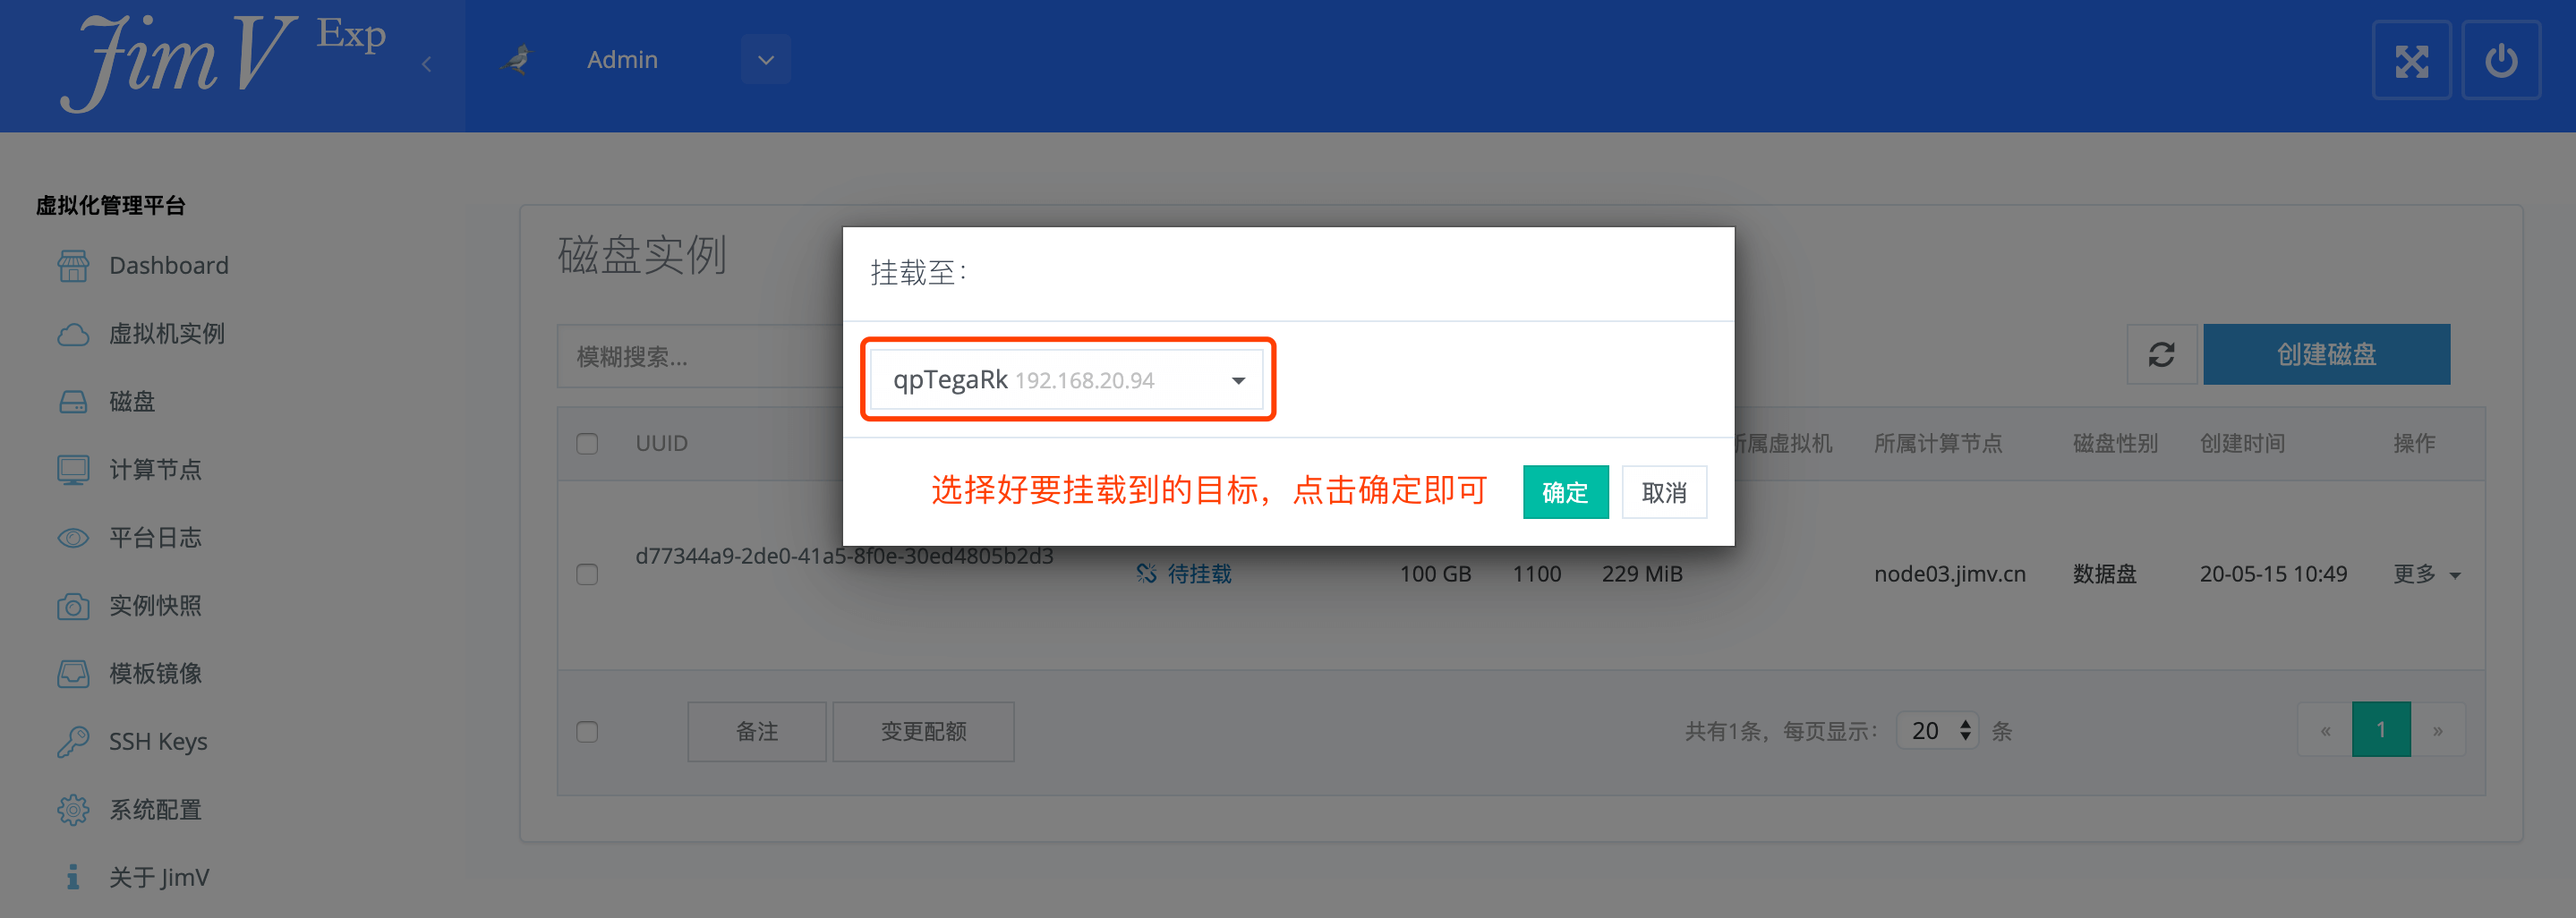
| − | * | + | *<img style="max-width: 1170px;" src="https://wiki.jimv.cn/images/操作指南/云盘挂载.png" /> |
| − | * | + | *<img style="max-width: 1170px;" src="https://wiki.jimv.cn/images/操作指南/云盘挂载-2.png" /> |
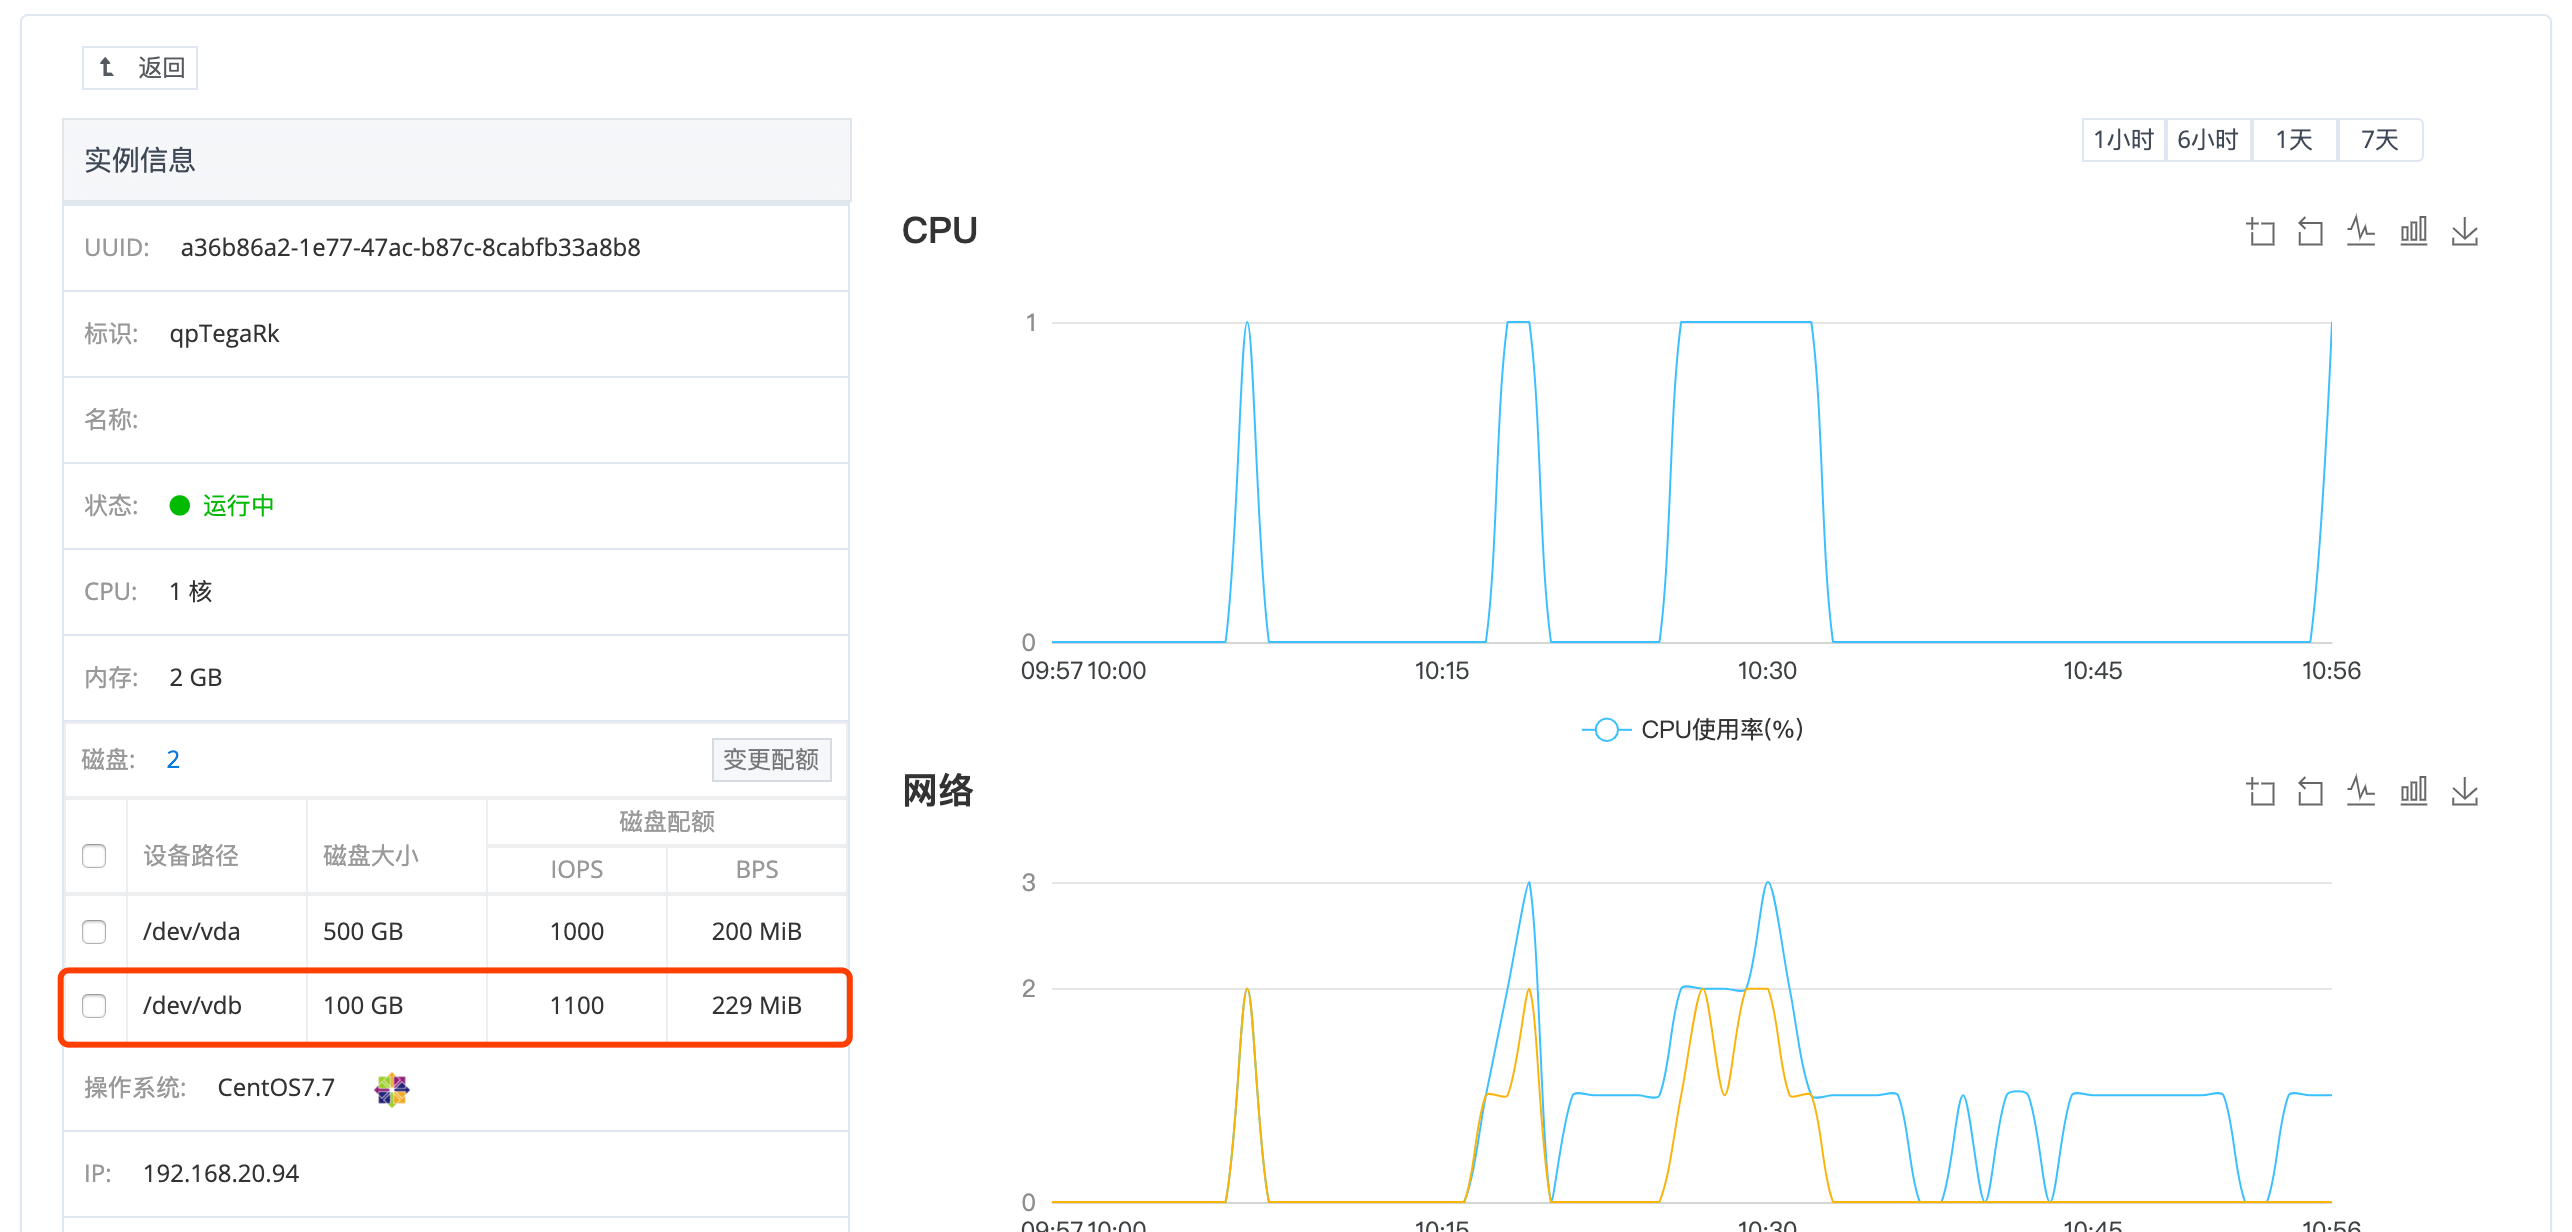
| − | * | + | *<img style="max-width: 1170px;" src="https://wiki.jimv.cn/images/操作指南/云盘挂载-验证.png" /> |
| − | * | + | *<img style="max-width: 1170px;" src="https://wiki.jimv.cn/images/操作指南/云盘挂载-验证-2.png" /> |
==磁盘修剪== | ==磁盘修剪== | ||
| 第138行: | 第138行: | ||
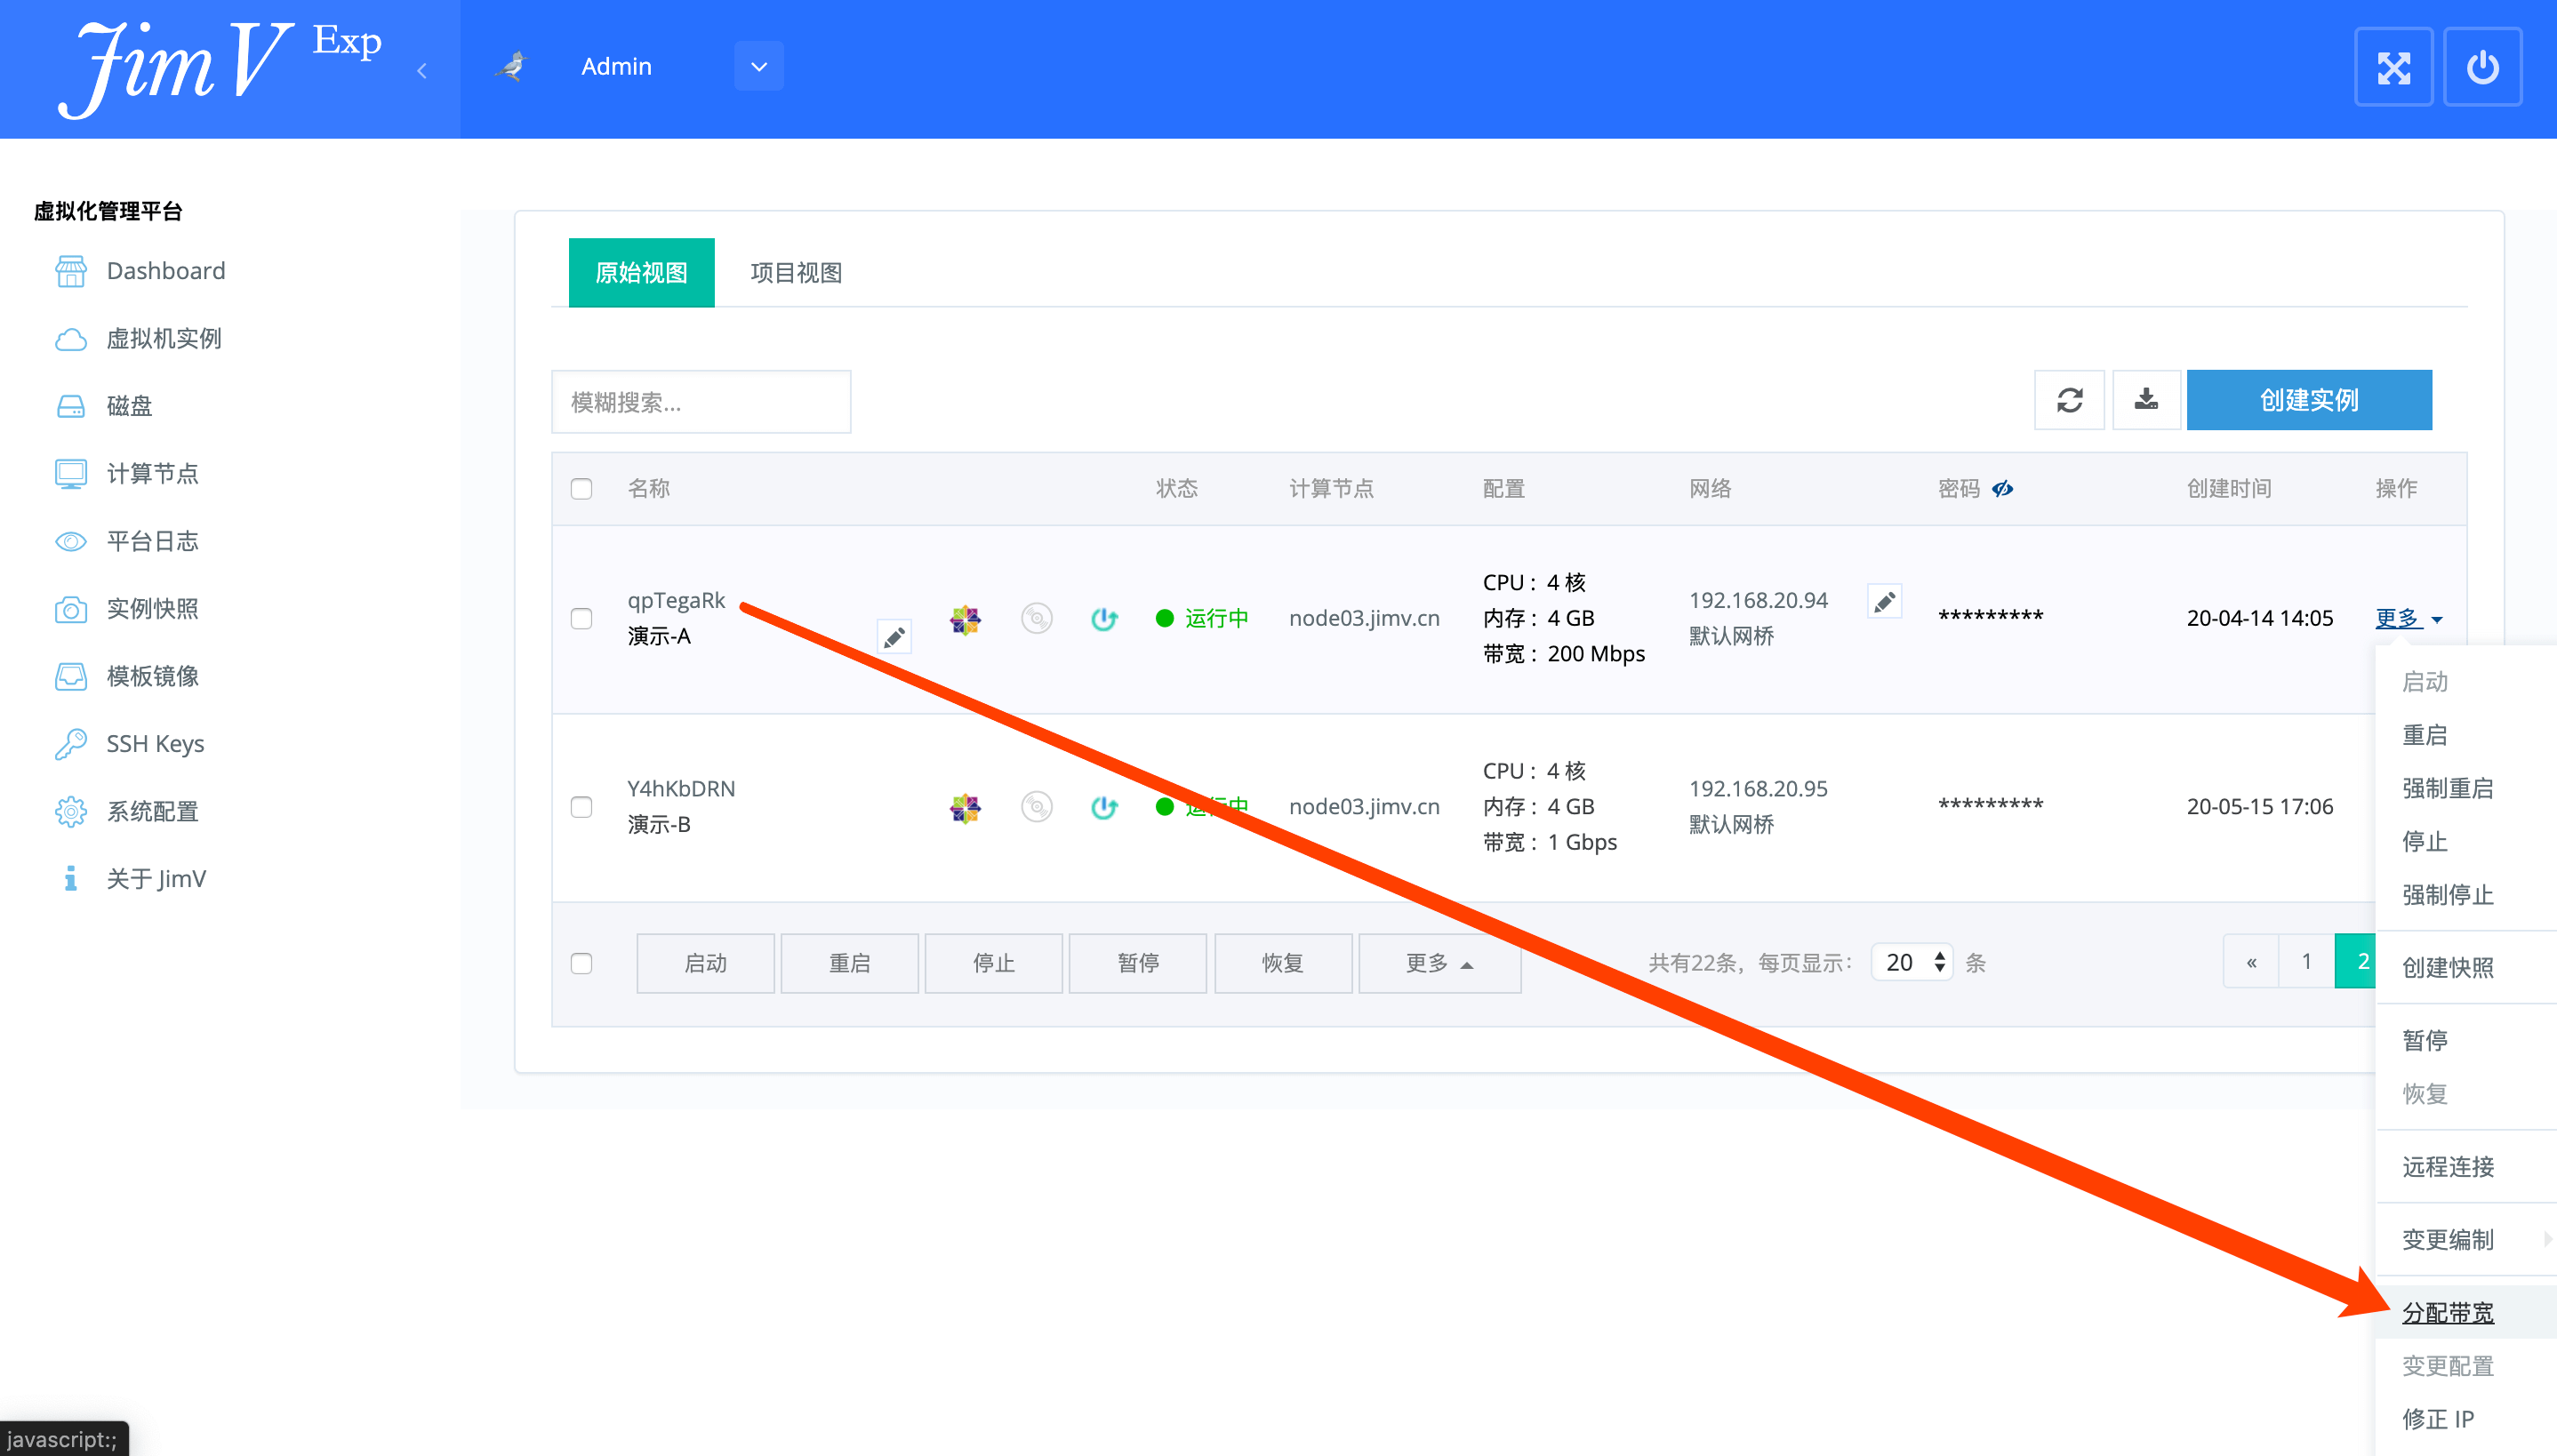
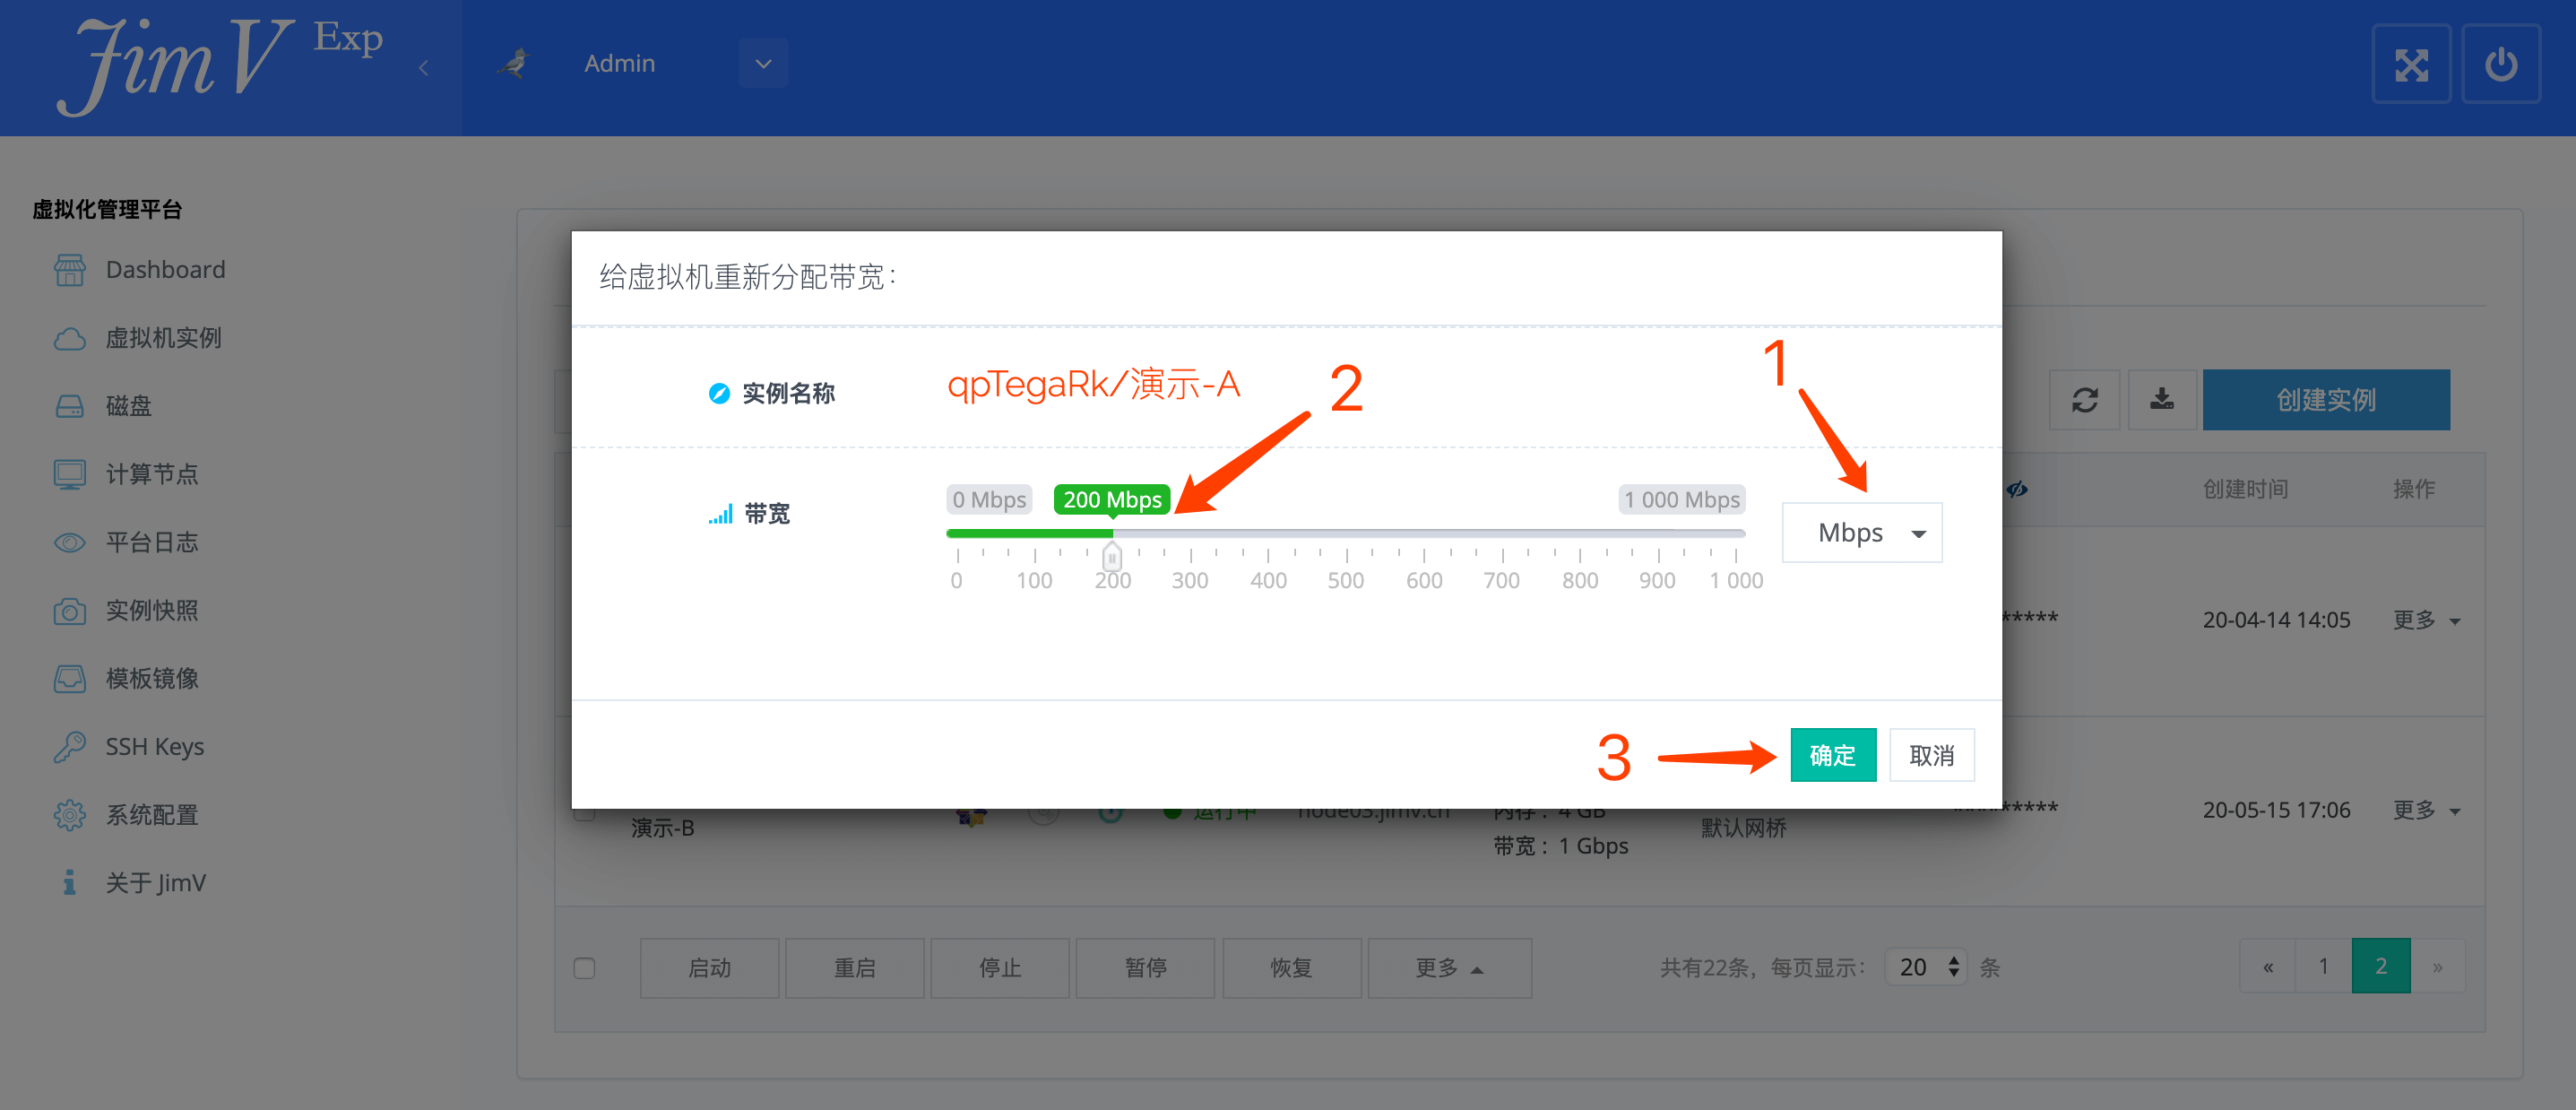
===带宽分配=== | ===带宽分配=== | ||
| − | * | + | *<img style="max-width: 1170px;" src="https://wiki.jimv.cn/images/操作指南/网络配额-分配带宽.png" /> |
| − | * | + | *<img style="max-width: 1170px;" src="https://wiki.jimv.cn/images/操作指南/网络配额-分配带宽-2.png" /> |
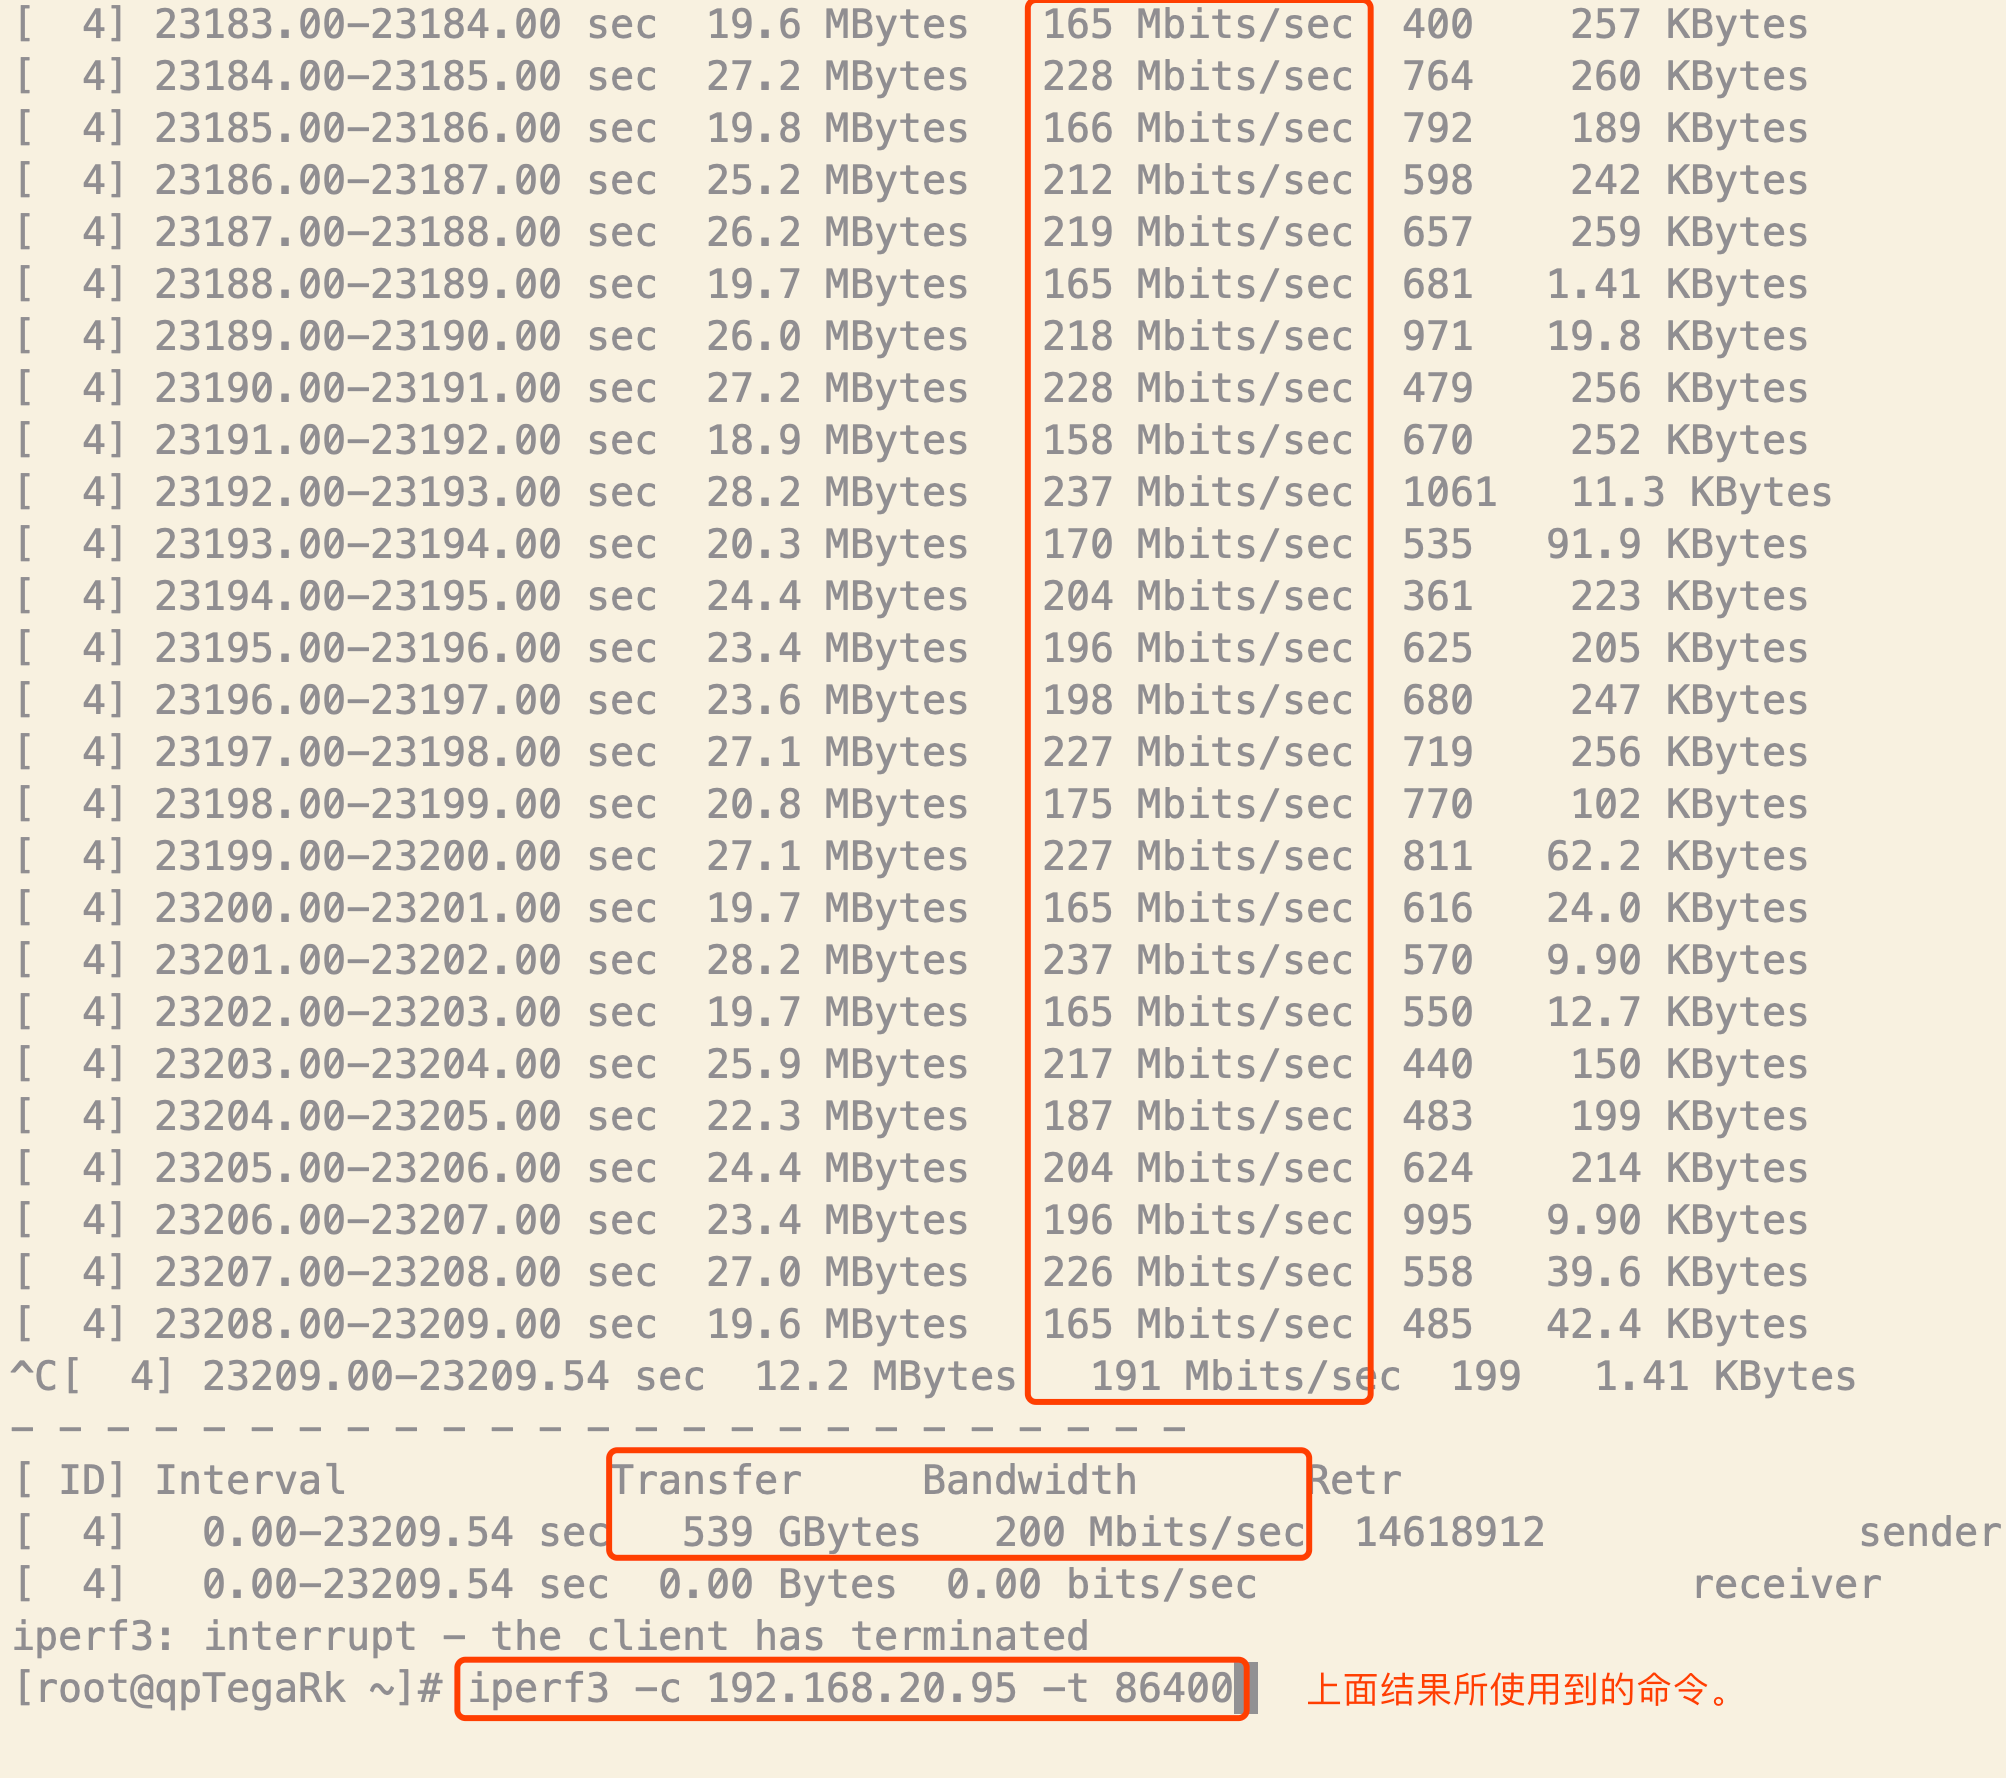
===配额测试=== | ===配额测试=== | ||
| − | * | + | *<img style="max-width: 1170px;" src="https://wiki.jimv.cn/images/操作指南/网络限速-测试-iperf3-client.png" /> |
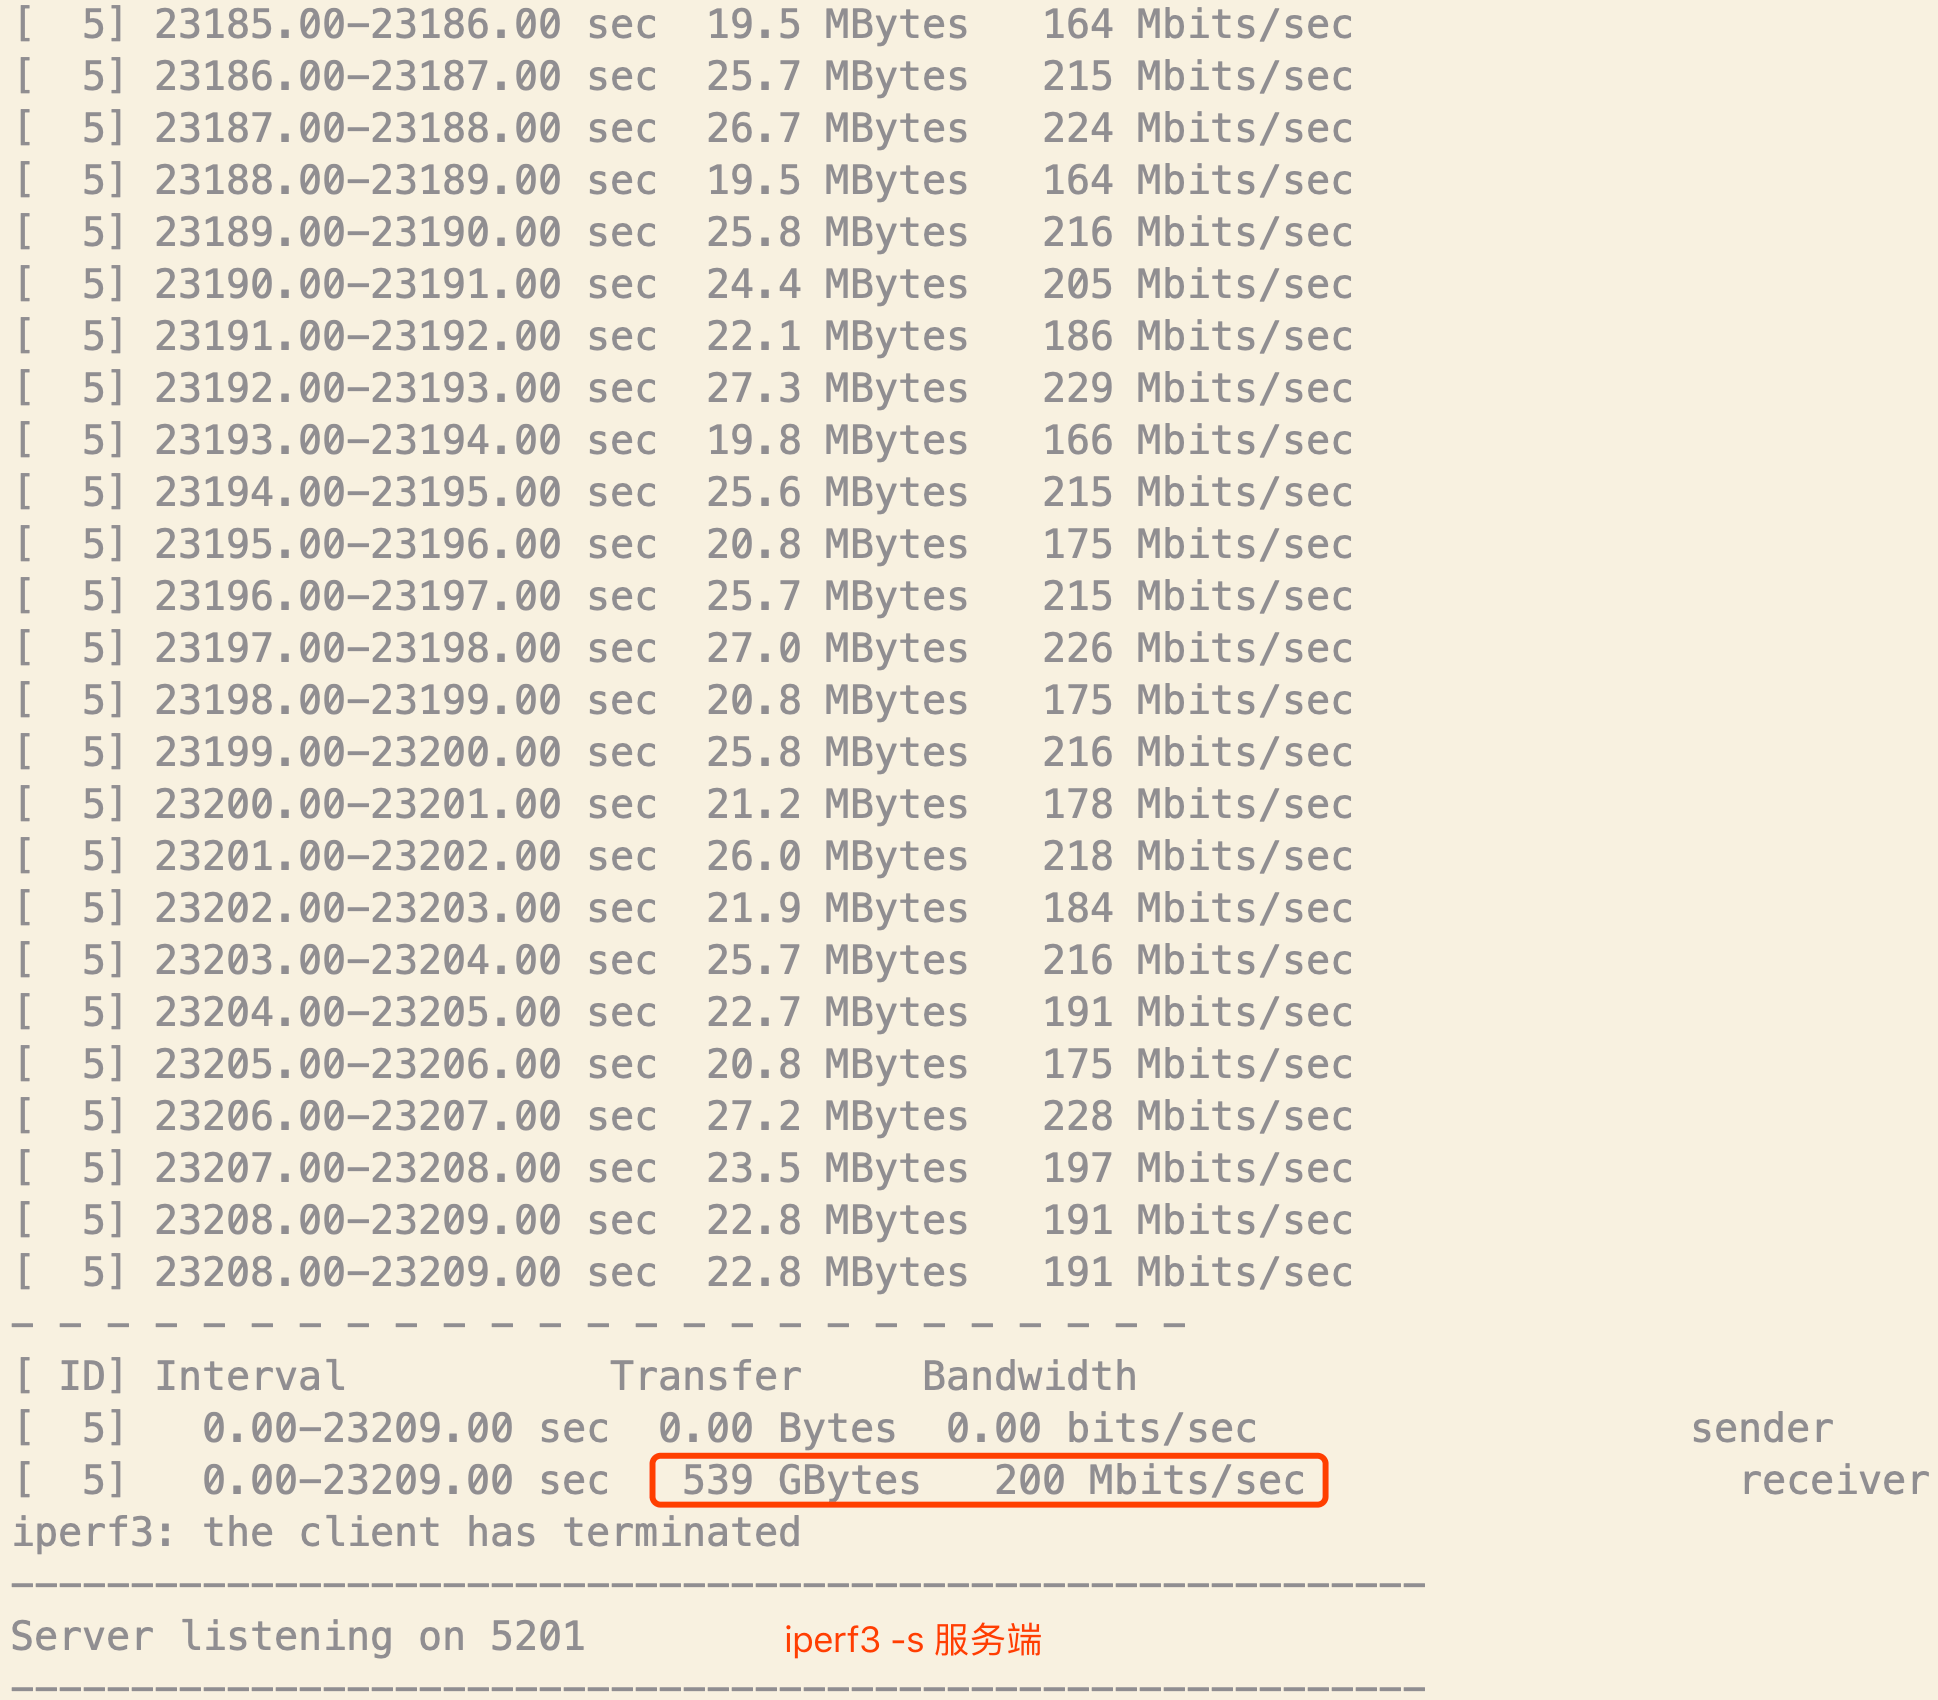
| − | * | + | *<img style="max-width: 1170px;" src="https://wiki.jimv.cn/images/操作指南/网络限速-测试-iperf3-server.png" /> |
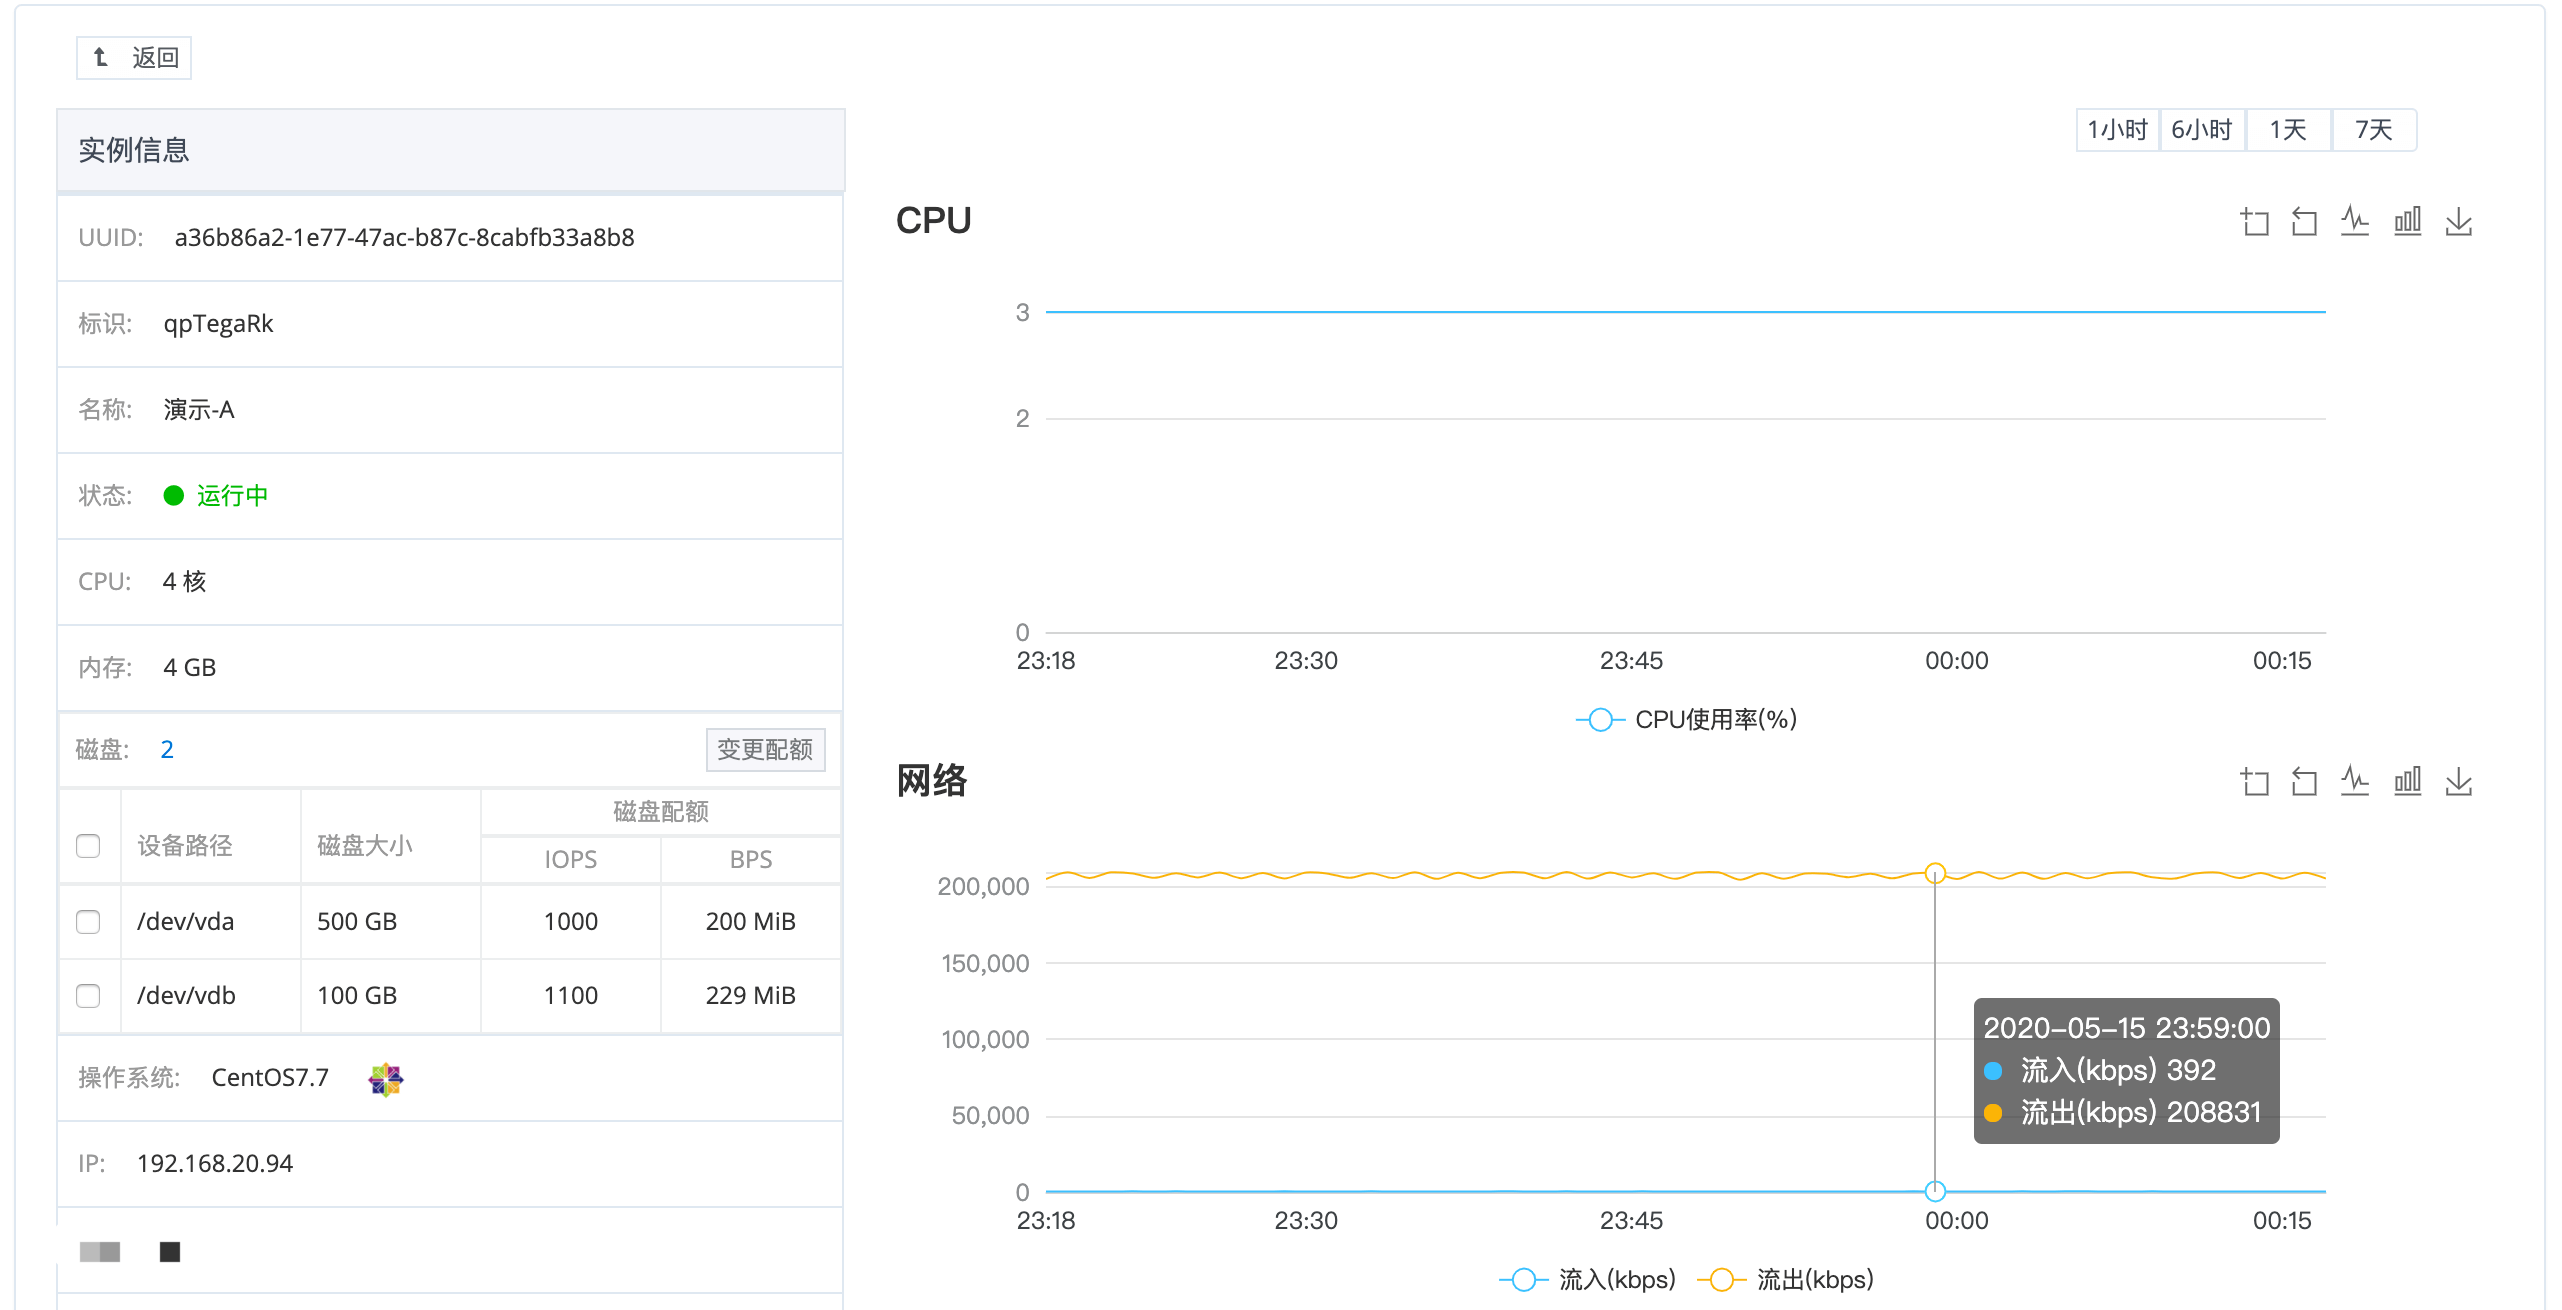
| − | * | + | *<img style="max-width: 1170px;" src="https://wiki.jimv.cn/images/操作指南/网络限速-测试.png" /> |
| − | * | + | *<img style="max-width: 1170px;" src="https://wiki.jimv.cn/images/操作指南/网络限速-测试-2.png" /> |
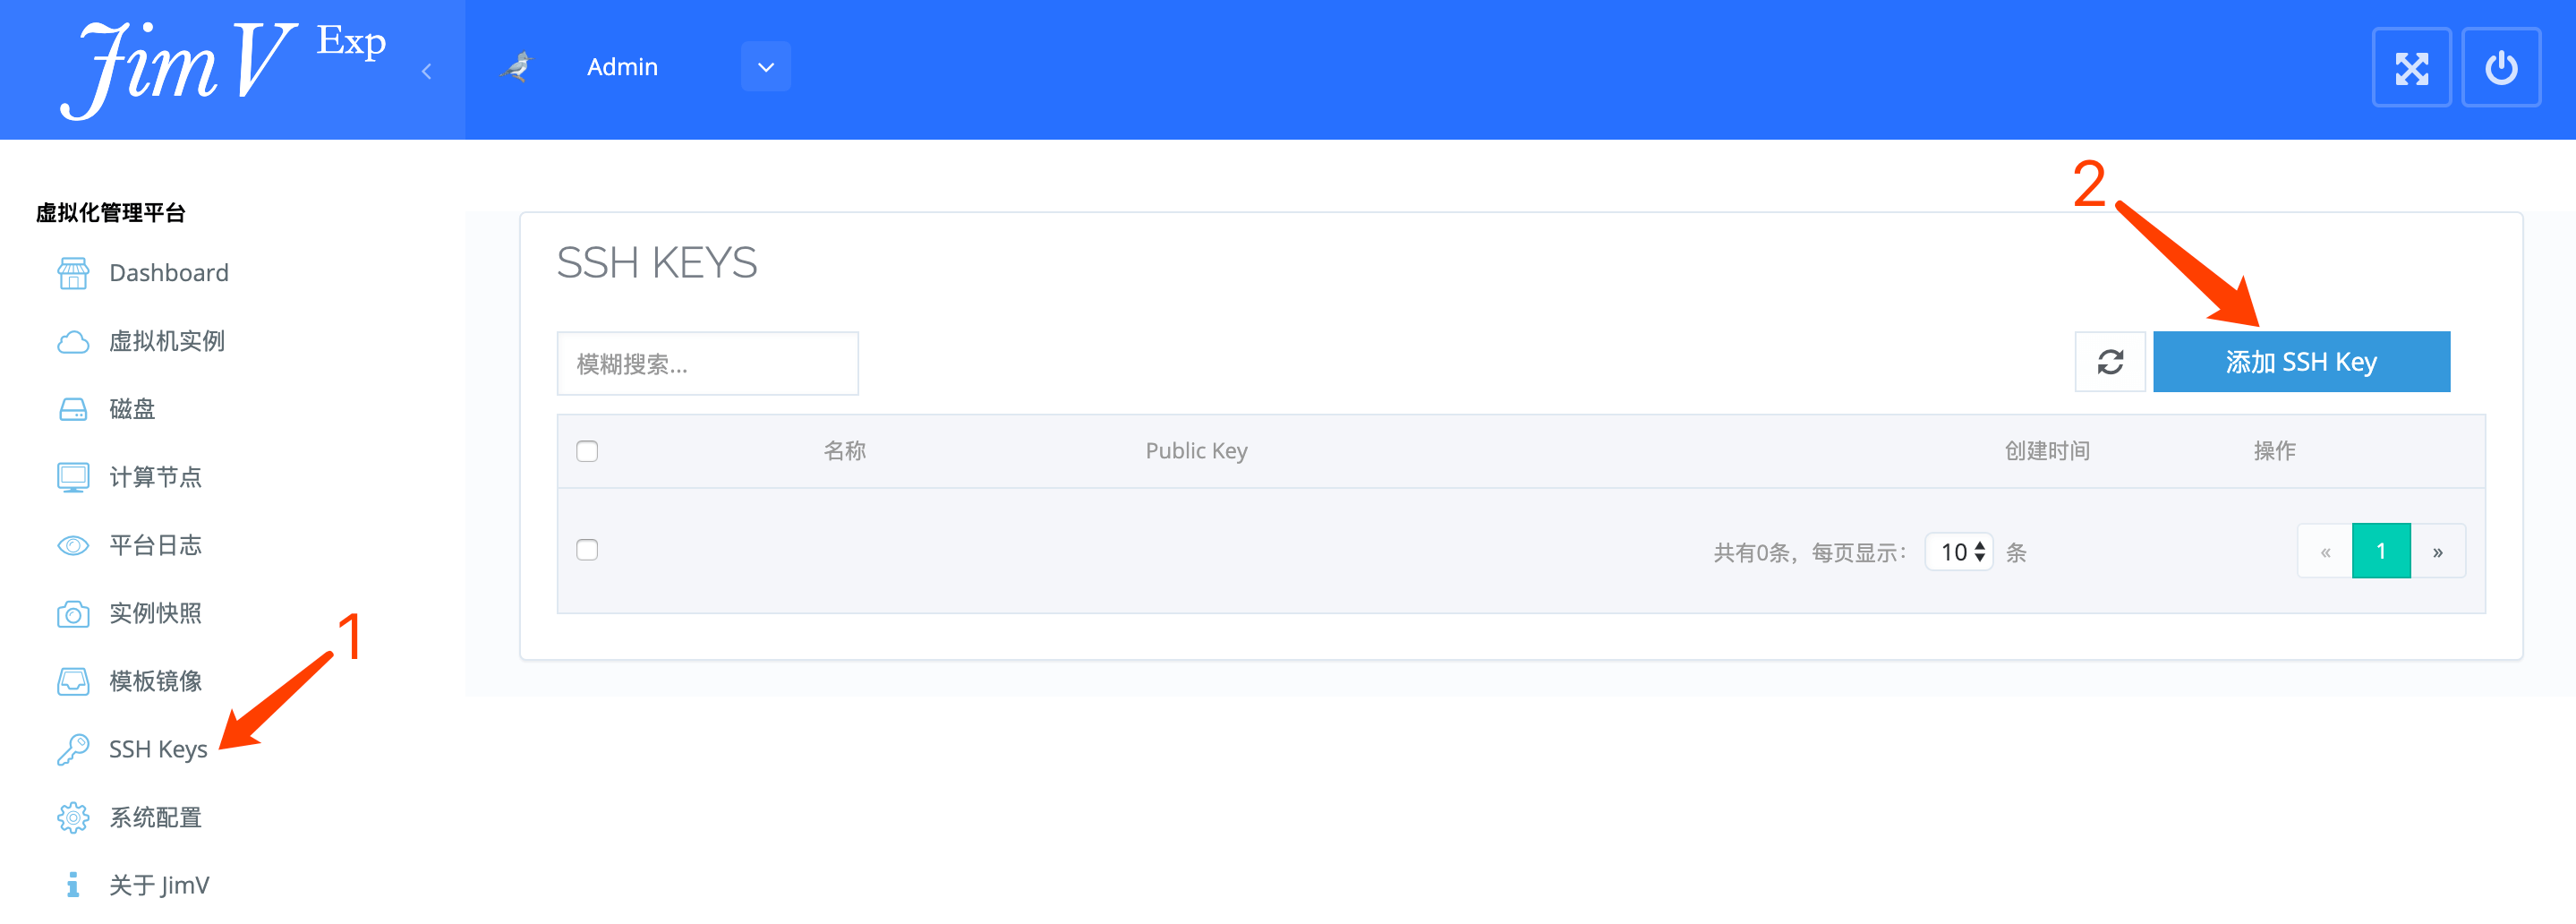
==SSH-Key 注入== | ==SSH-Key 注入== | ||
| − | #导入 SSH-Key;<br> | + | #导入 SSH-Key;<br><img style="max-width: 1170px;" src="https://wiki.jimv.cn/images/操作指南/SSH-KEY.png" /> |
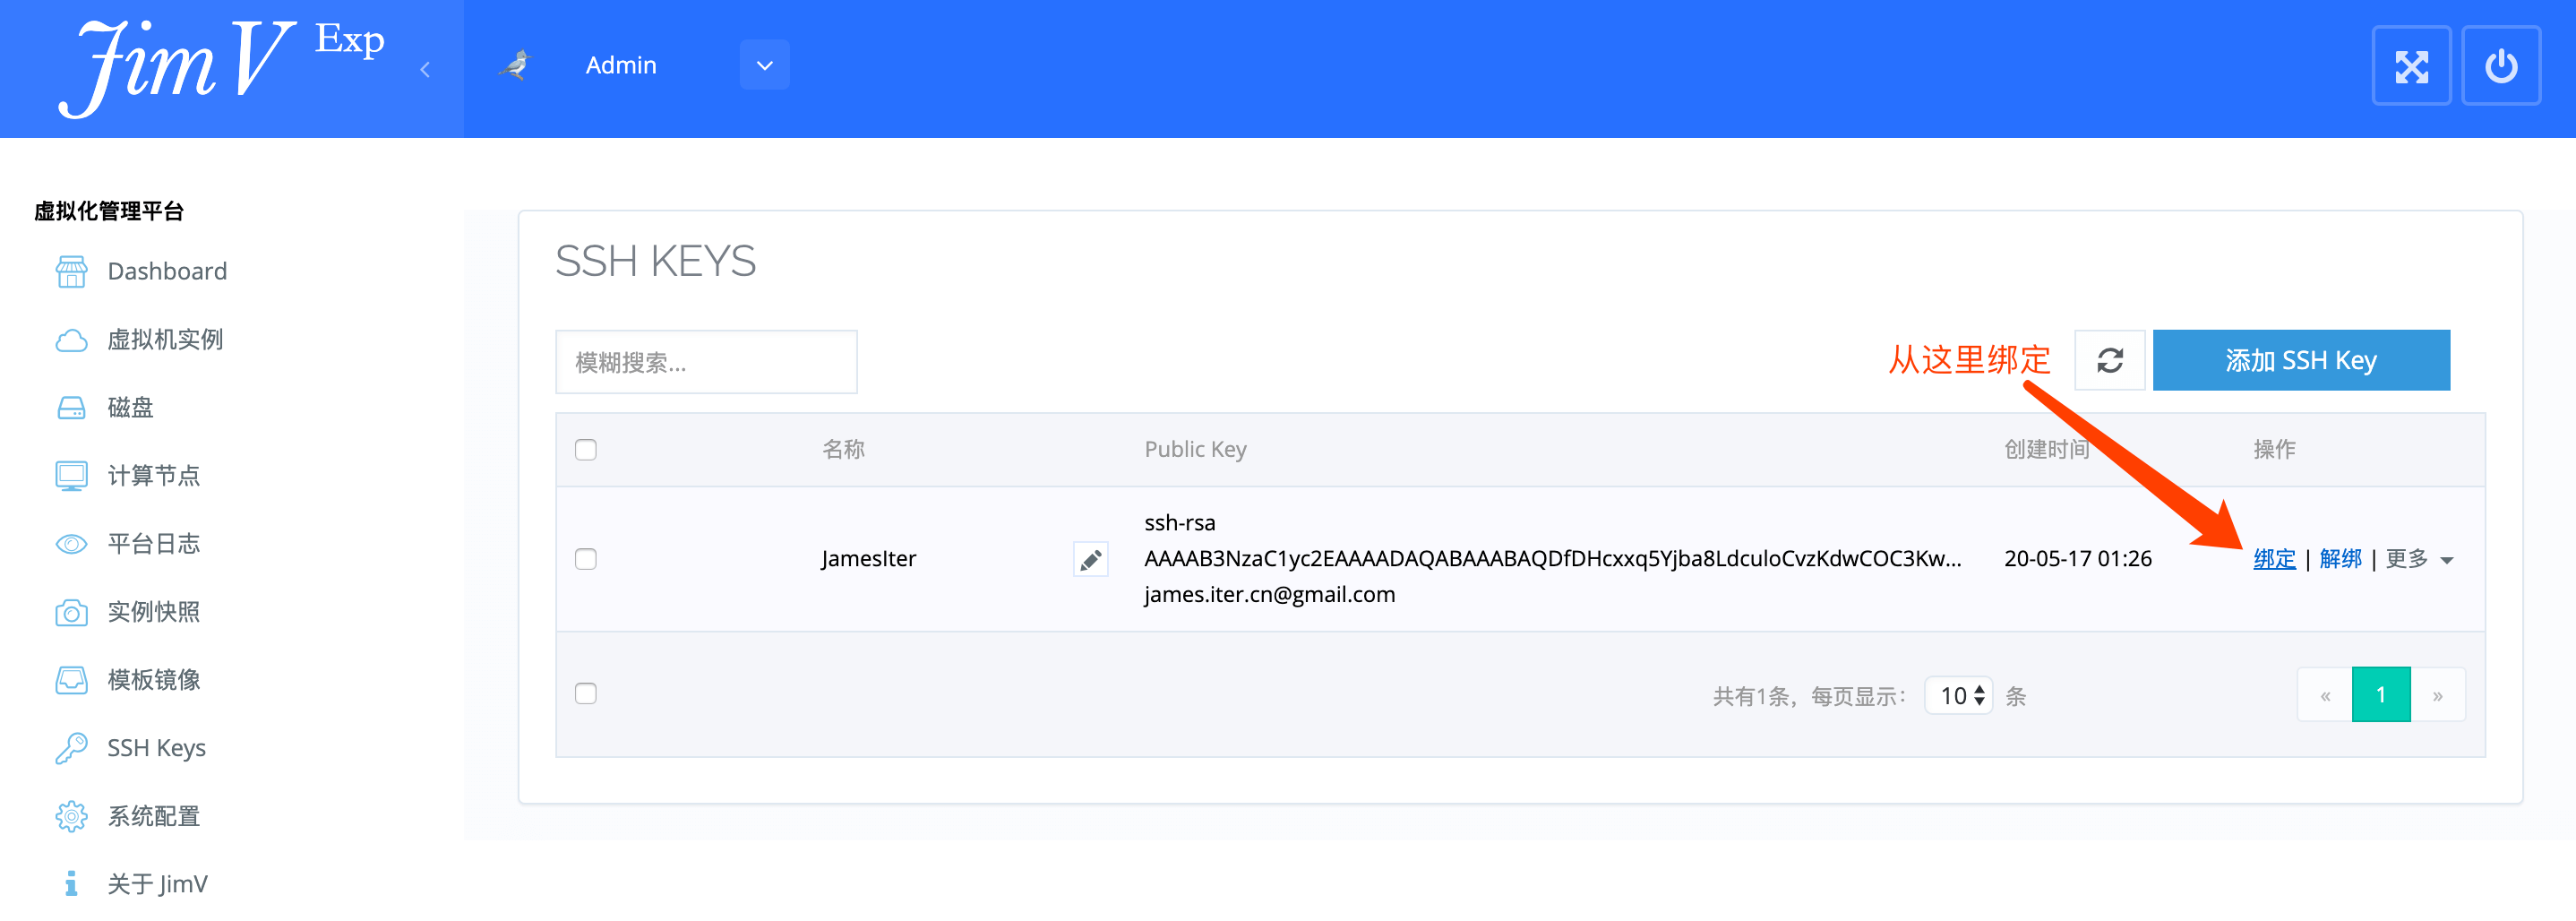
| − | #注入 SSH-Key 到虚拟机;<br> | + | #注入 SSH-Key 到虚拟机;<br><img style="max-width: 1170px;" src="https://wiki.jimv.cn/images/操作指南/SSH-KEY-绑定.png" /> |
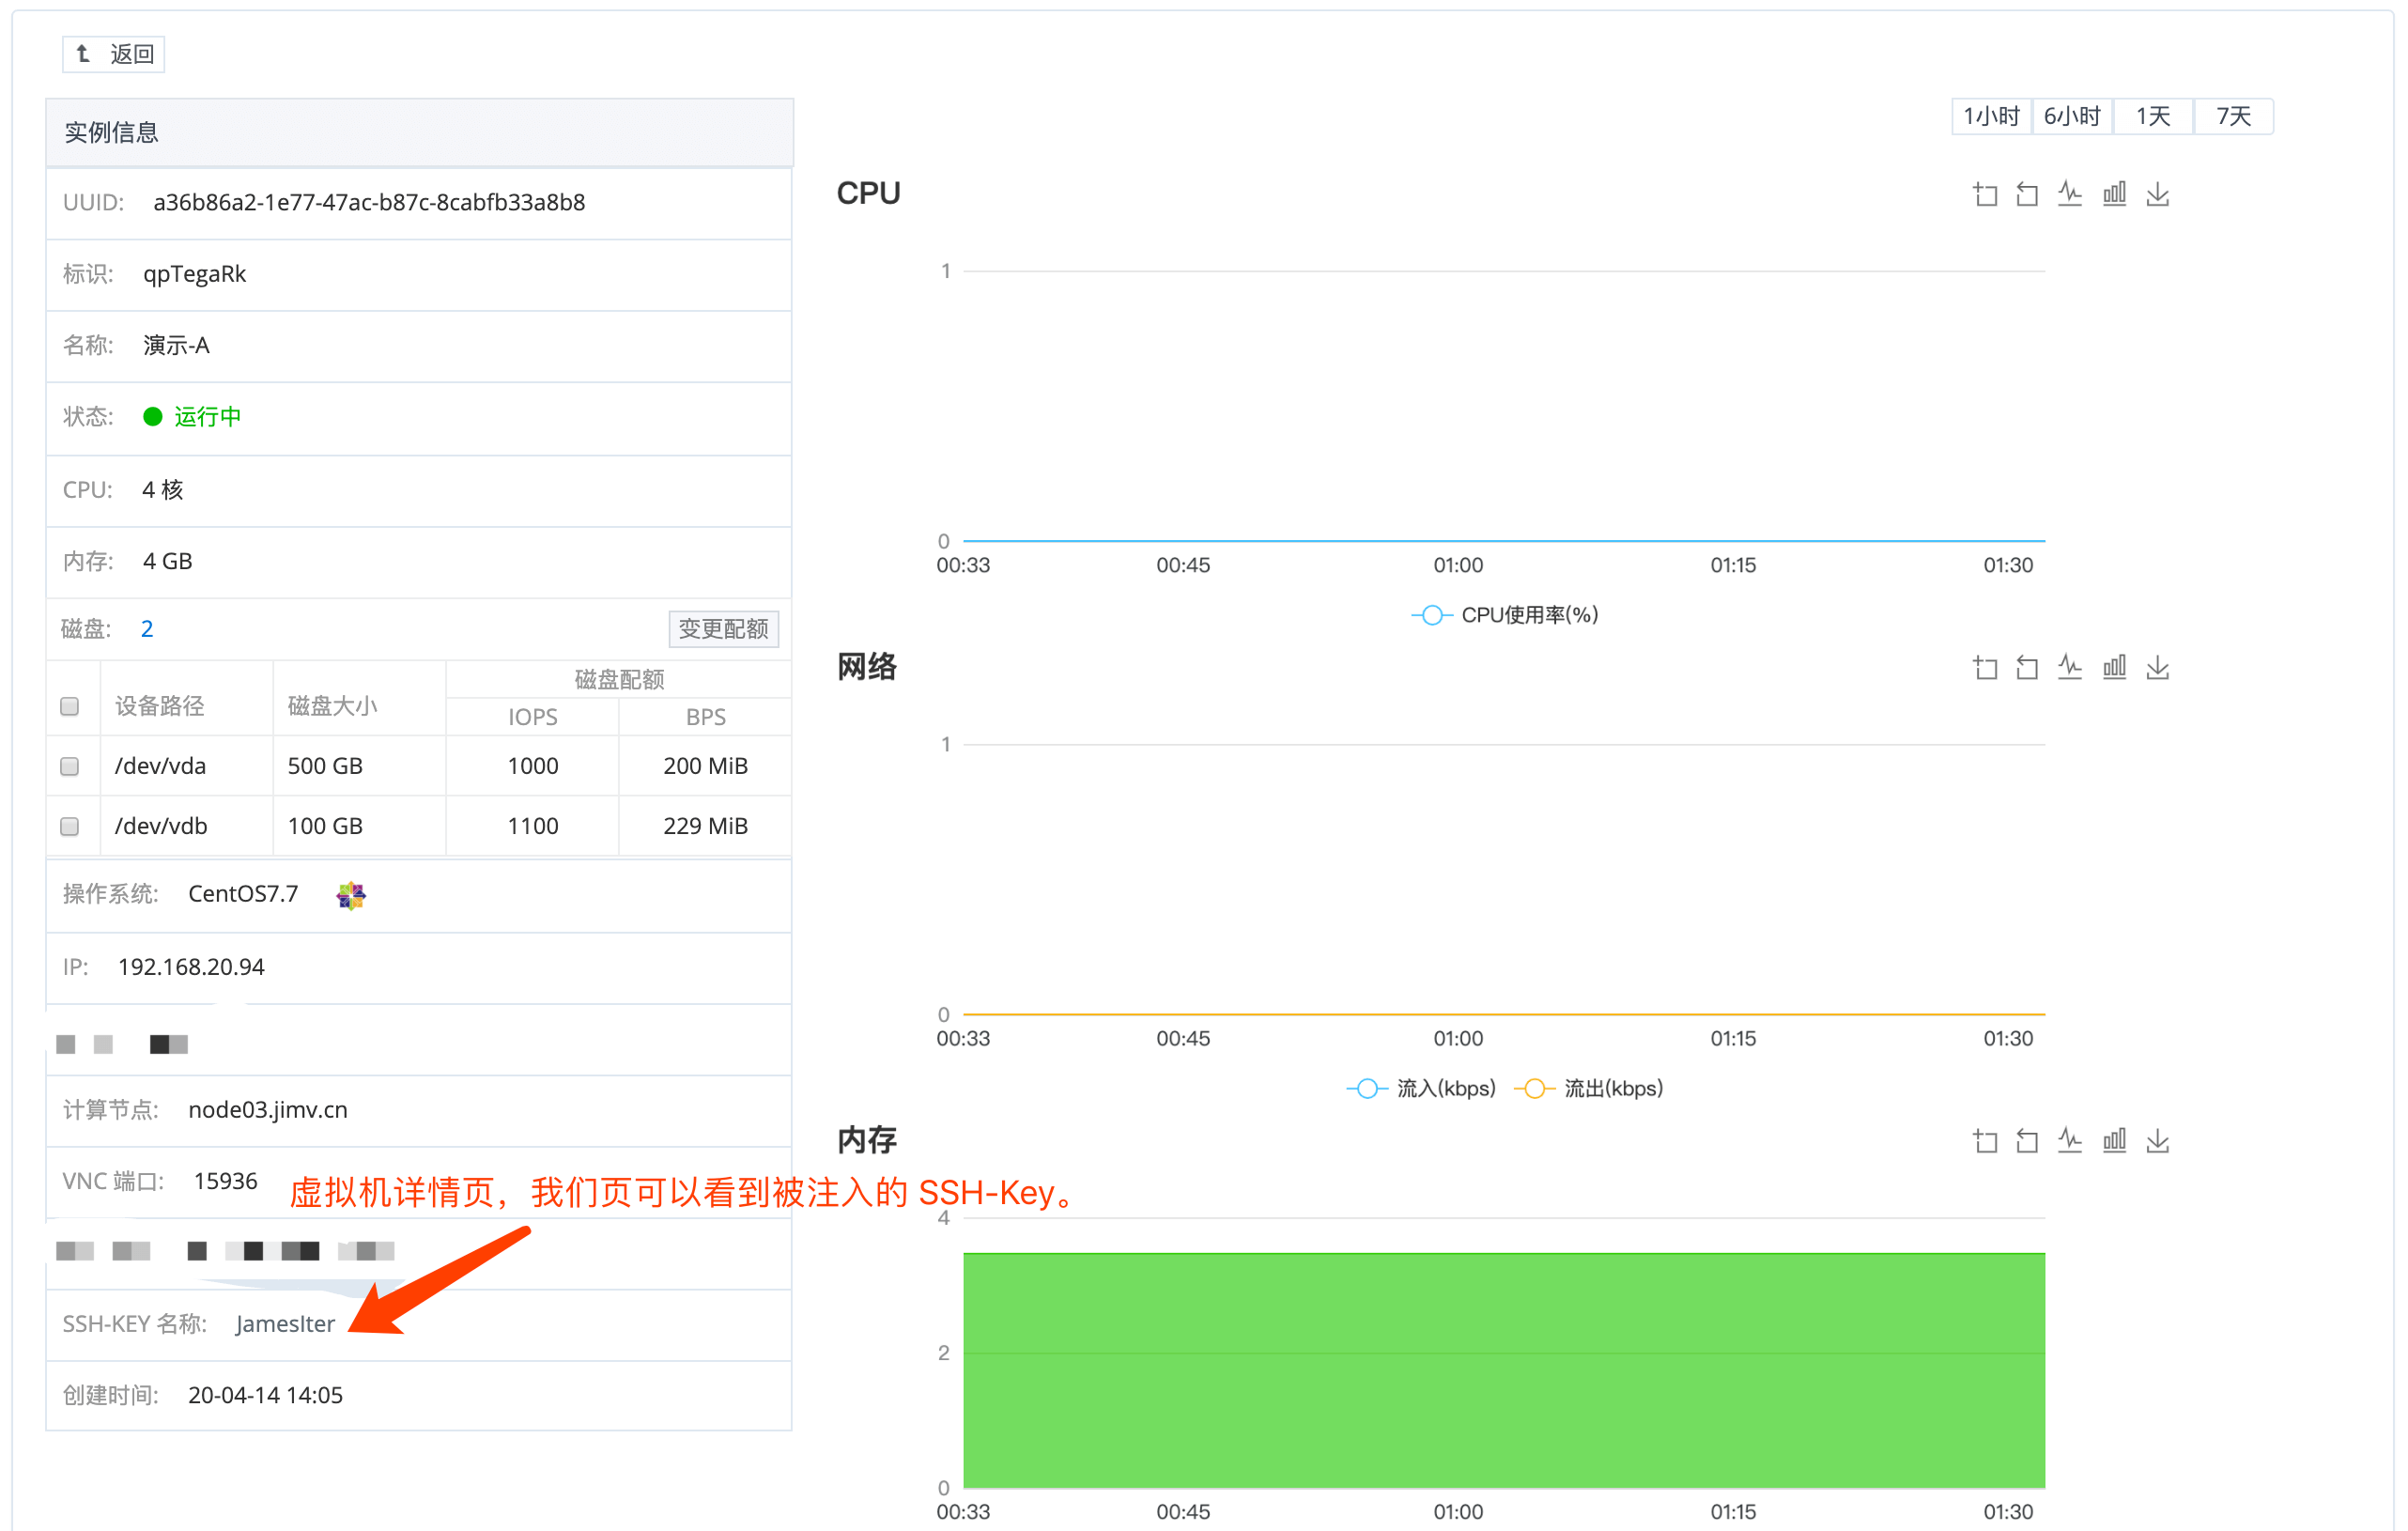
| − | #验证;<br> | + | #验证;<br><img style="max-width: 1170px;" src="https://wiki.jimv.cn/images/操作指南/SSH-KEY-验证.png" /> |
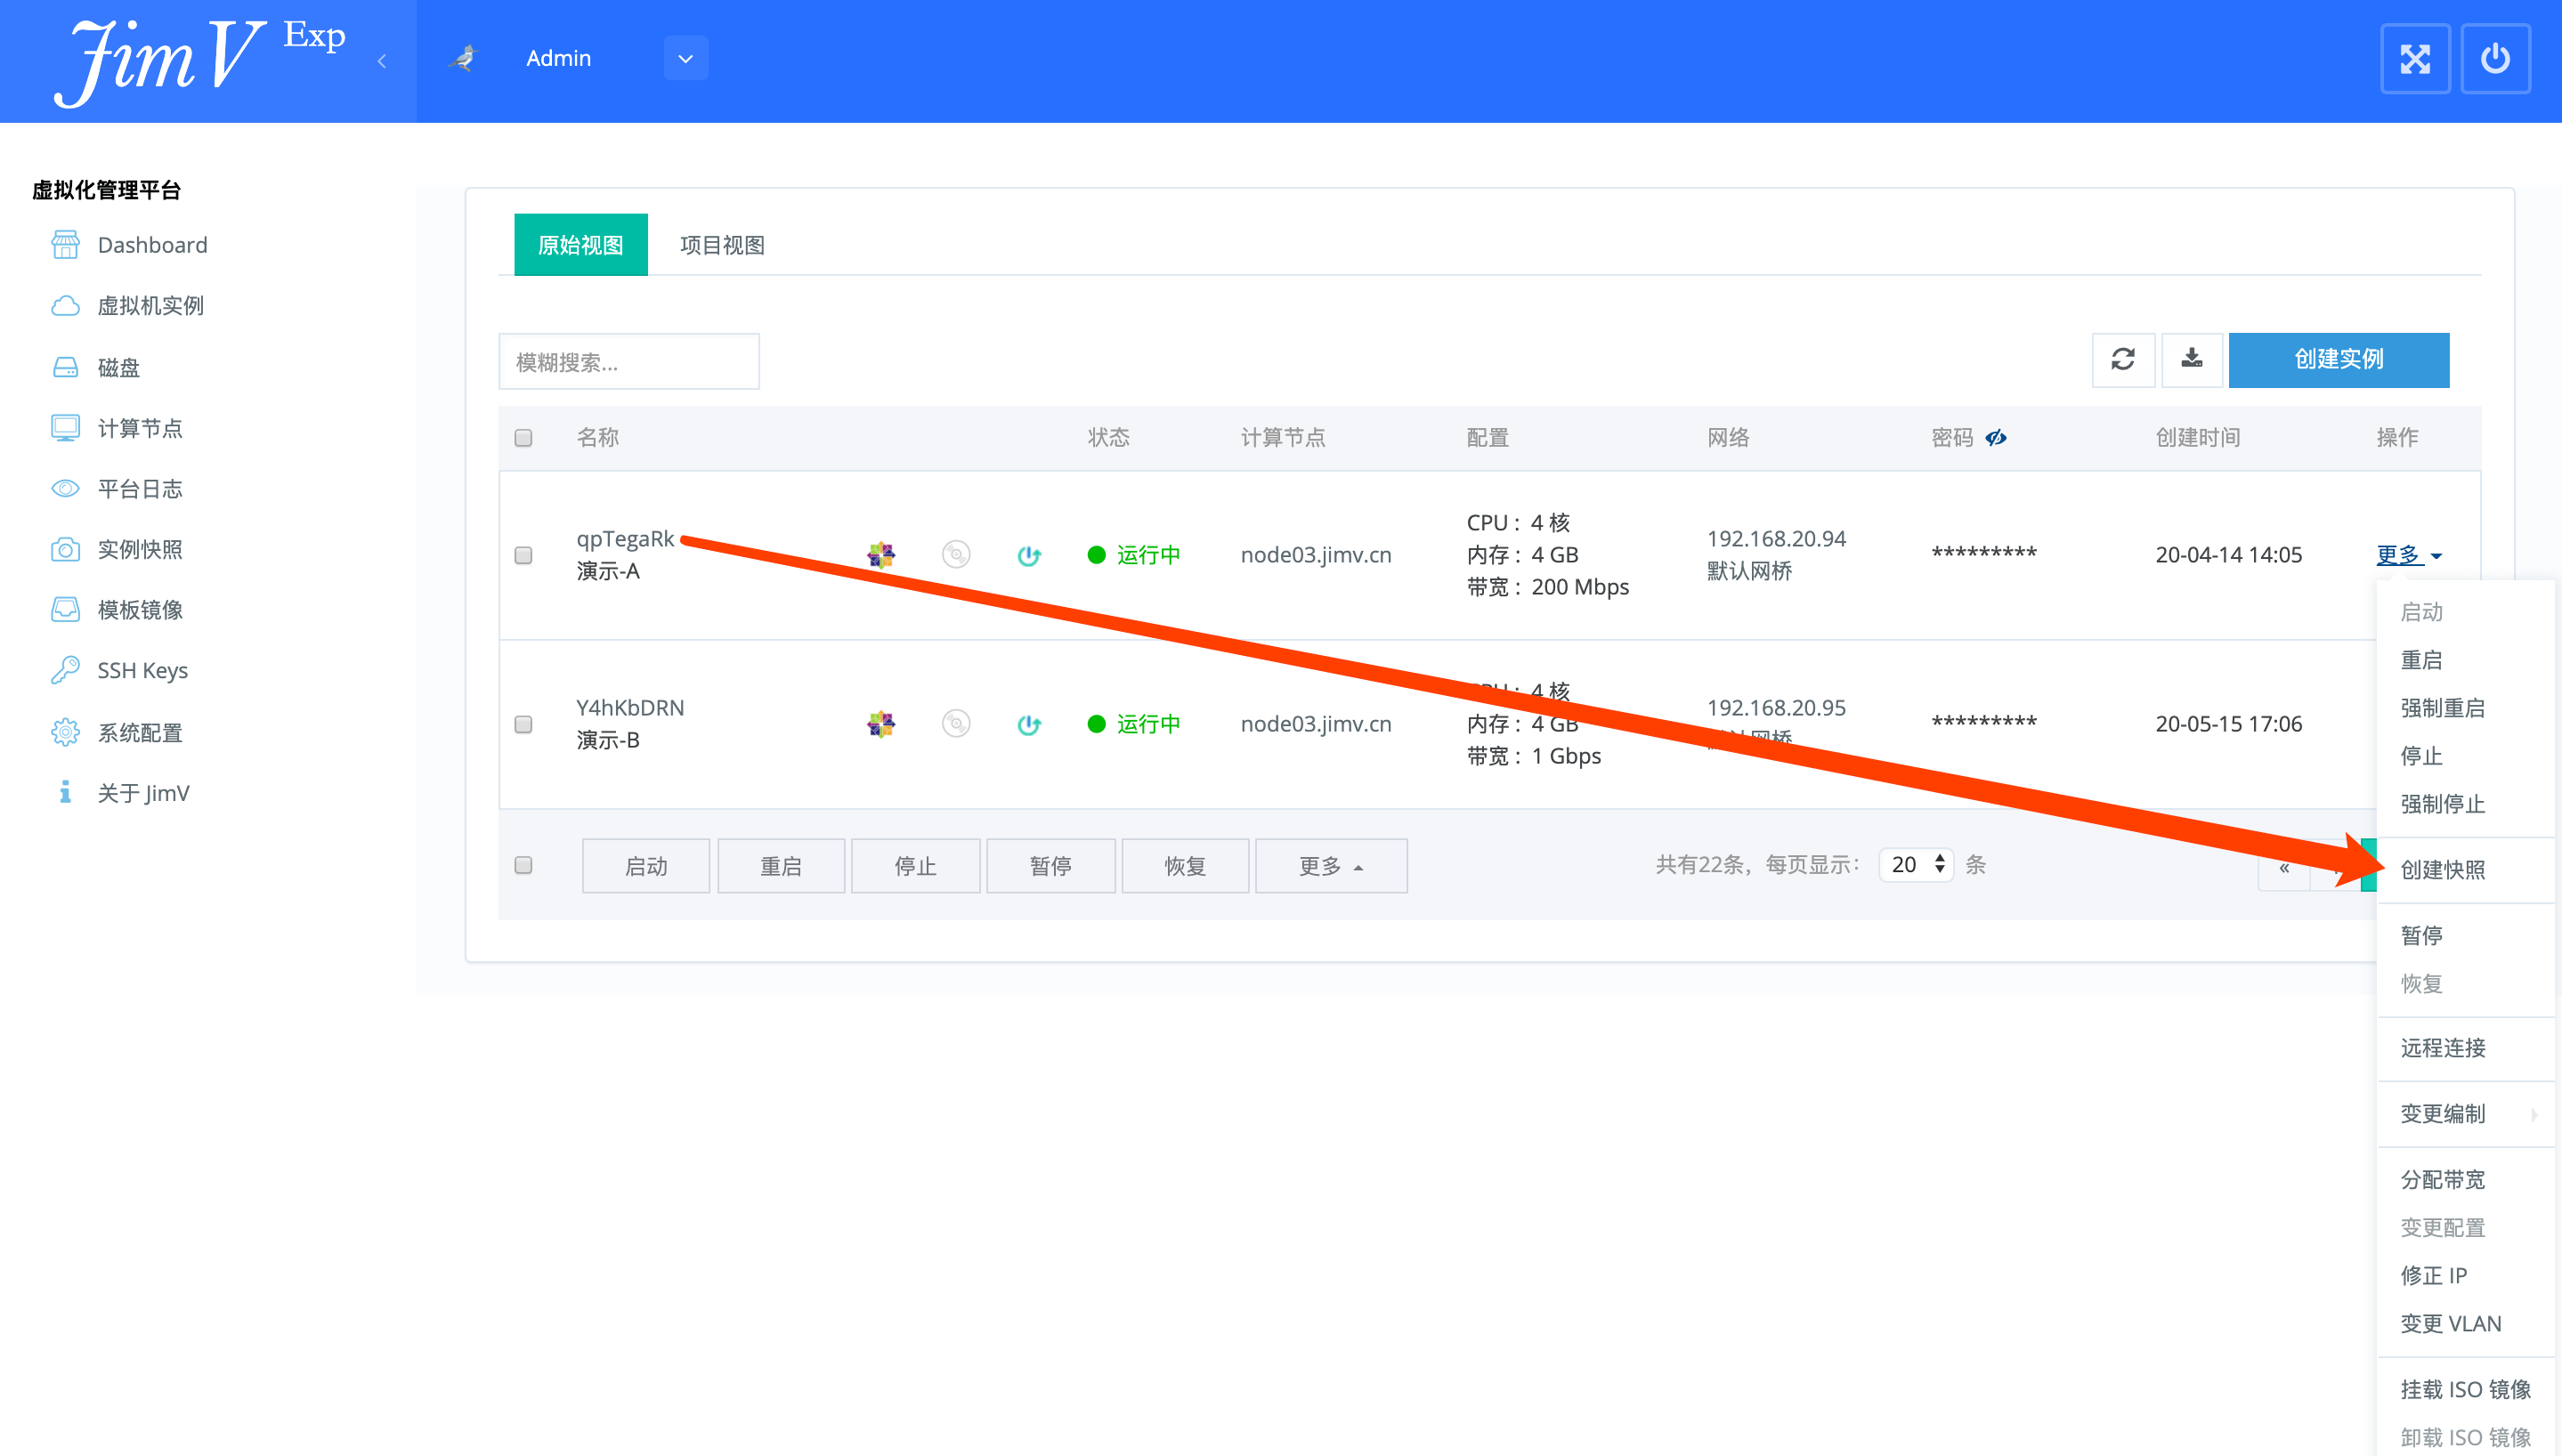
==虚拟机快照== | ==虚拟机快照== | ||
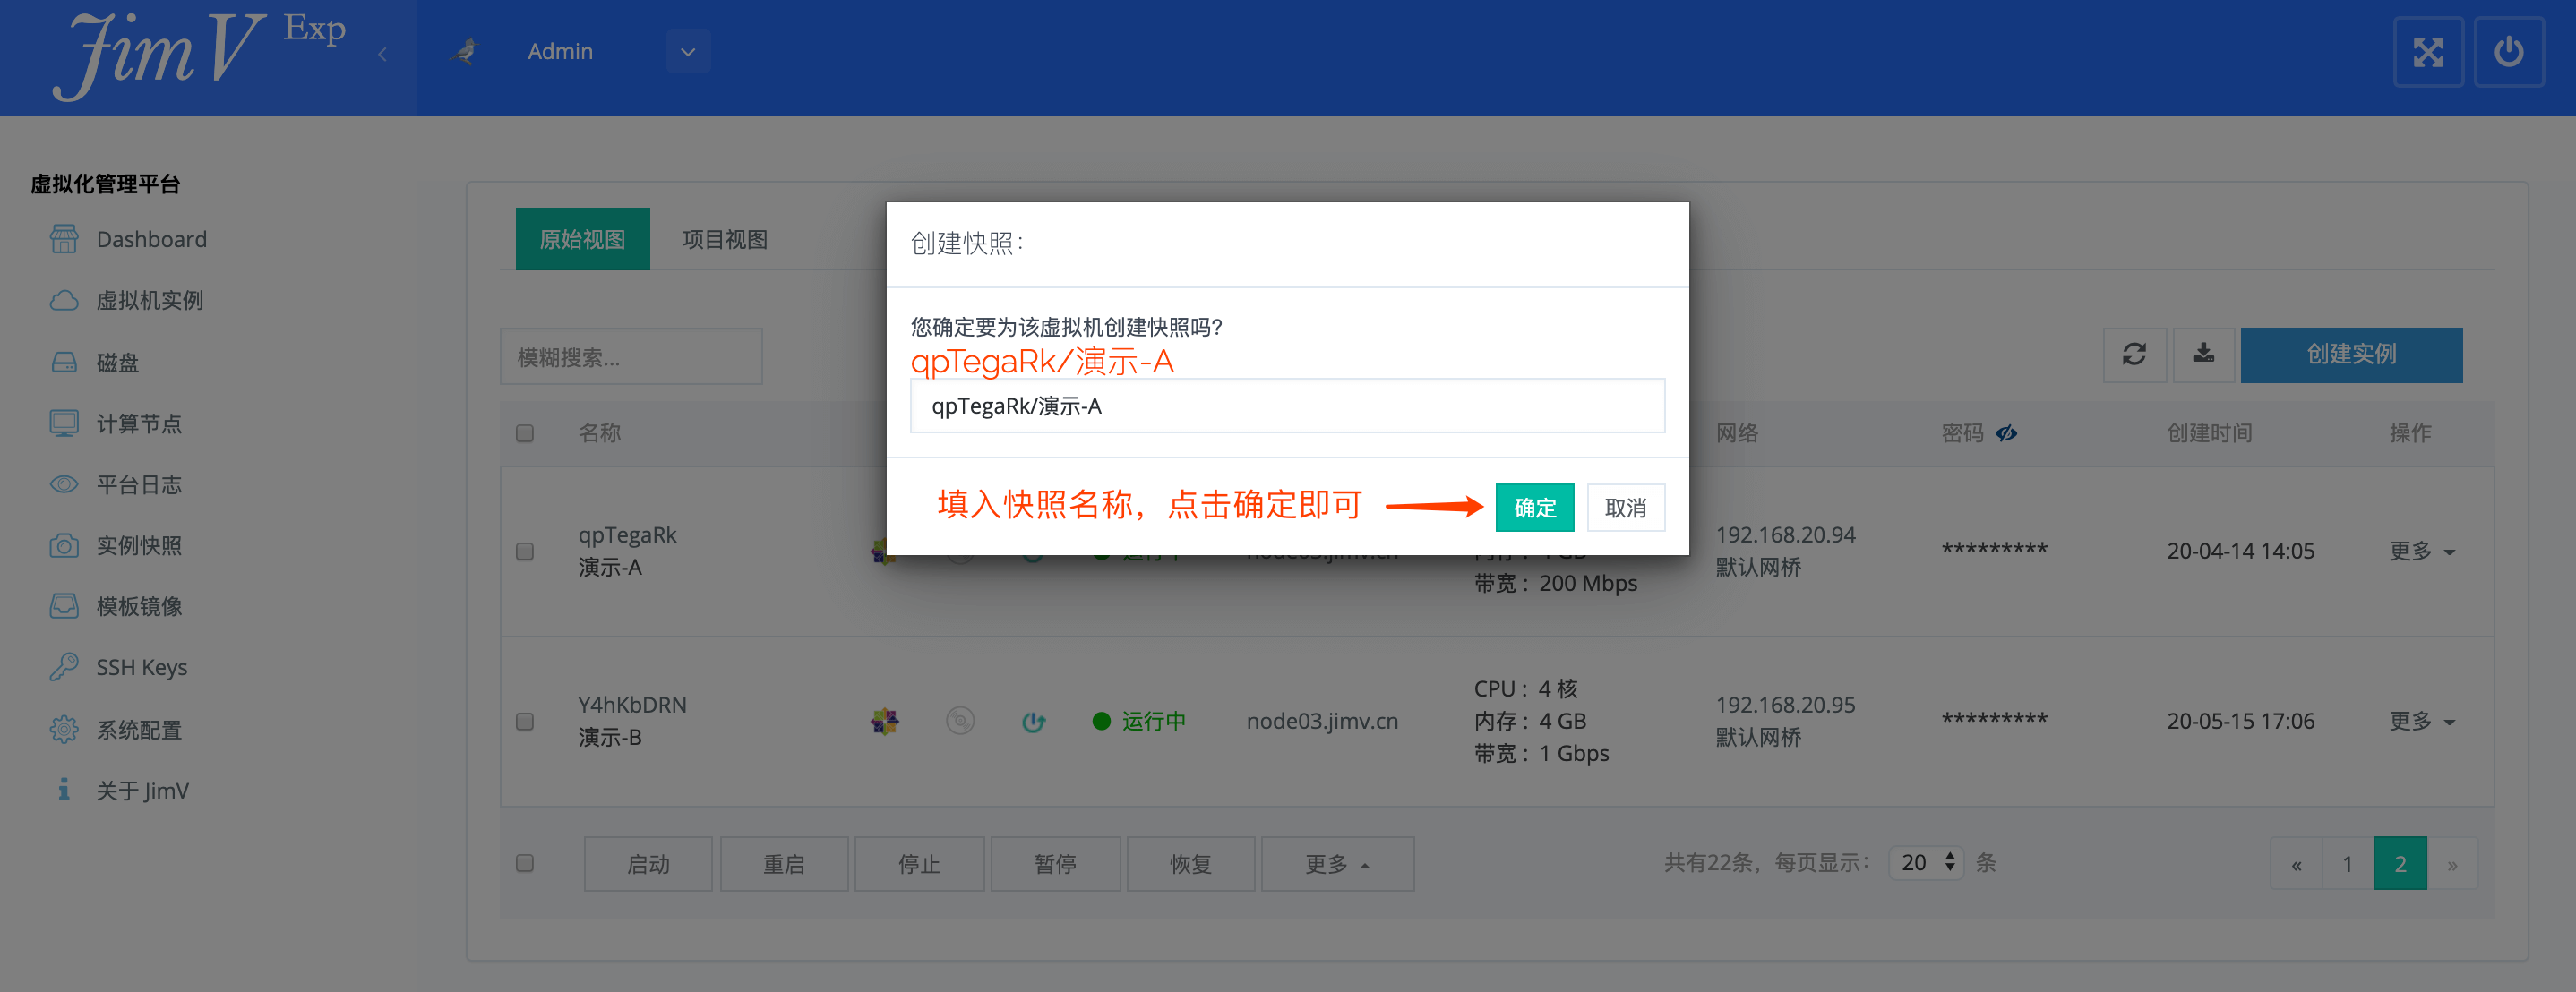
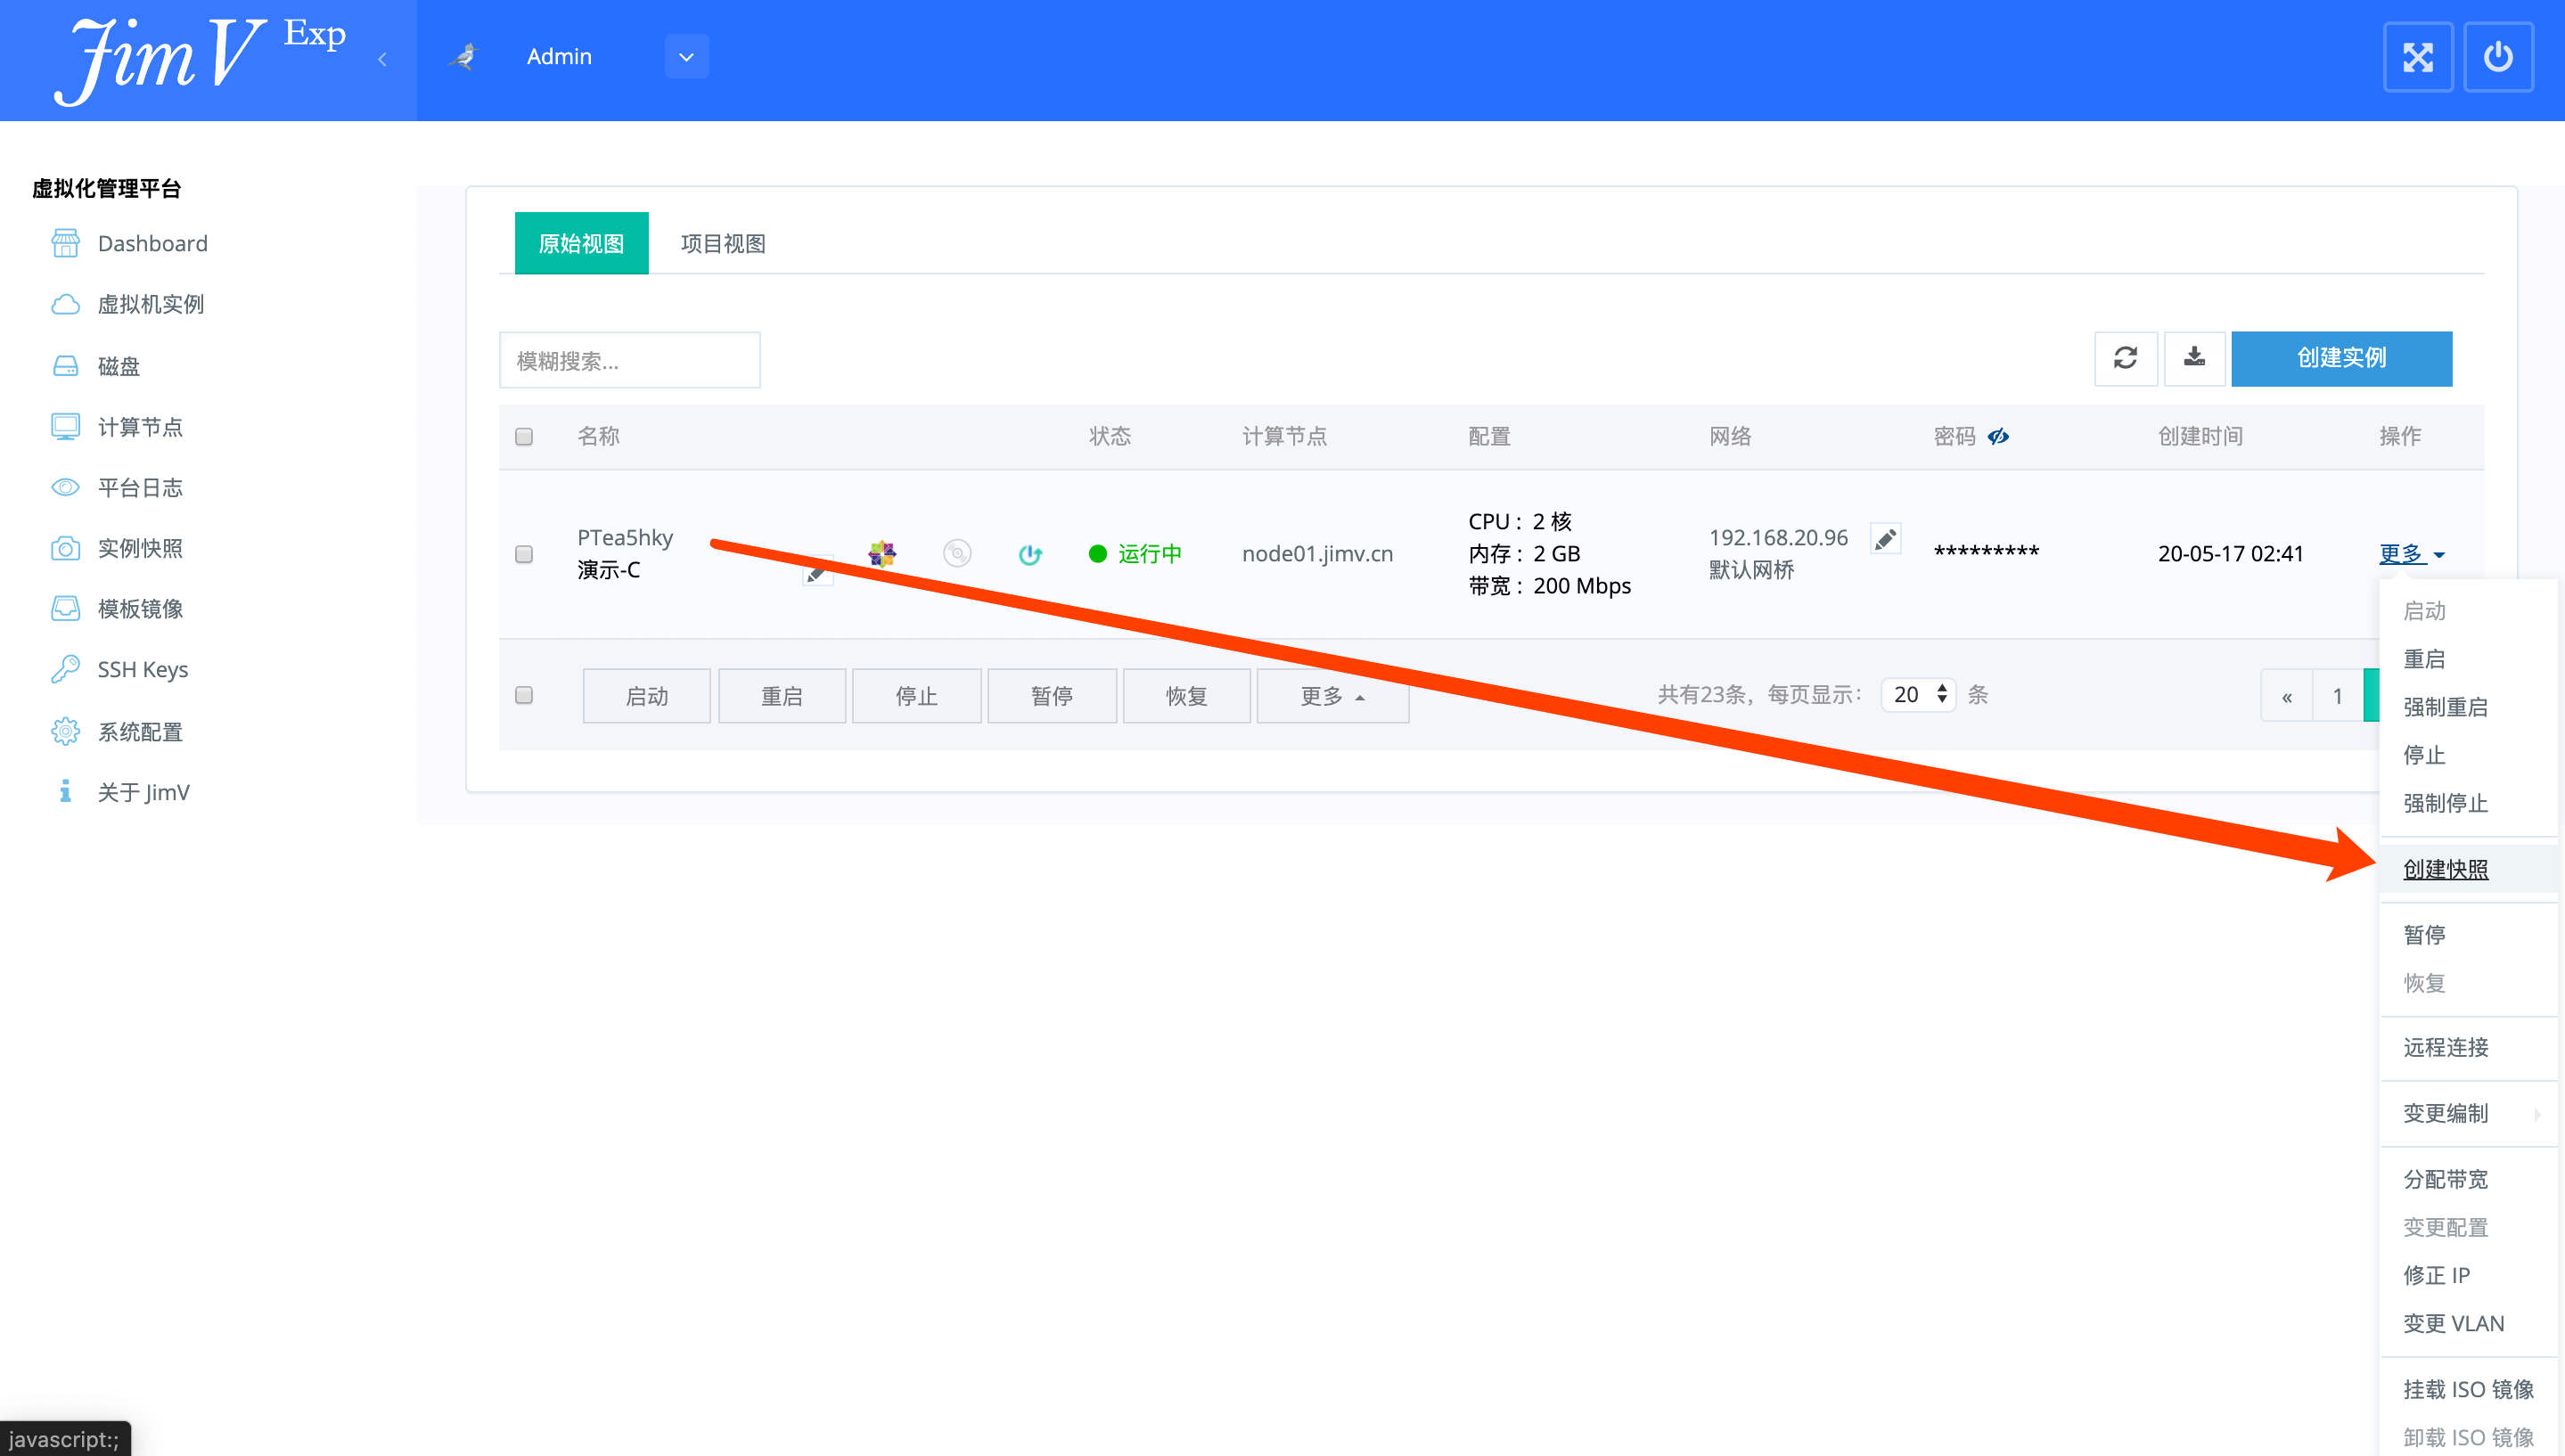
===创建快照=== | ===创建快照=== | ||
| − | * | + | *<img style="max-width: 1170px;" src="https://wiki.jimv.cn/images/操作指南/创建快照.png" /> |
| − | * | + | *<img style="max-width: 1170px;" src="https://wiki.jimv.cn/images/操作指南/创建快照-2.png" /> |
| − | * | + | *<img style="max-width: 1170px;" src="https://wiki.jimv.cn/images/操作指南/创建快照-3.png" /> |
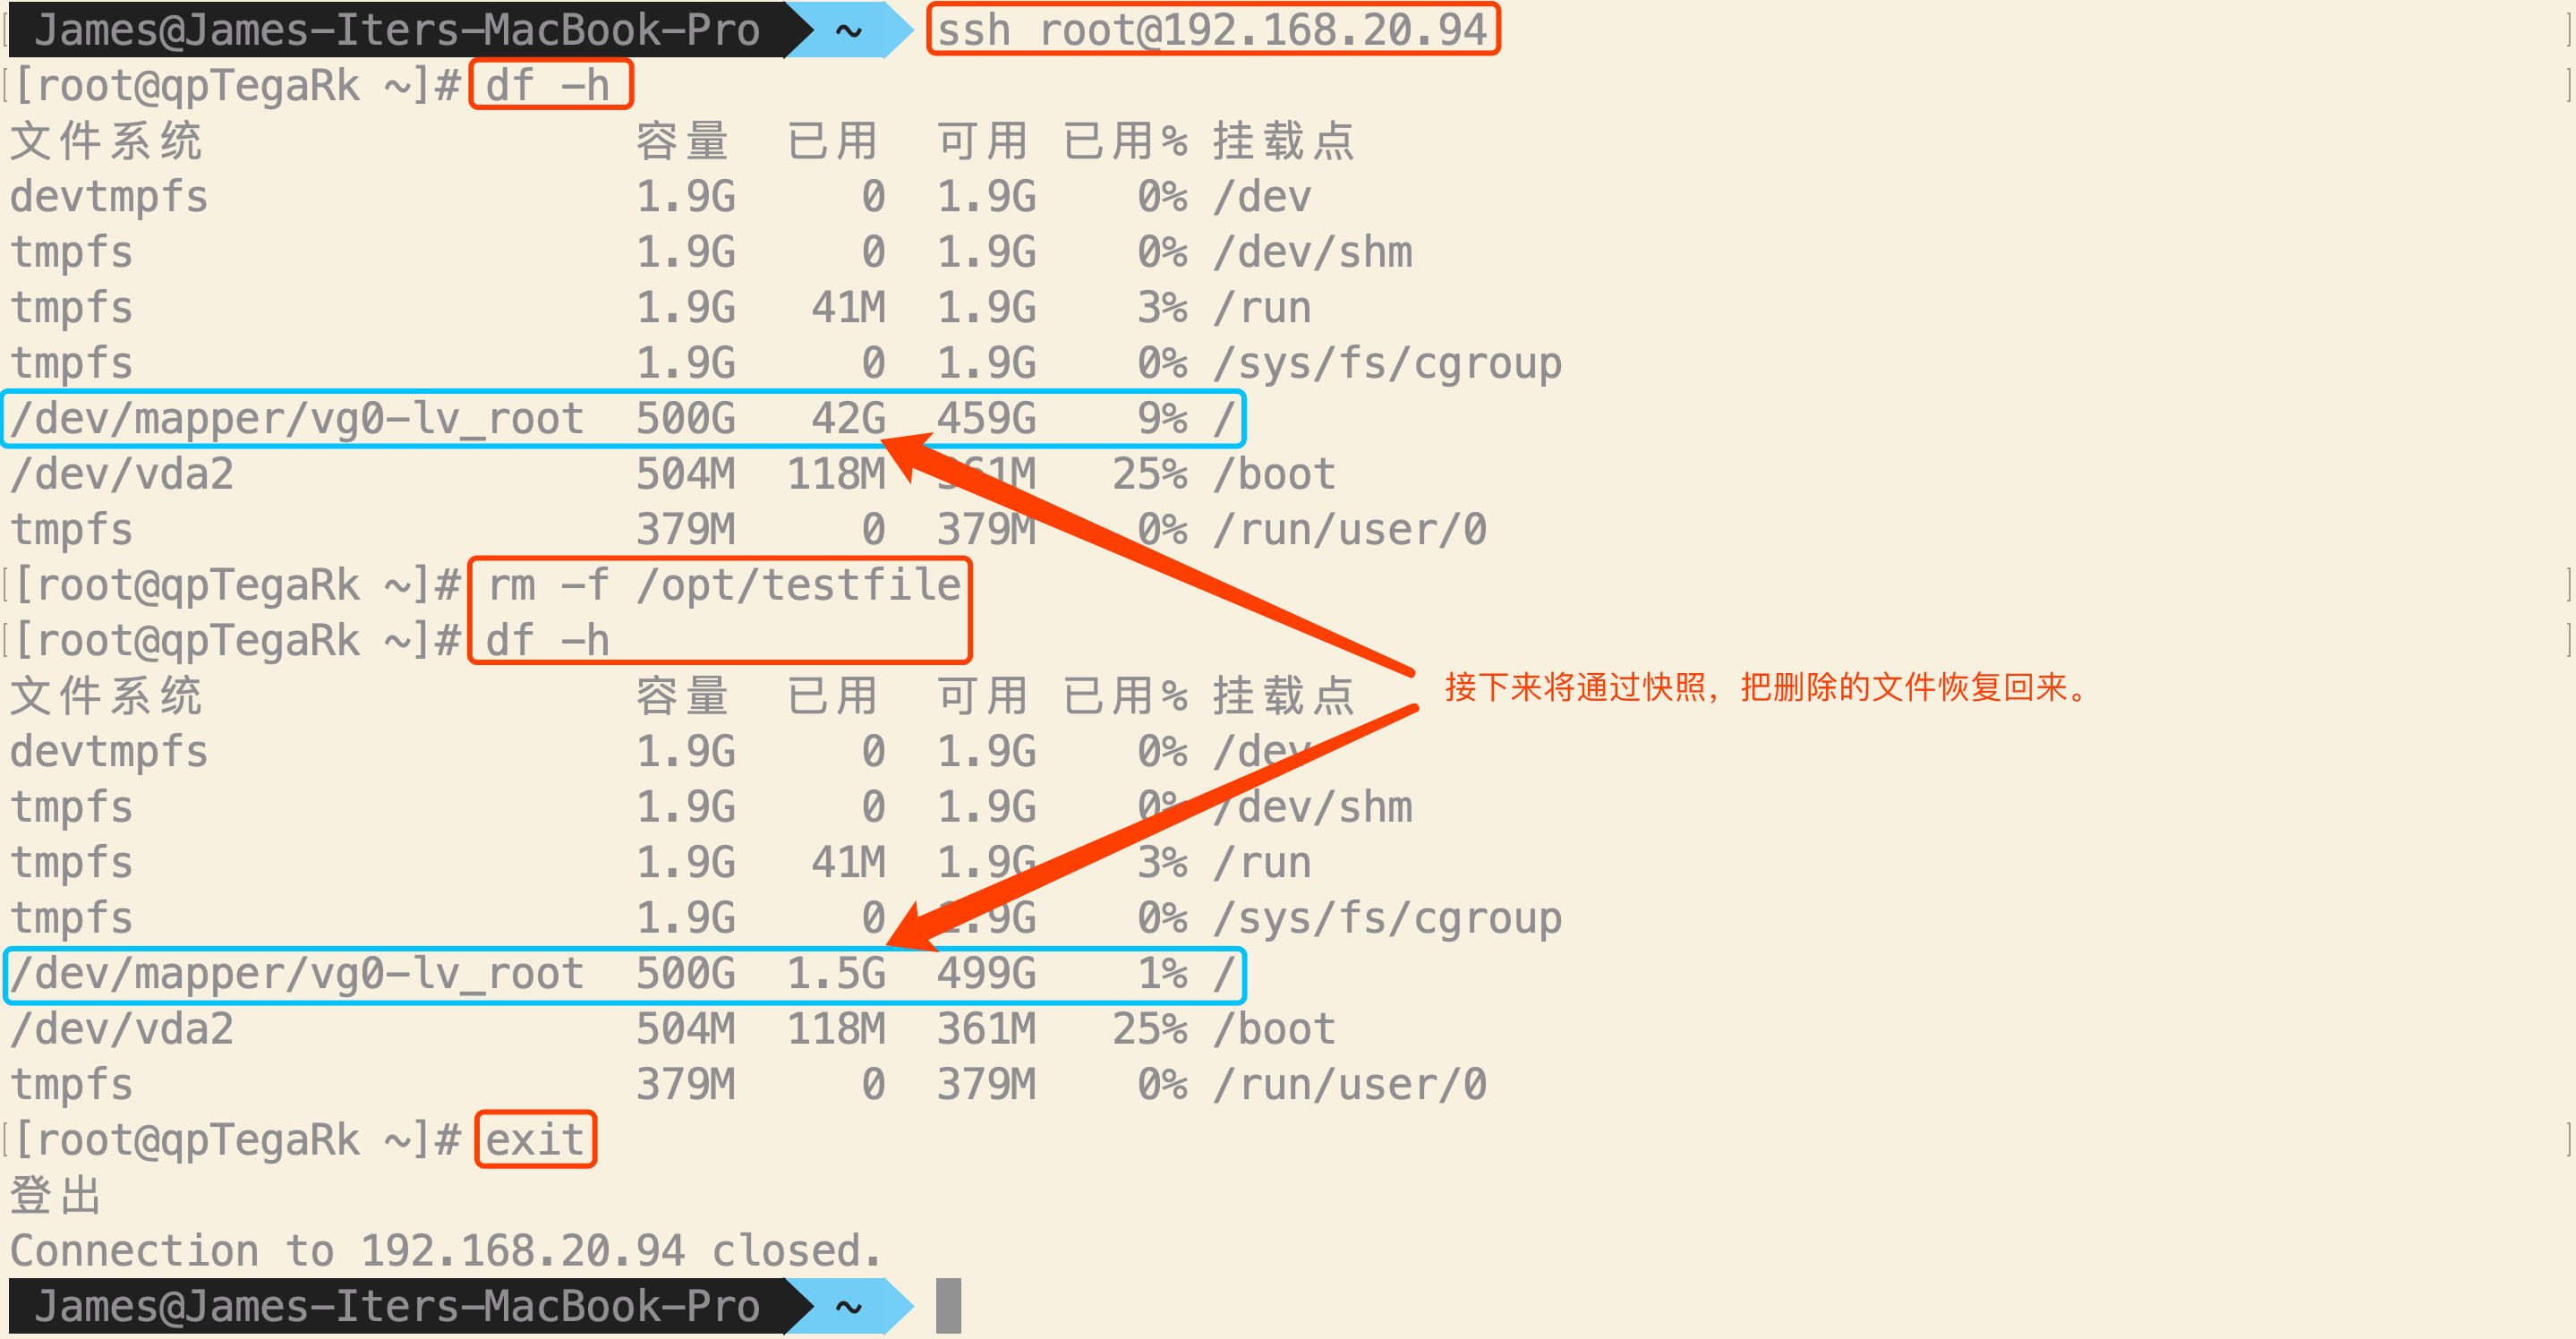
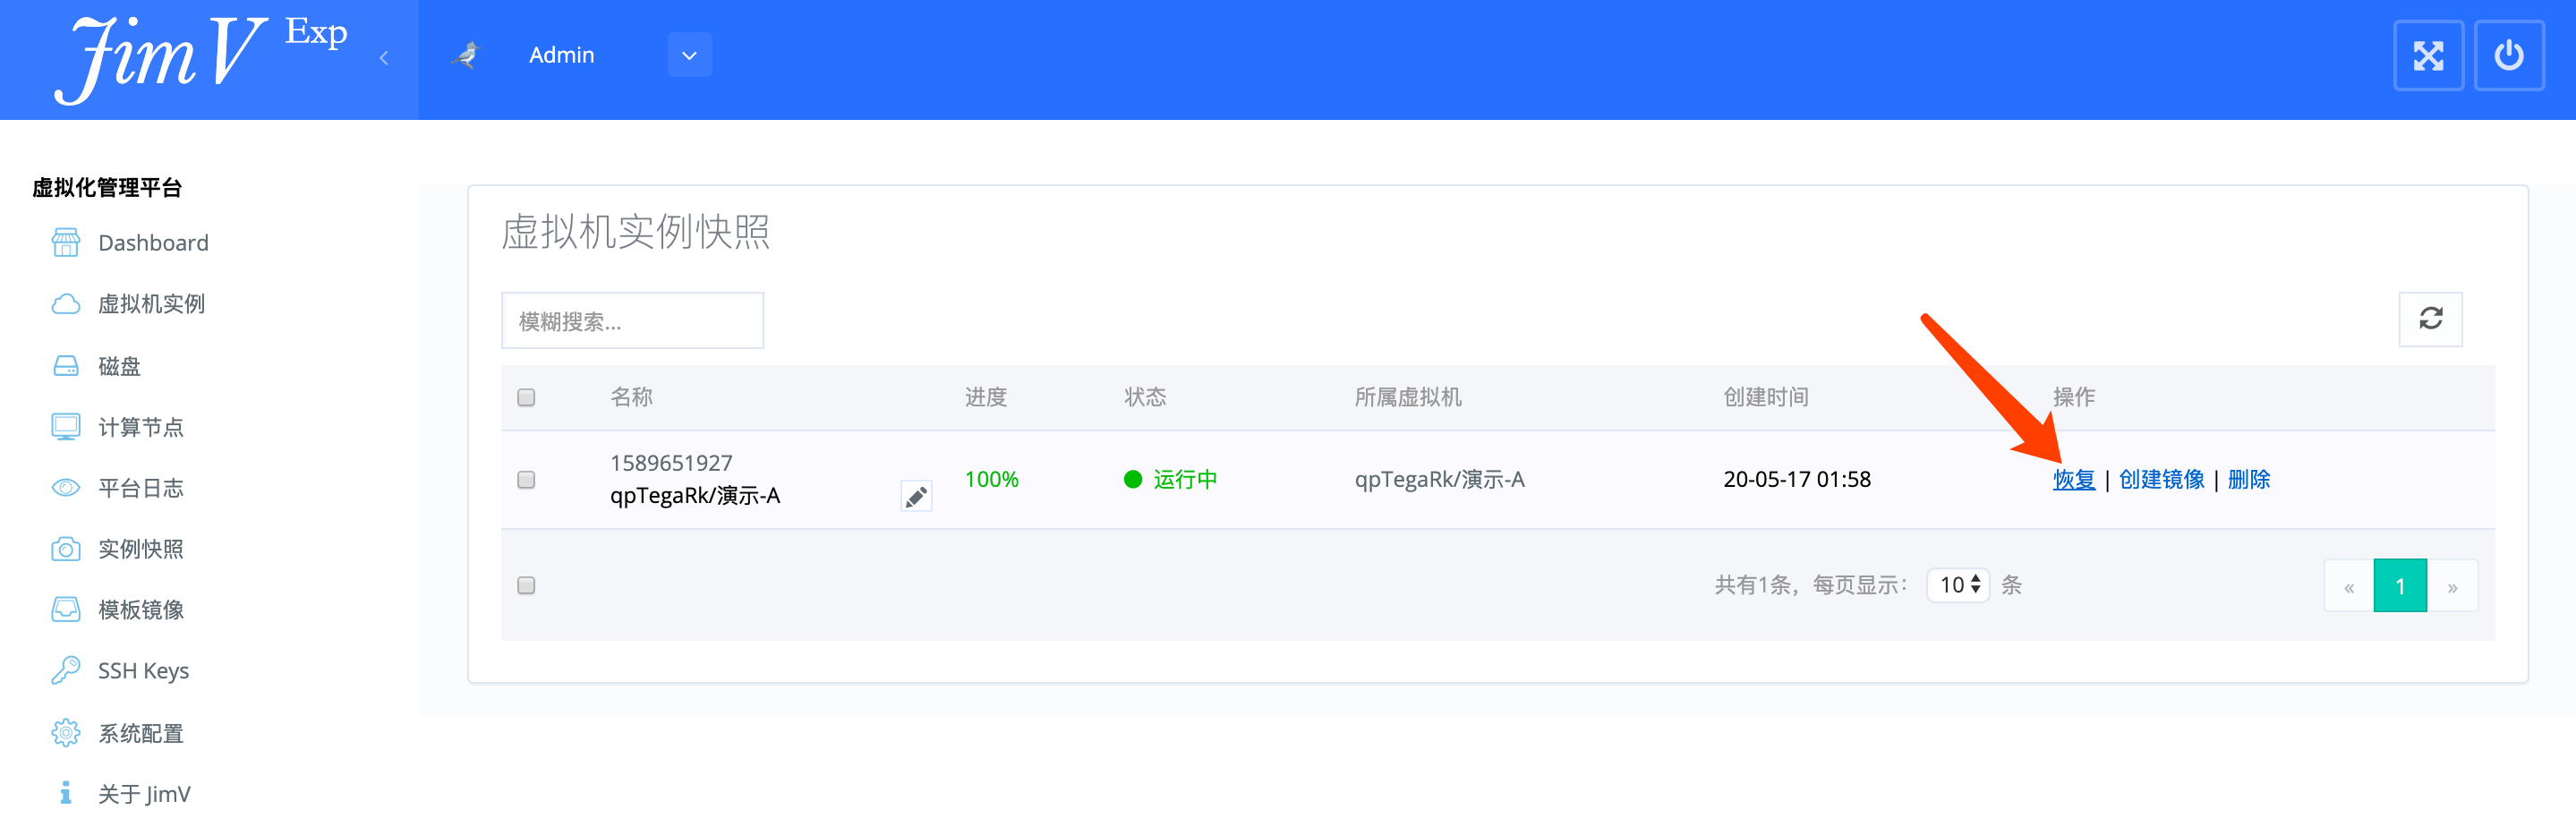
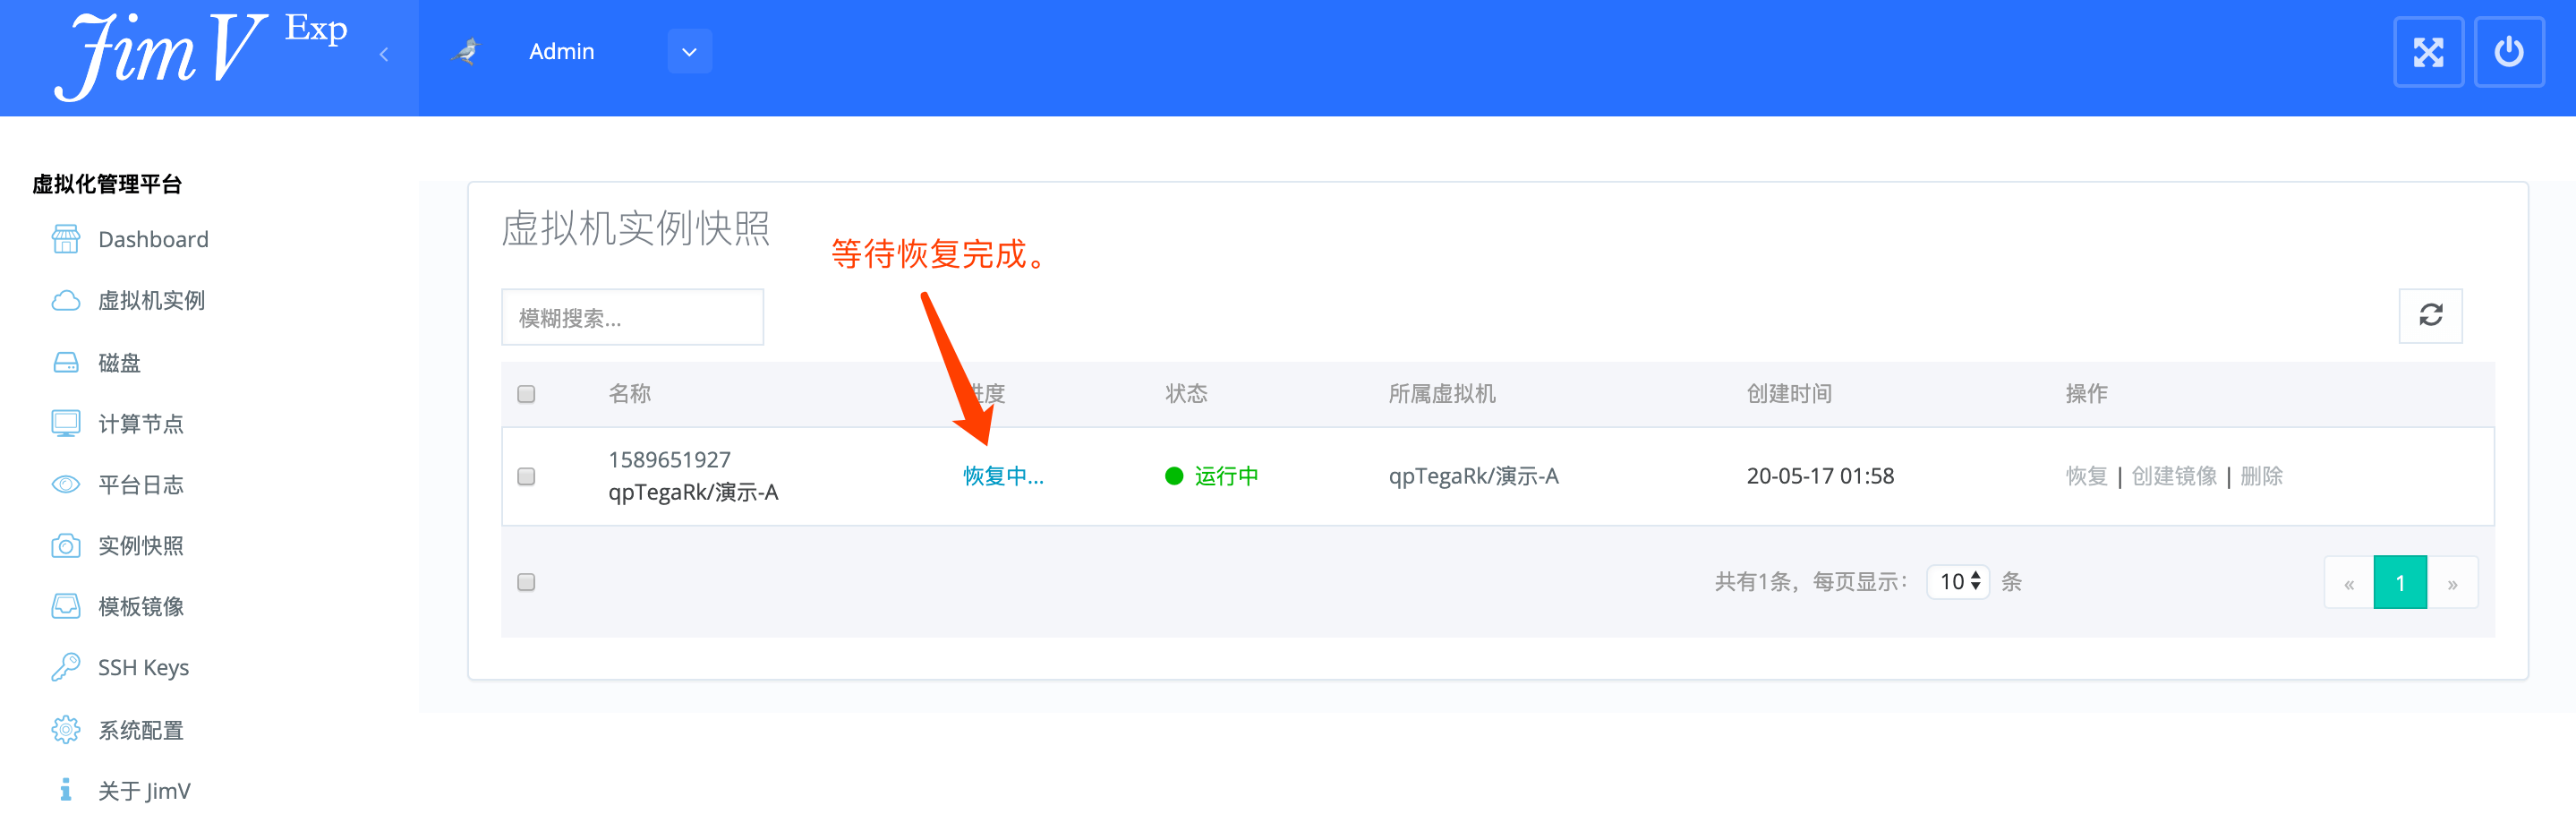
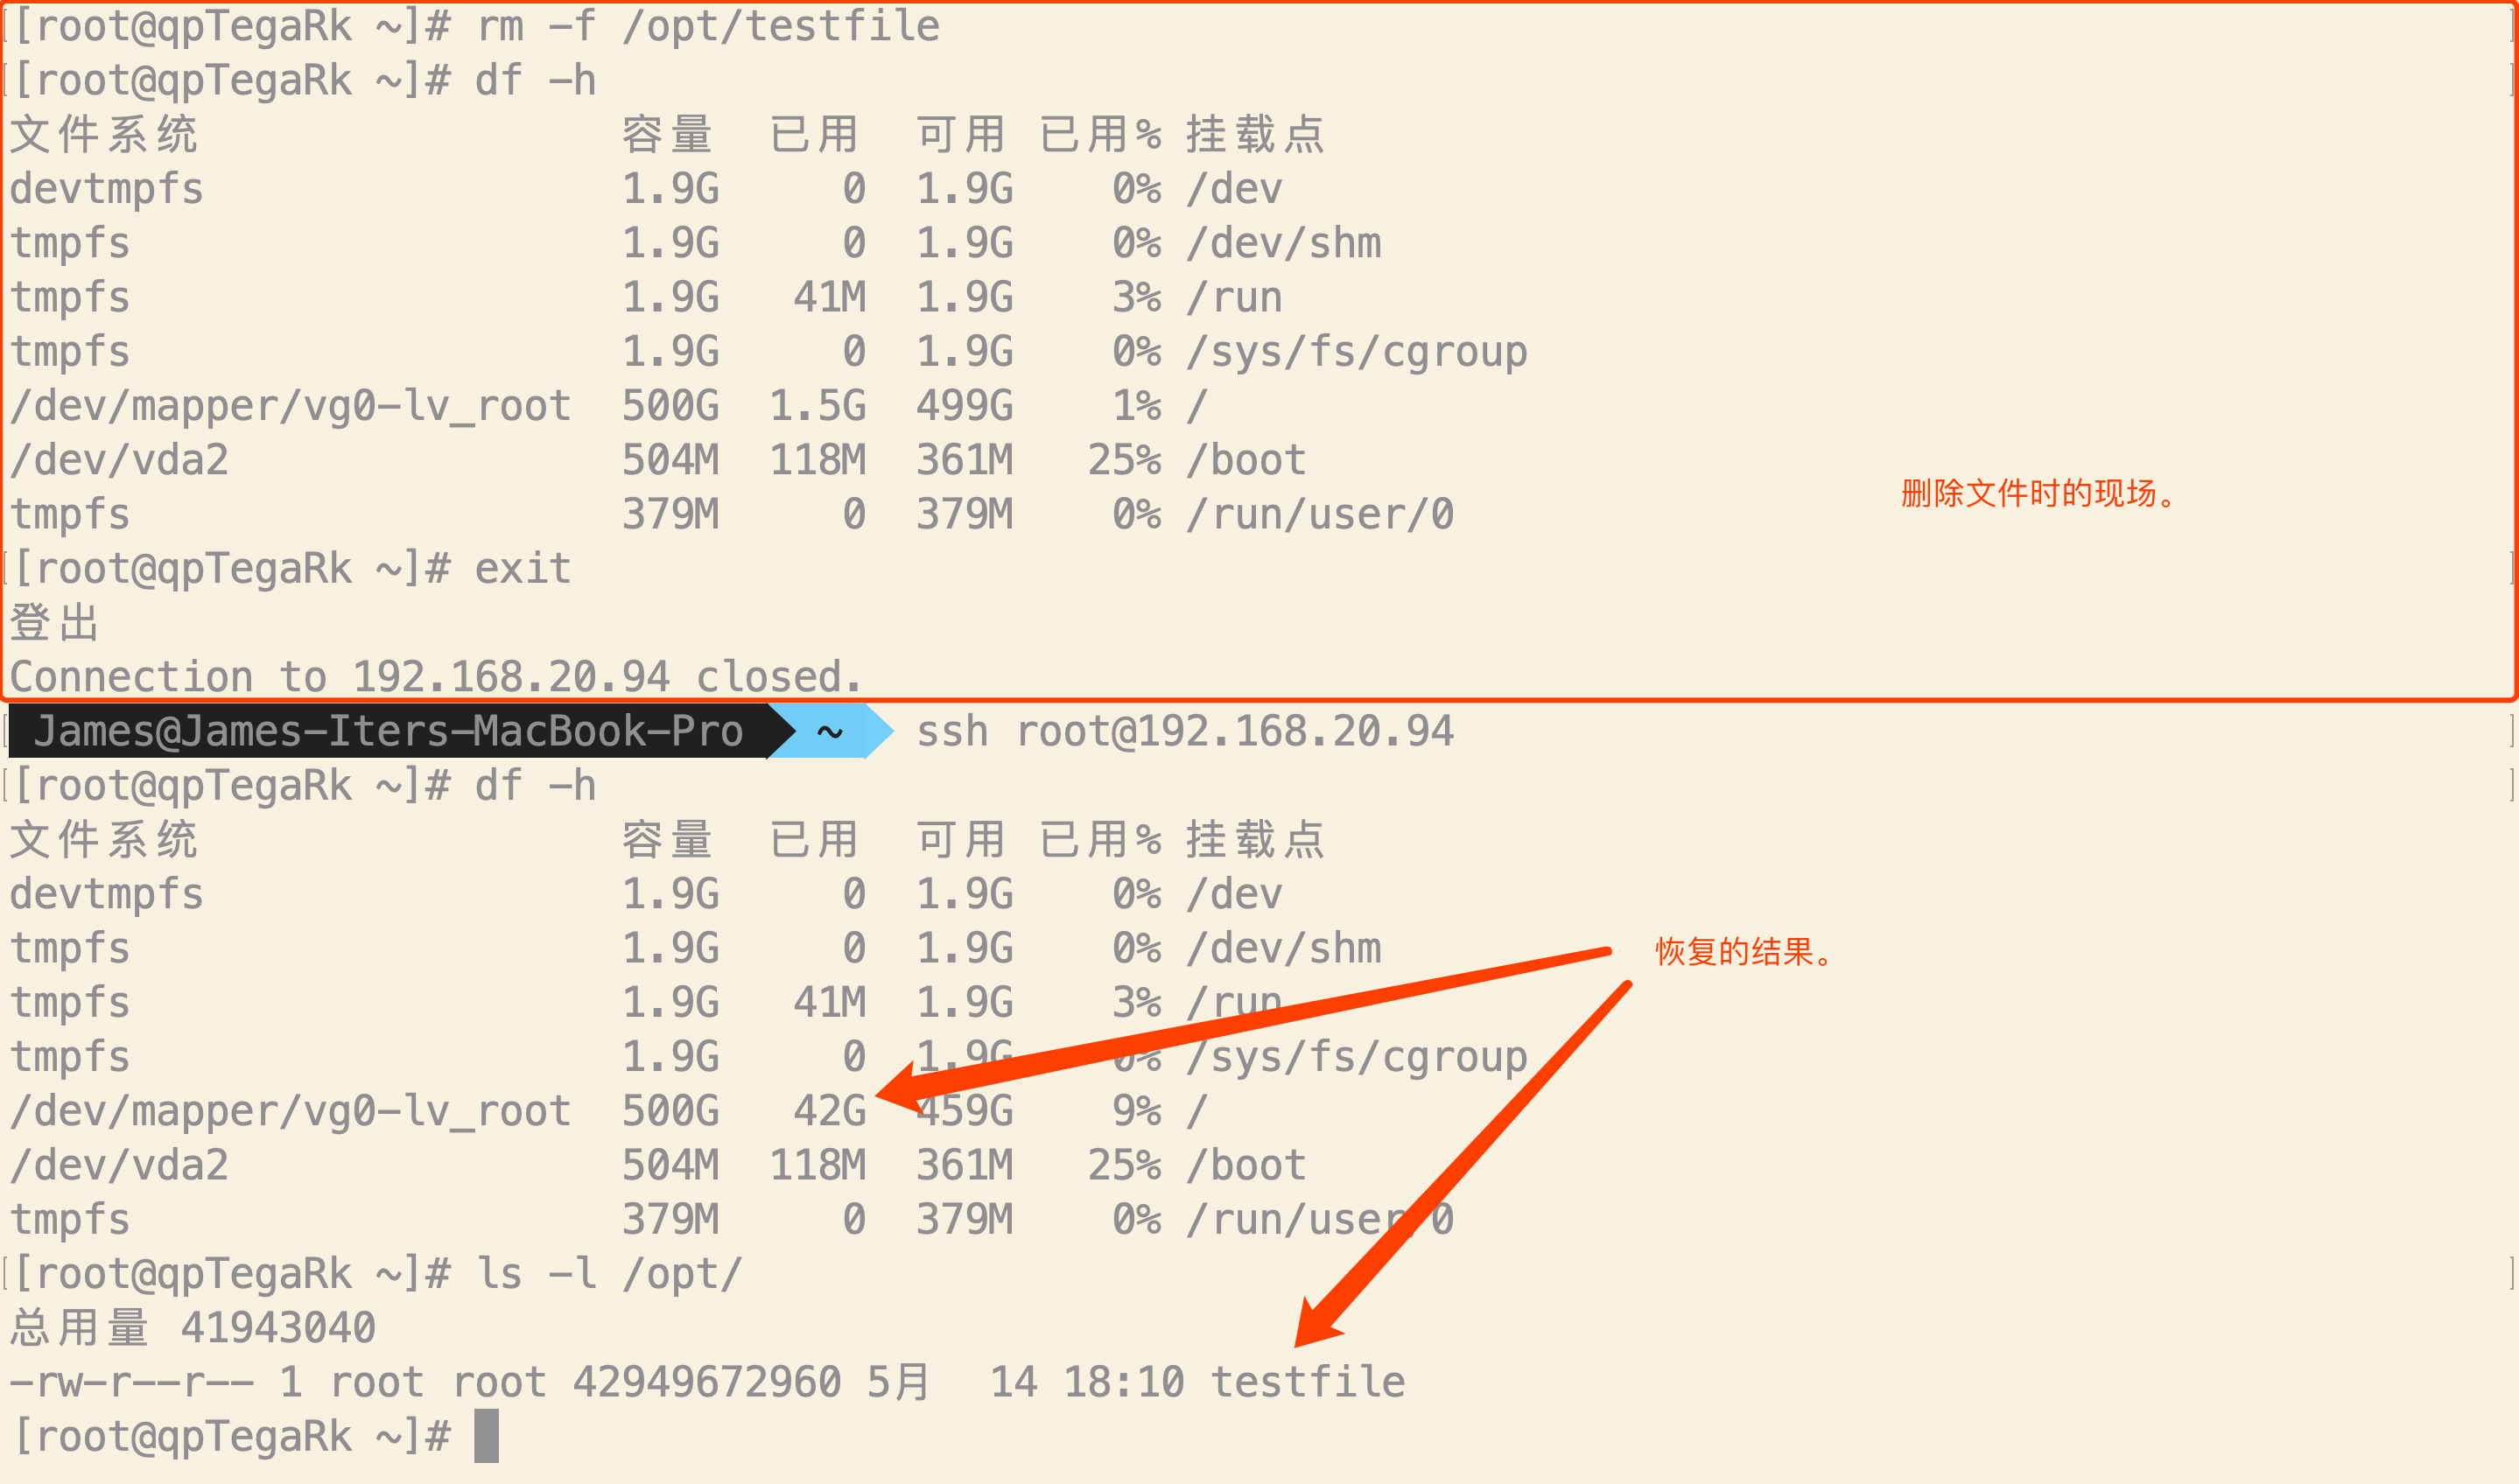
===从快照恢复=== | ===从快照恢复=== | ||
| − | * | + | *<img style="max-width: 1170px;" src="https://wiki.jimv.cn/images/操作指南/快照恢复测试.png" /> |
| − | * | + | *<img style="max-width: 1170px;" src="https://wiki.jimv.cn/images/操作指南/快照恢复测试-2.png" /> |
| − | * | + | *<img style="max-width: 1170px;" src="https://wiki.jimv.cn/images/操作指南/快照恢复测试-3.png" /> |
| − | * | + | *<img style="max-width: 1170px;" src="https://wiki.jimv.cn/images/操作指南/快照恢复测试-4.png" /> |
| − | * | + | *<img style="max-width: 1170px;" src="https://wiki.jimv.cn/images/操作指南/快照恢复测试-5.png" /> |
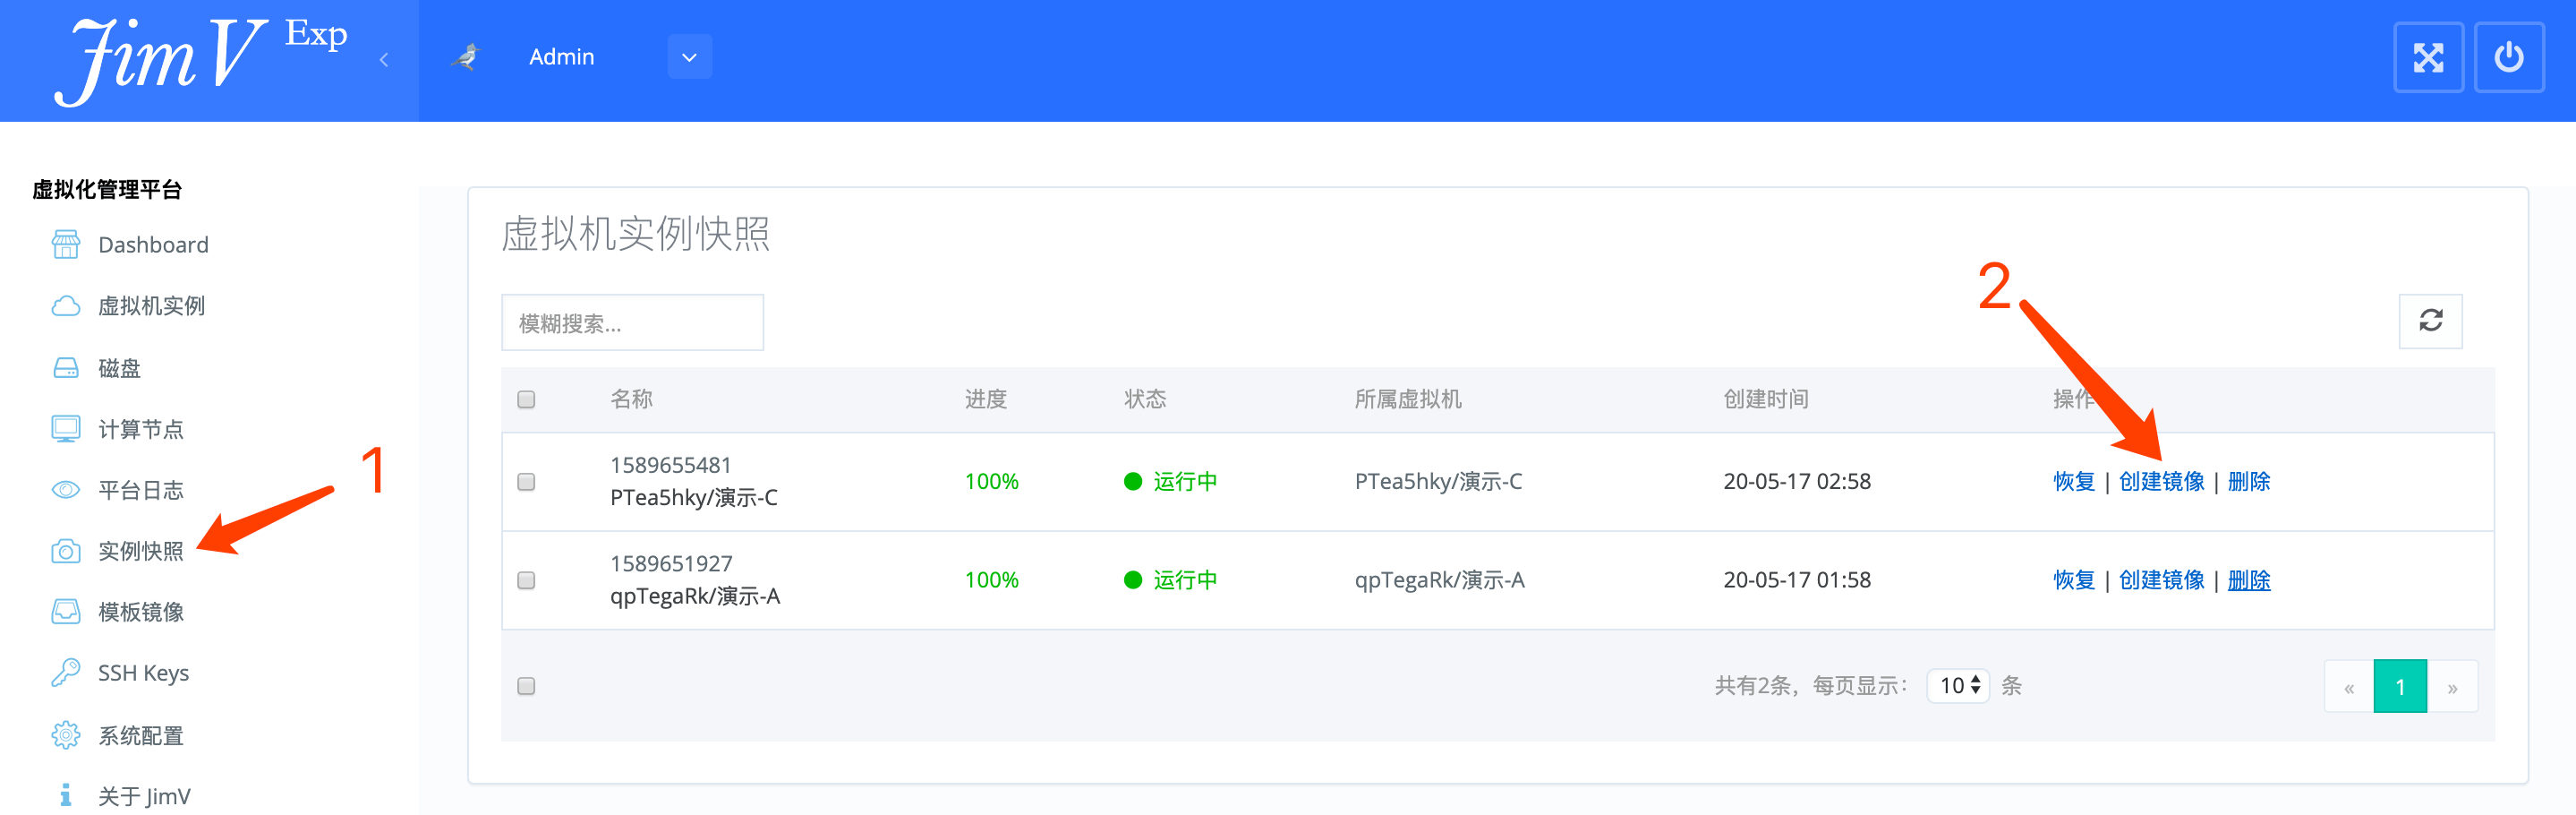
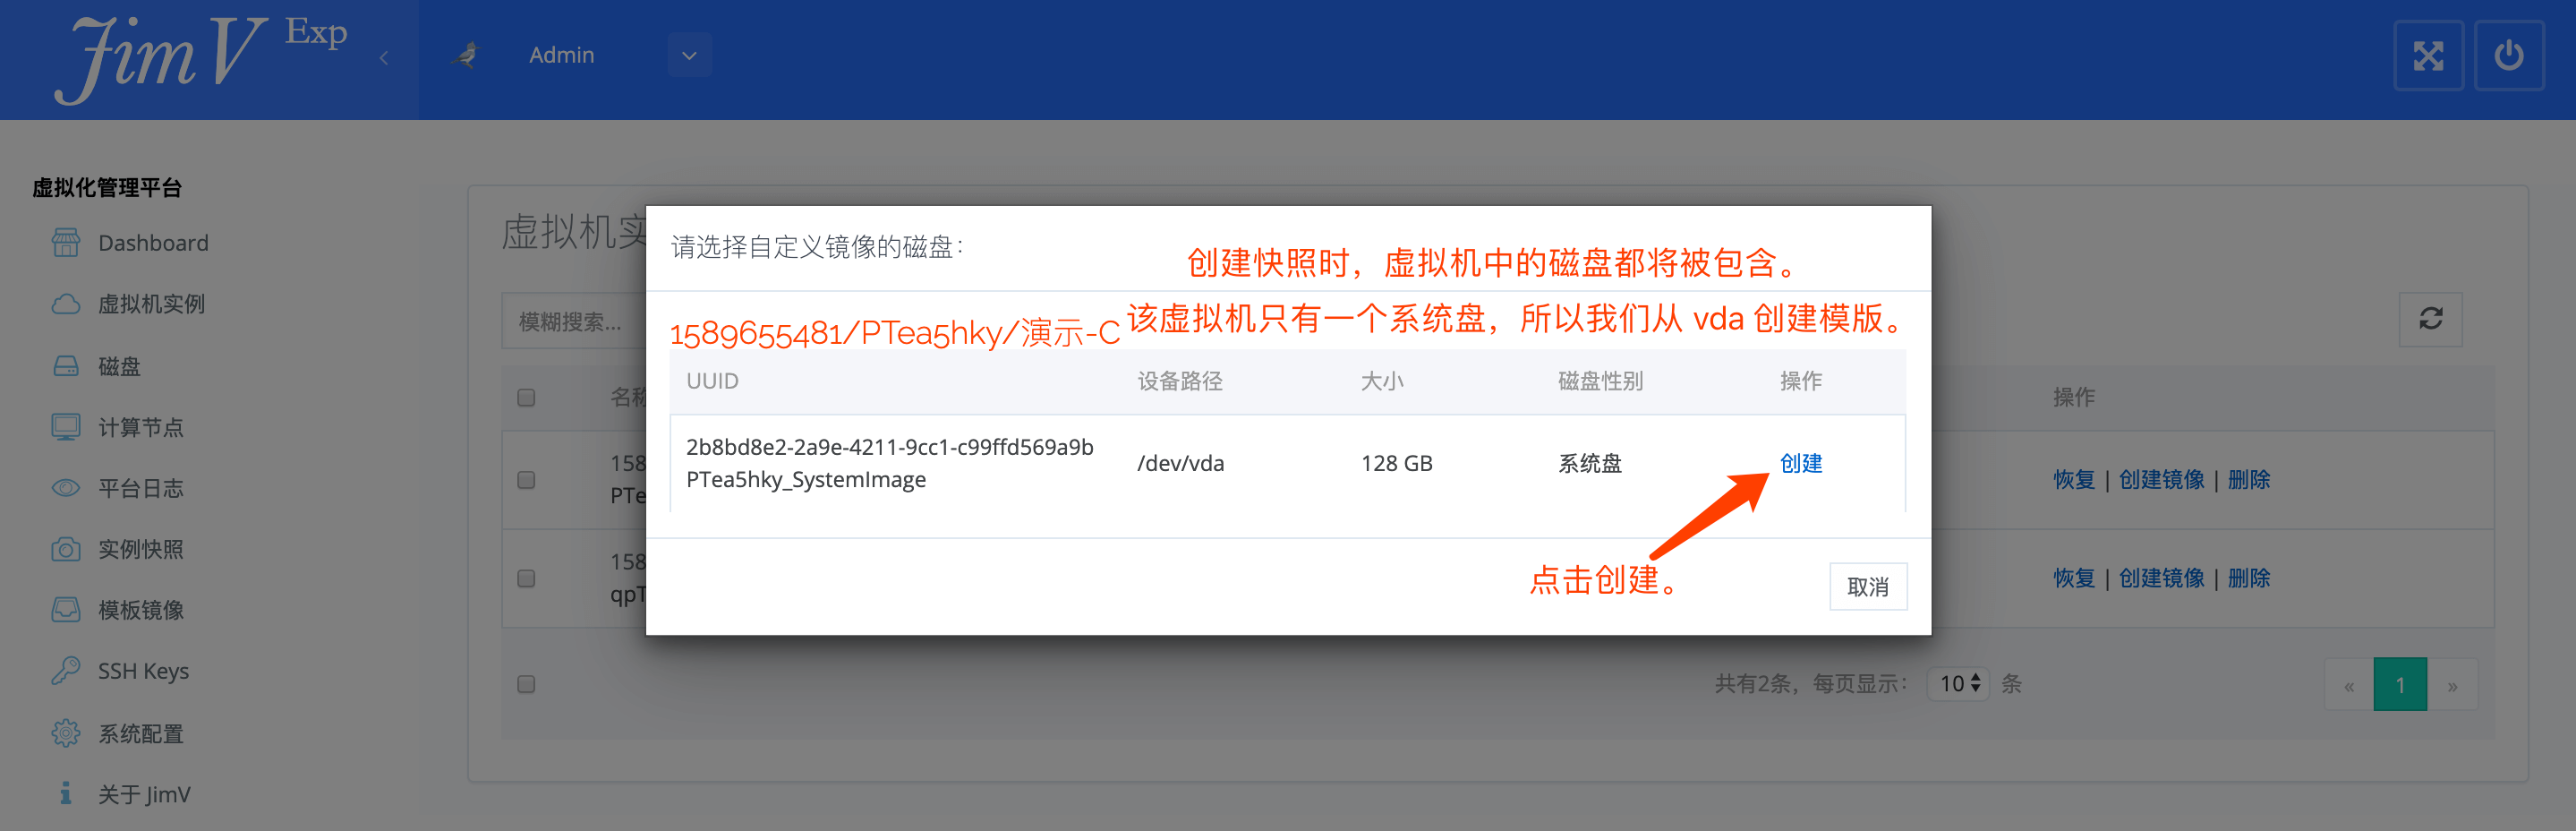
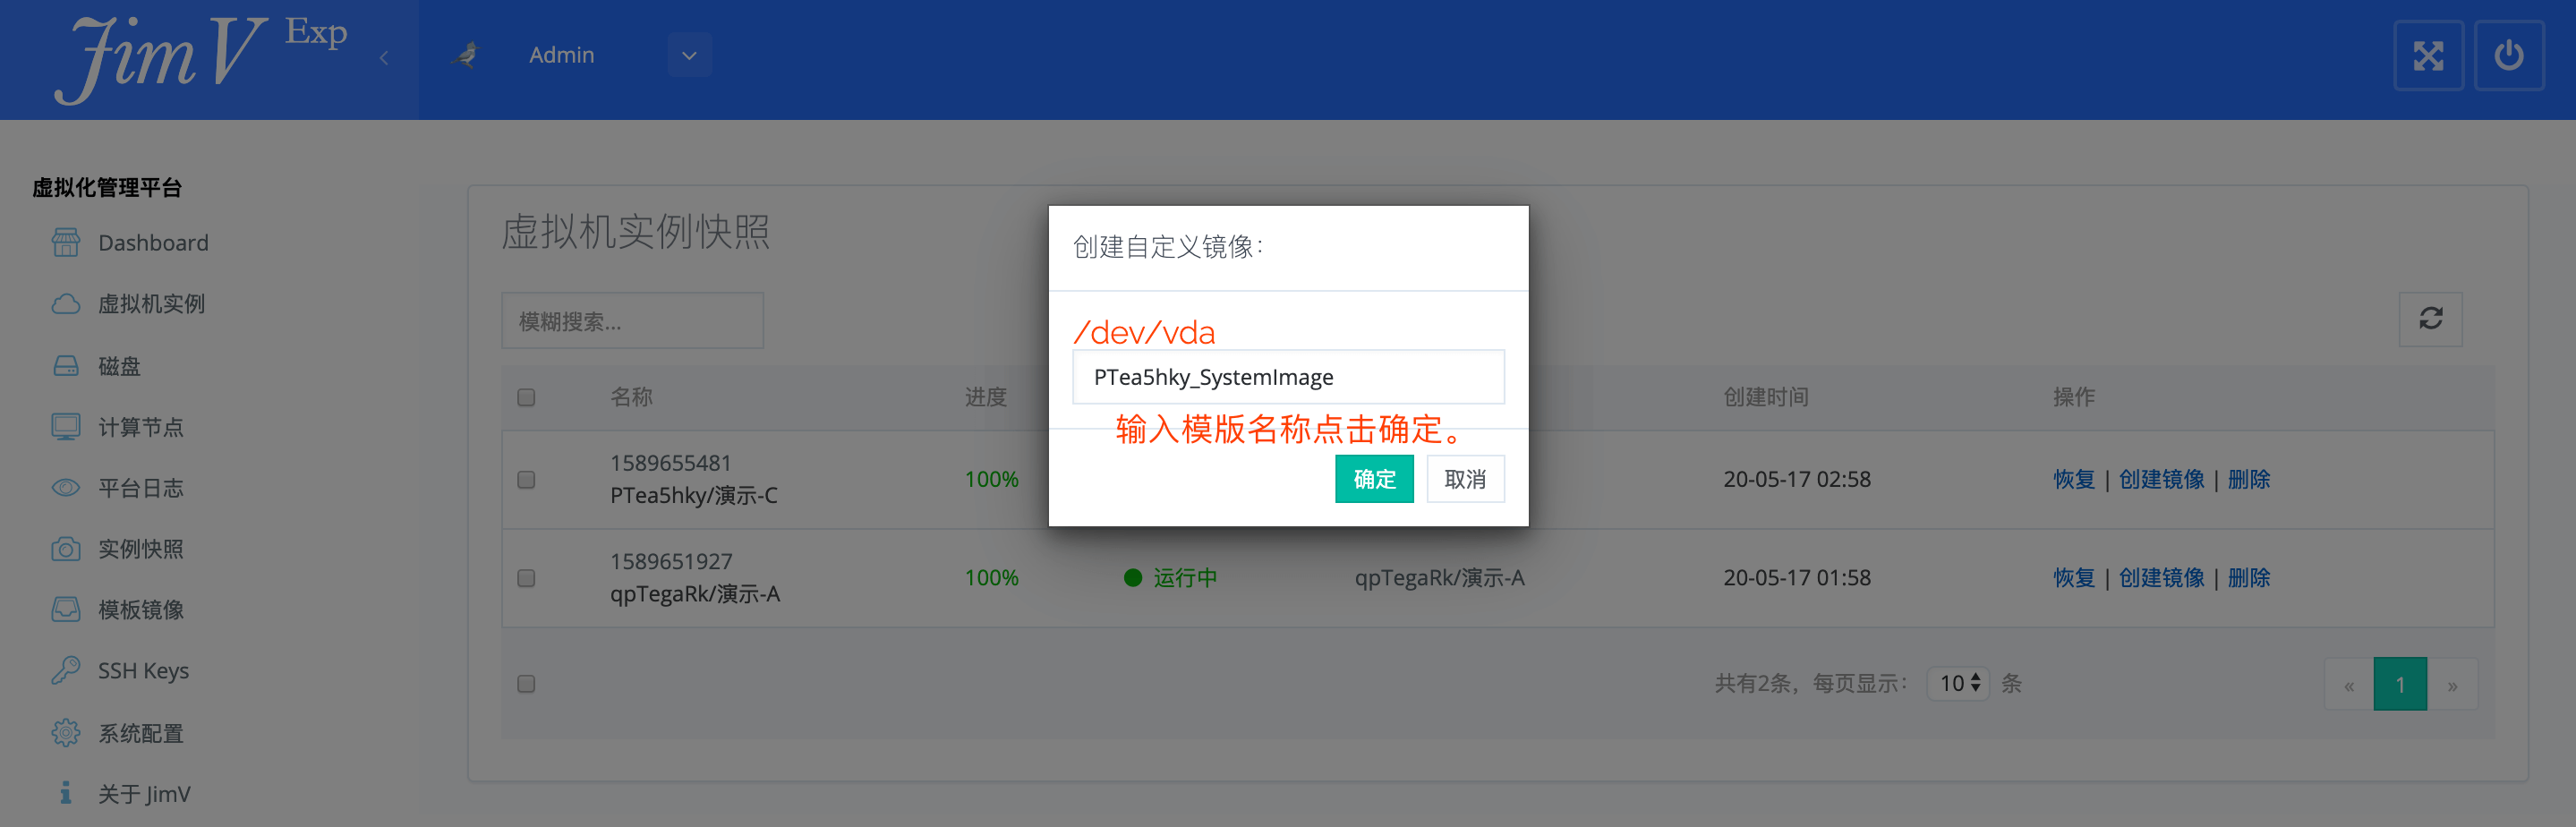
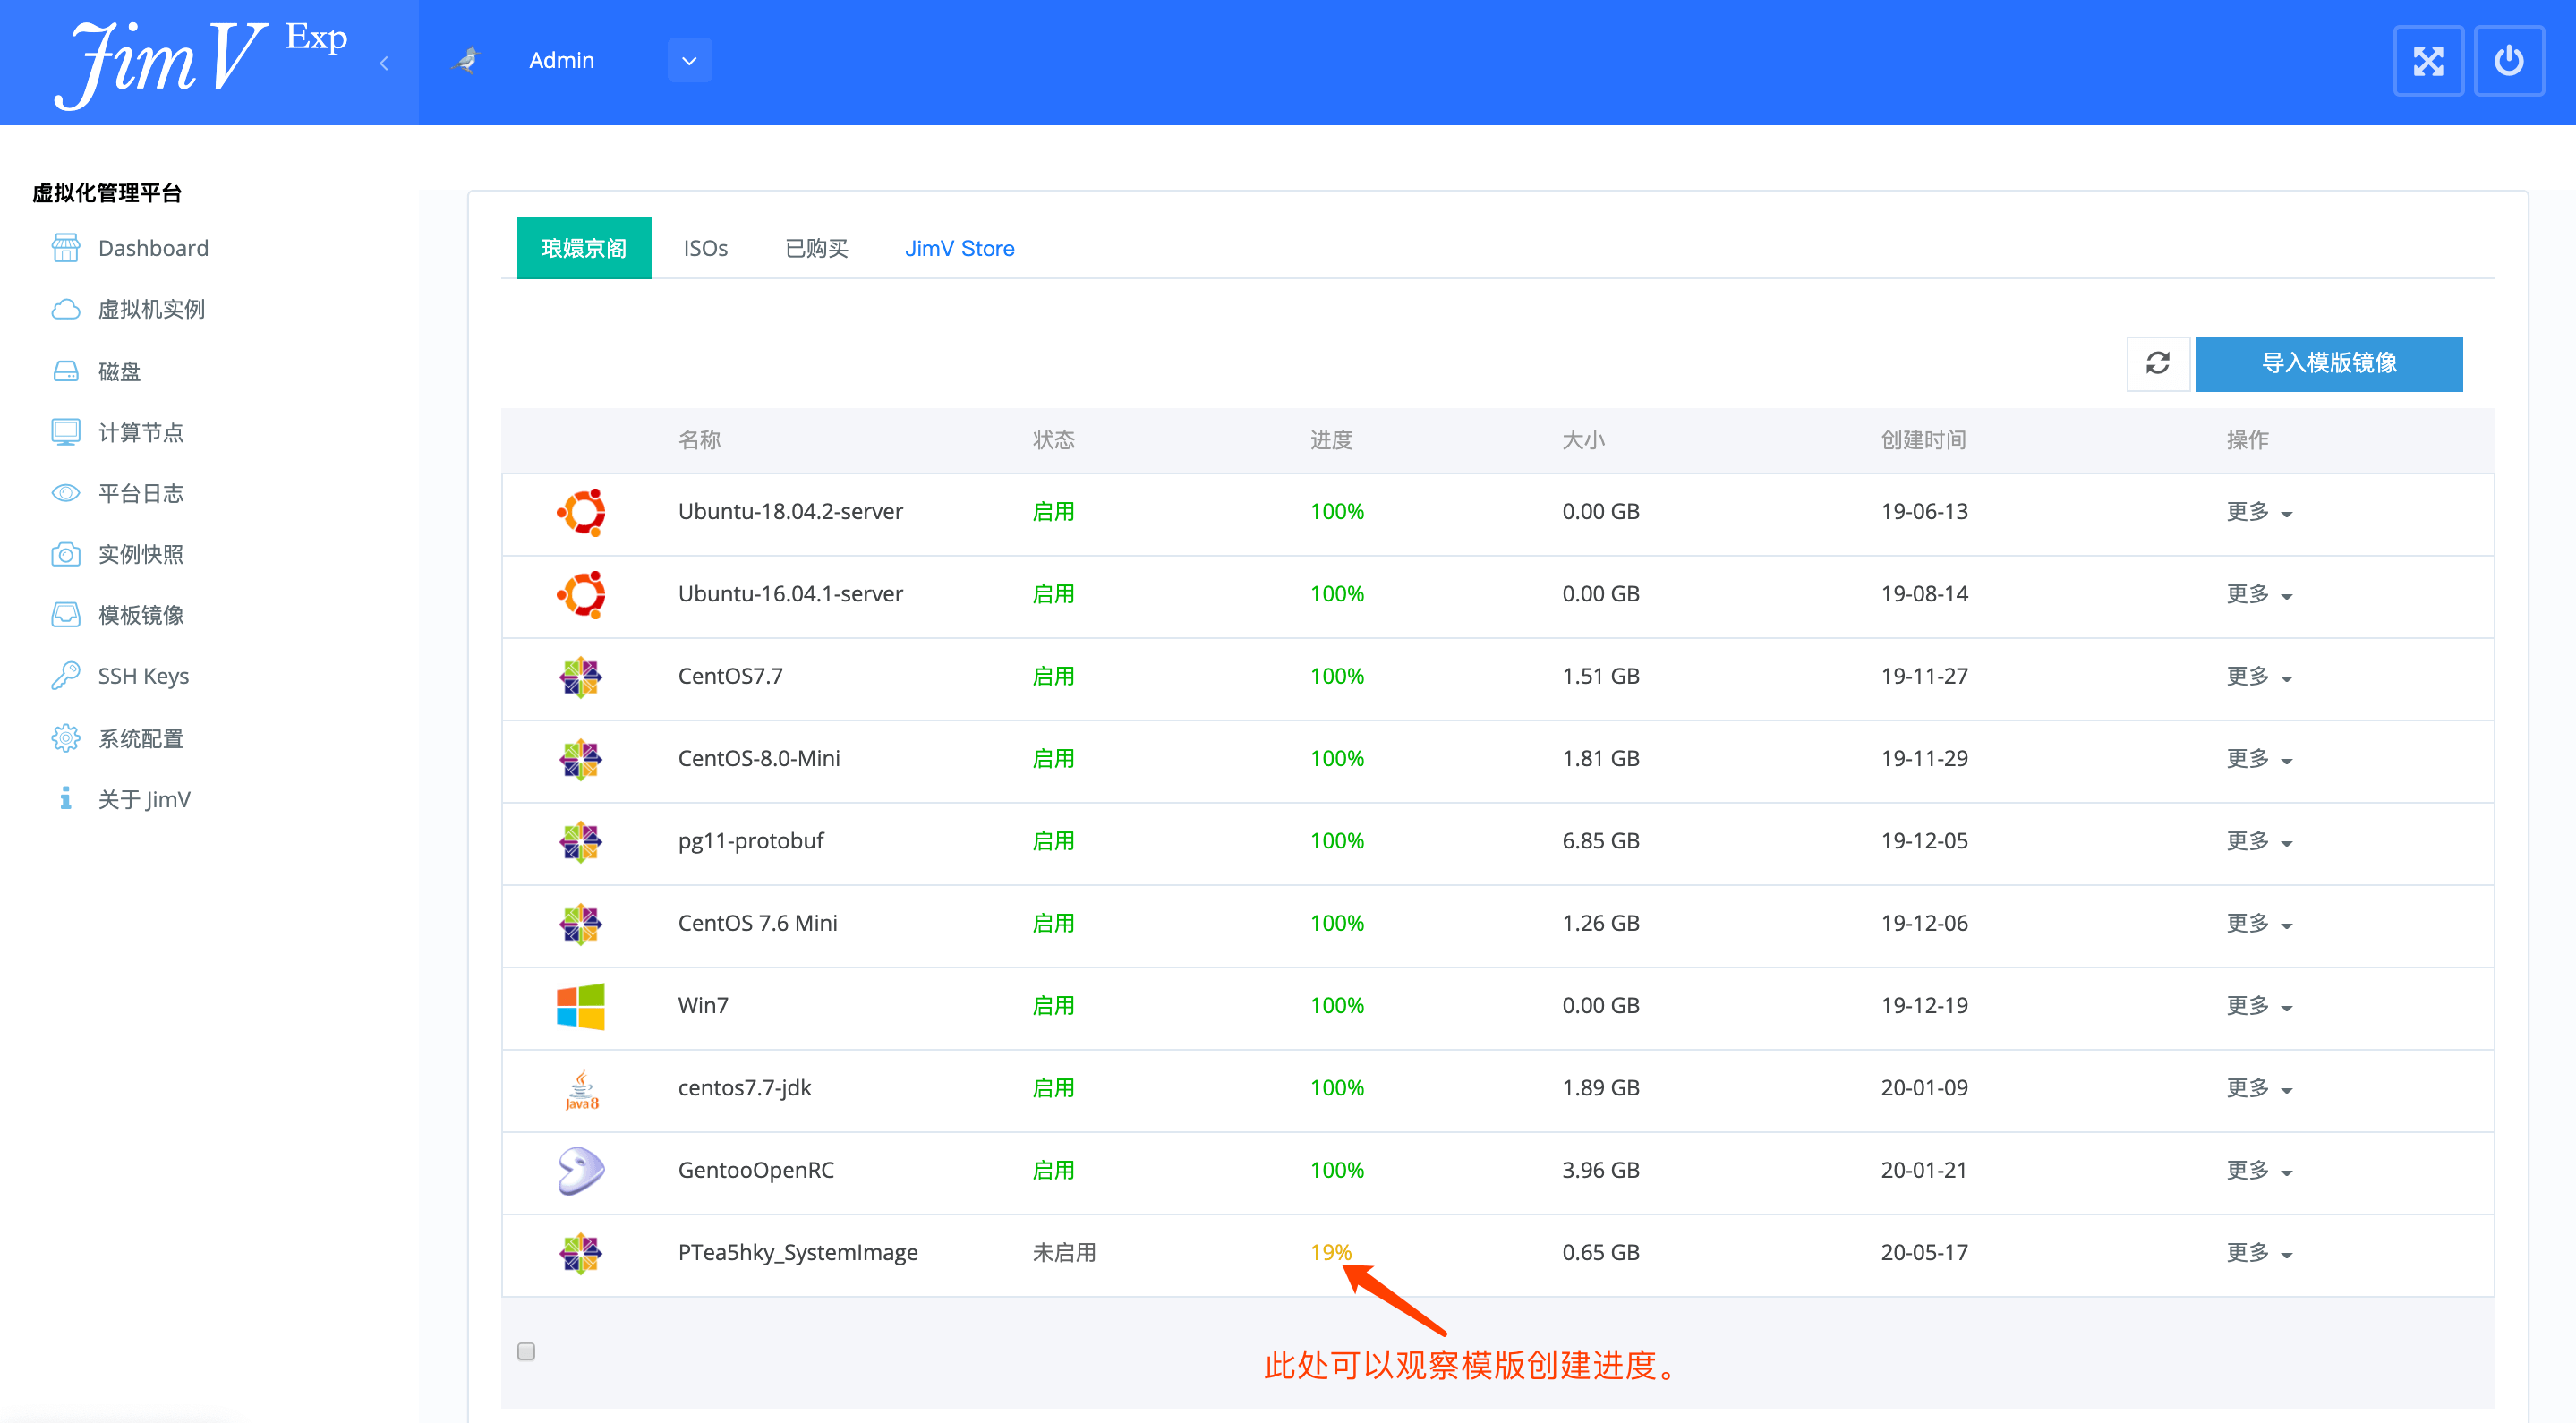
==从快照制作模版== | ==从快照制作模版== | ||
===创建模版=== | ===创建模版=== | ||
| − | * | + | *<img style="max-width: 1170px;" src="https://wiki.jimv.cn/images/操作指南/从快照创建模版.png" /> |
| − | * | + | *<img style="max-width: 1170px;" src="https://wiki.jimv.cn/images/操作指南/从快照创建模版-2.png" /> |
| − | * | + | *<img style="max-width: 1170px;" src="https://wiki.jimv.cn/images/操作指南/从快照创建模版-3.png" /> |
| − | * | + | *<img style="max-width: 1170px;" src="https://wiki.jimv.cn/images/操作指南/从快照创建模版-4.png" /> |
| − | * | + | *<img style="max-width: 1170px;" src="https://wiki.jimv.cn/images/操作指南/从快照创建模版-5.png" /> |
| − | * | + | *<img style="max-width: 1170px;" src="https://wiki.jimv.cn/images/操作指南/从快照创建模版-6.png" /> |
| − | * | + | *<img style="max-width: 1170px;" src="https://wiki.jimv.cn/images/操作指南/从快照创建模版-7.png" /> |
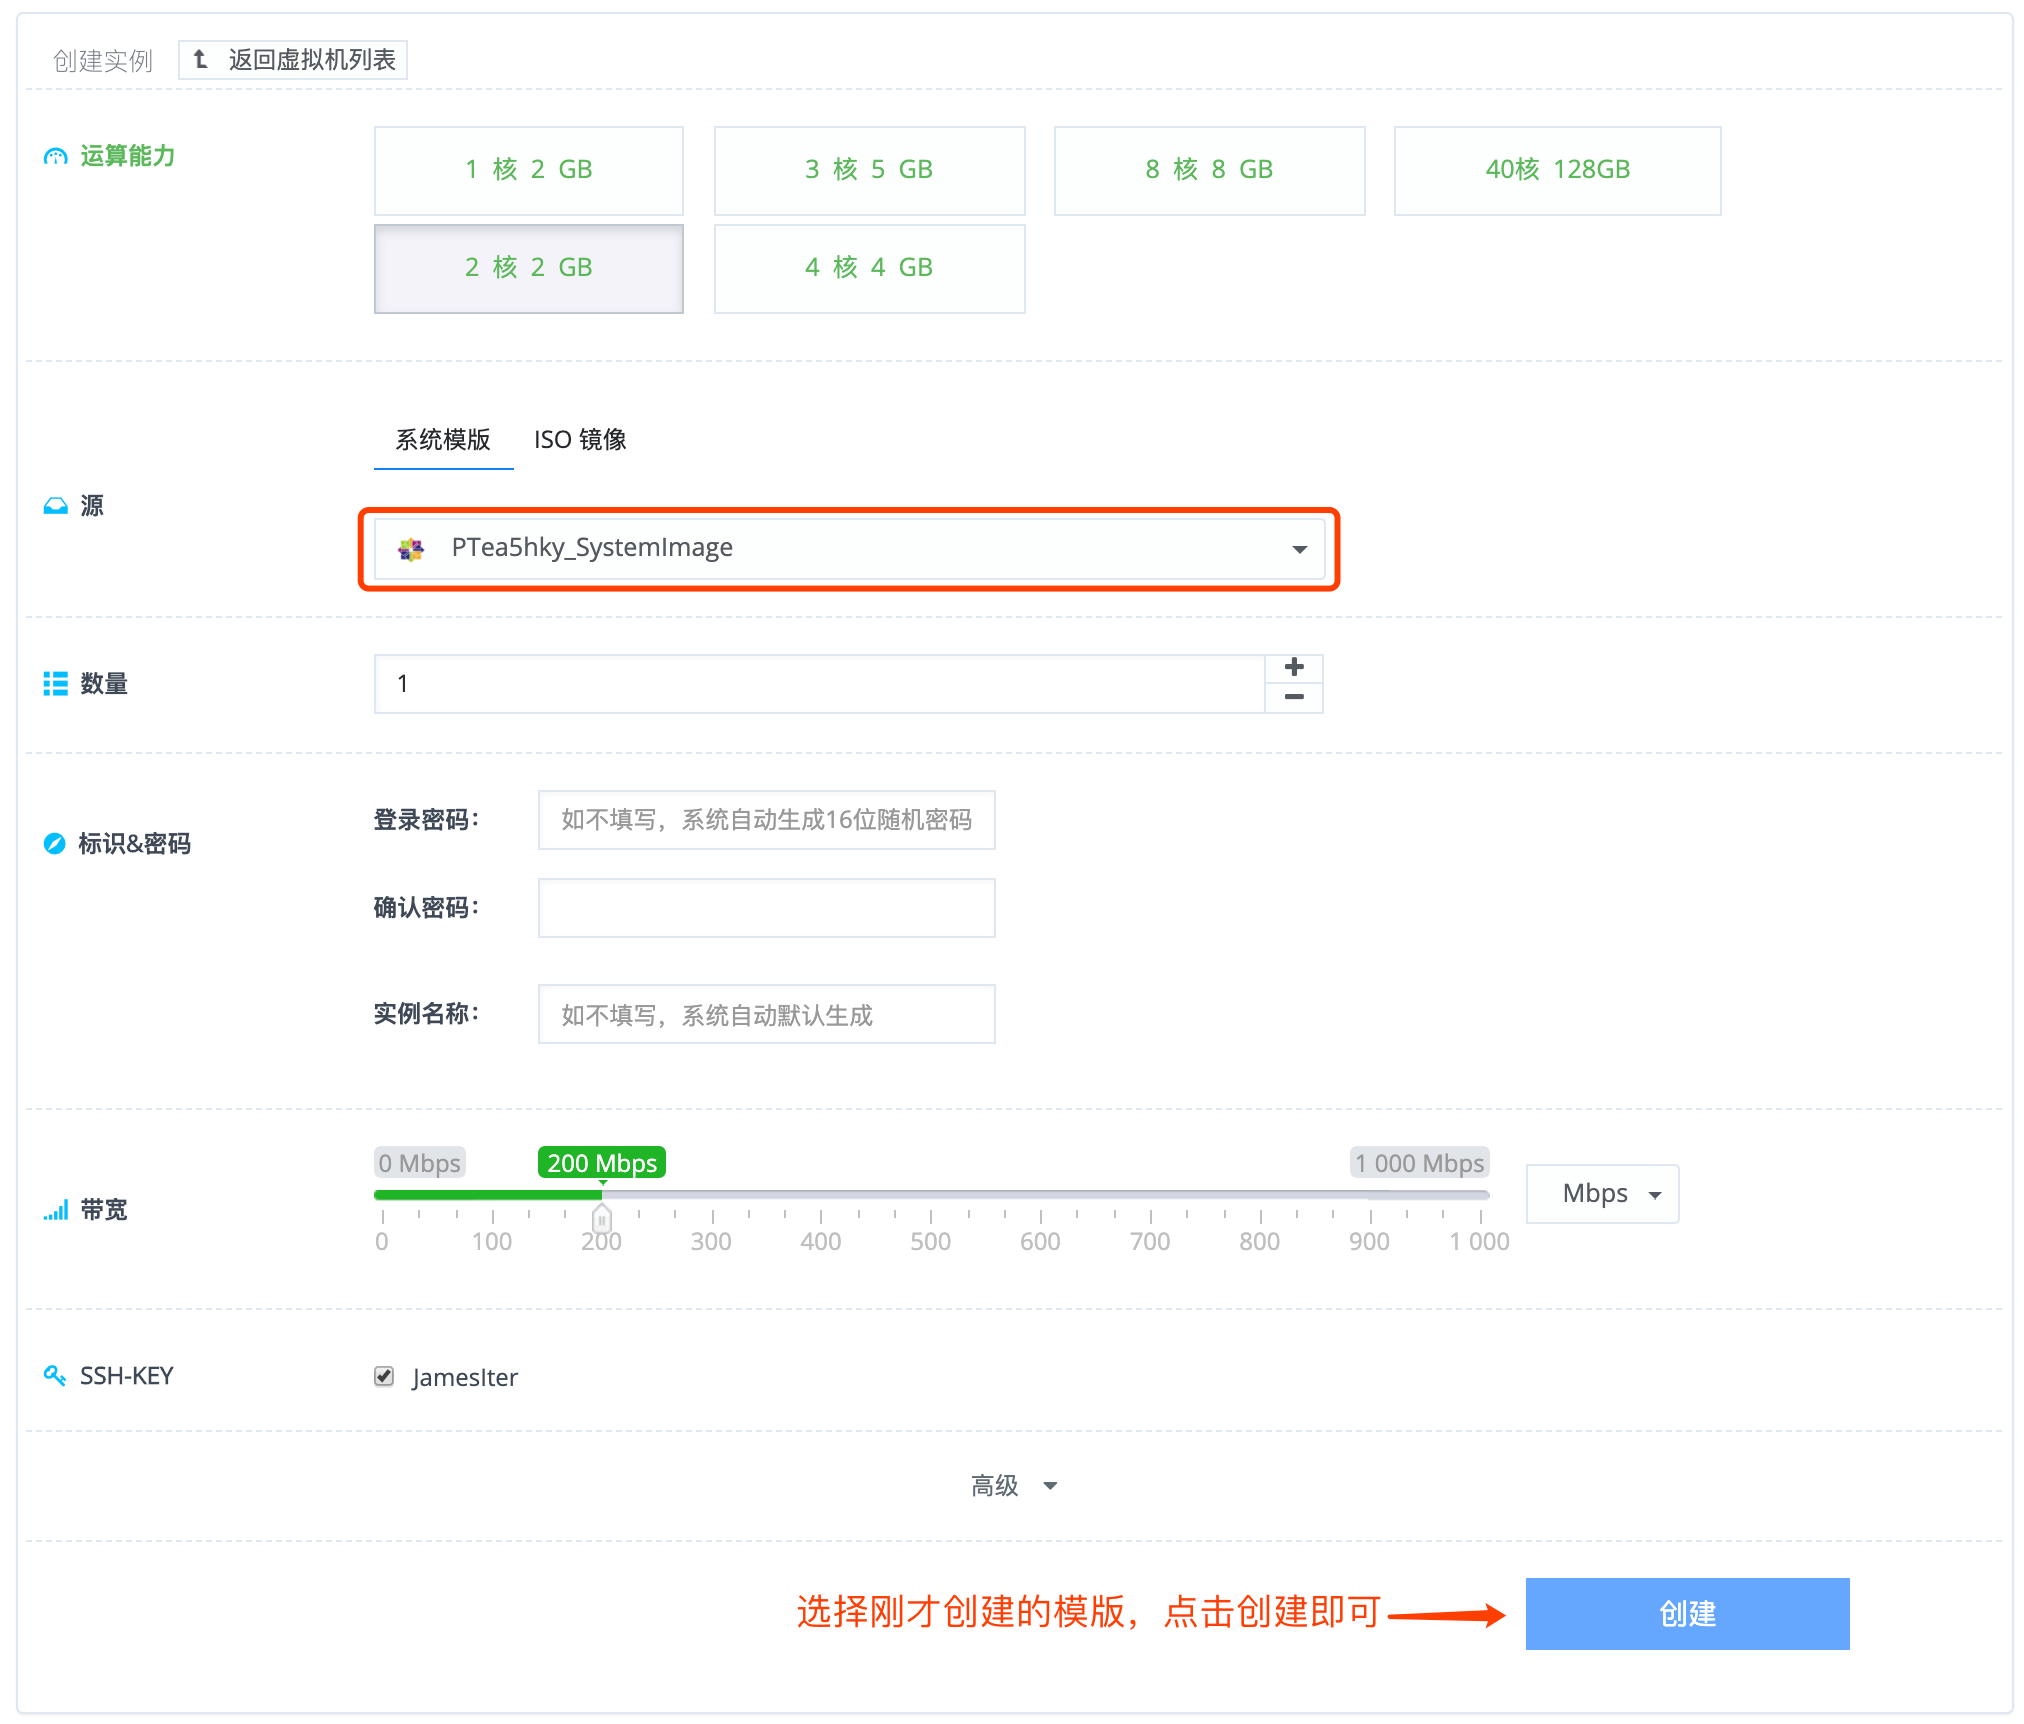
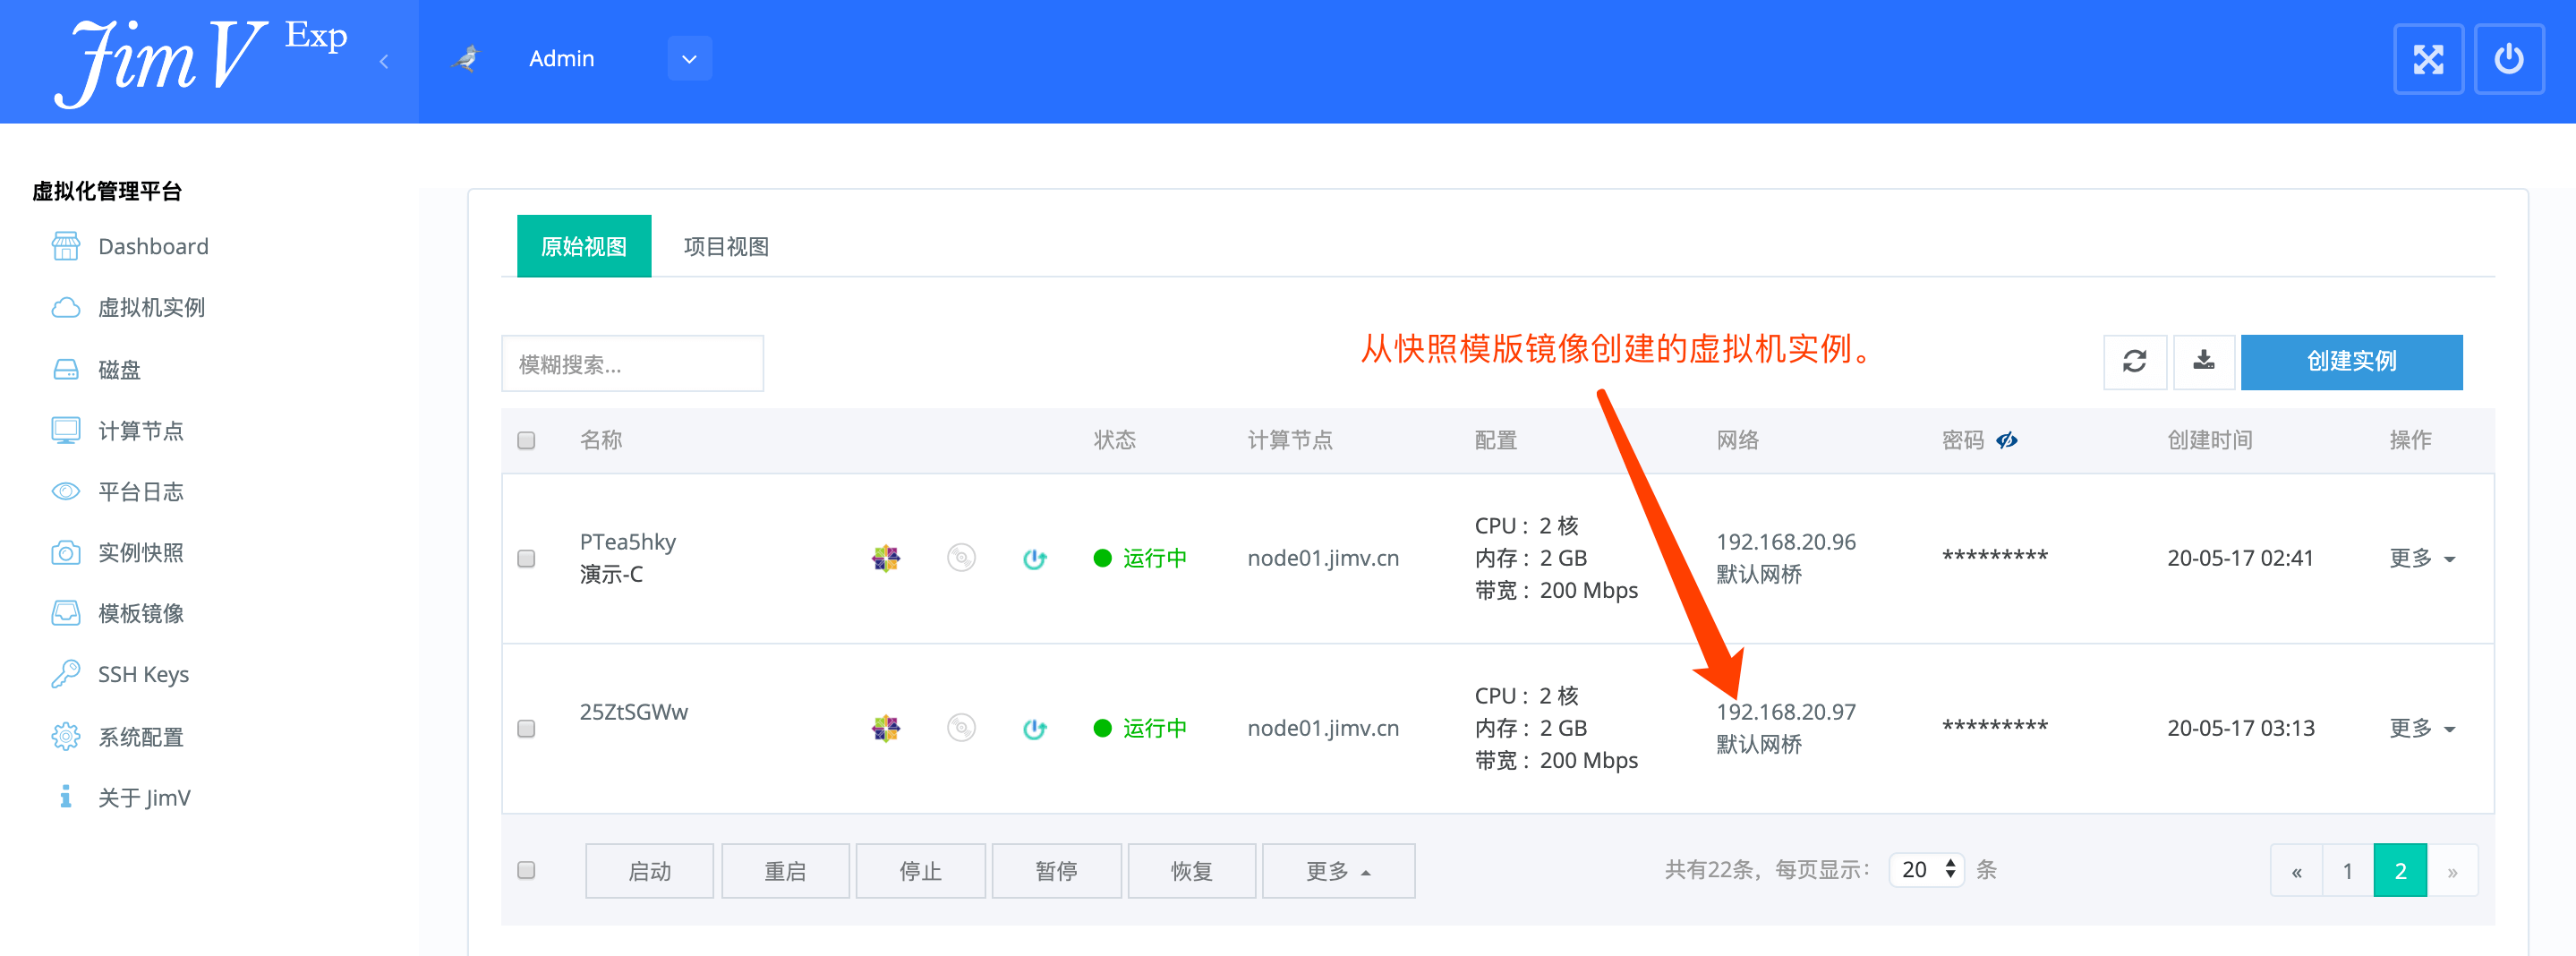
===验证模版=== | ===验证模版=== | ||
| − | * | + | *<img style="max-width: 1170px;" src="https://wiki.jimv.cn/images/操作指南/验证快照模版.png" /> |
| − | * | + | *<img style="max-width: 1170px;" src="https://wiki.jimv.cn/images/操作指南/验证快照模版-2.png" /> |
| − | * | + | *<img style="max-width: 1170px;" src="https://wiki.jimv.cn/images/操作指南/验证快照模版-3.png" /> |
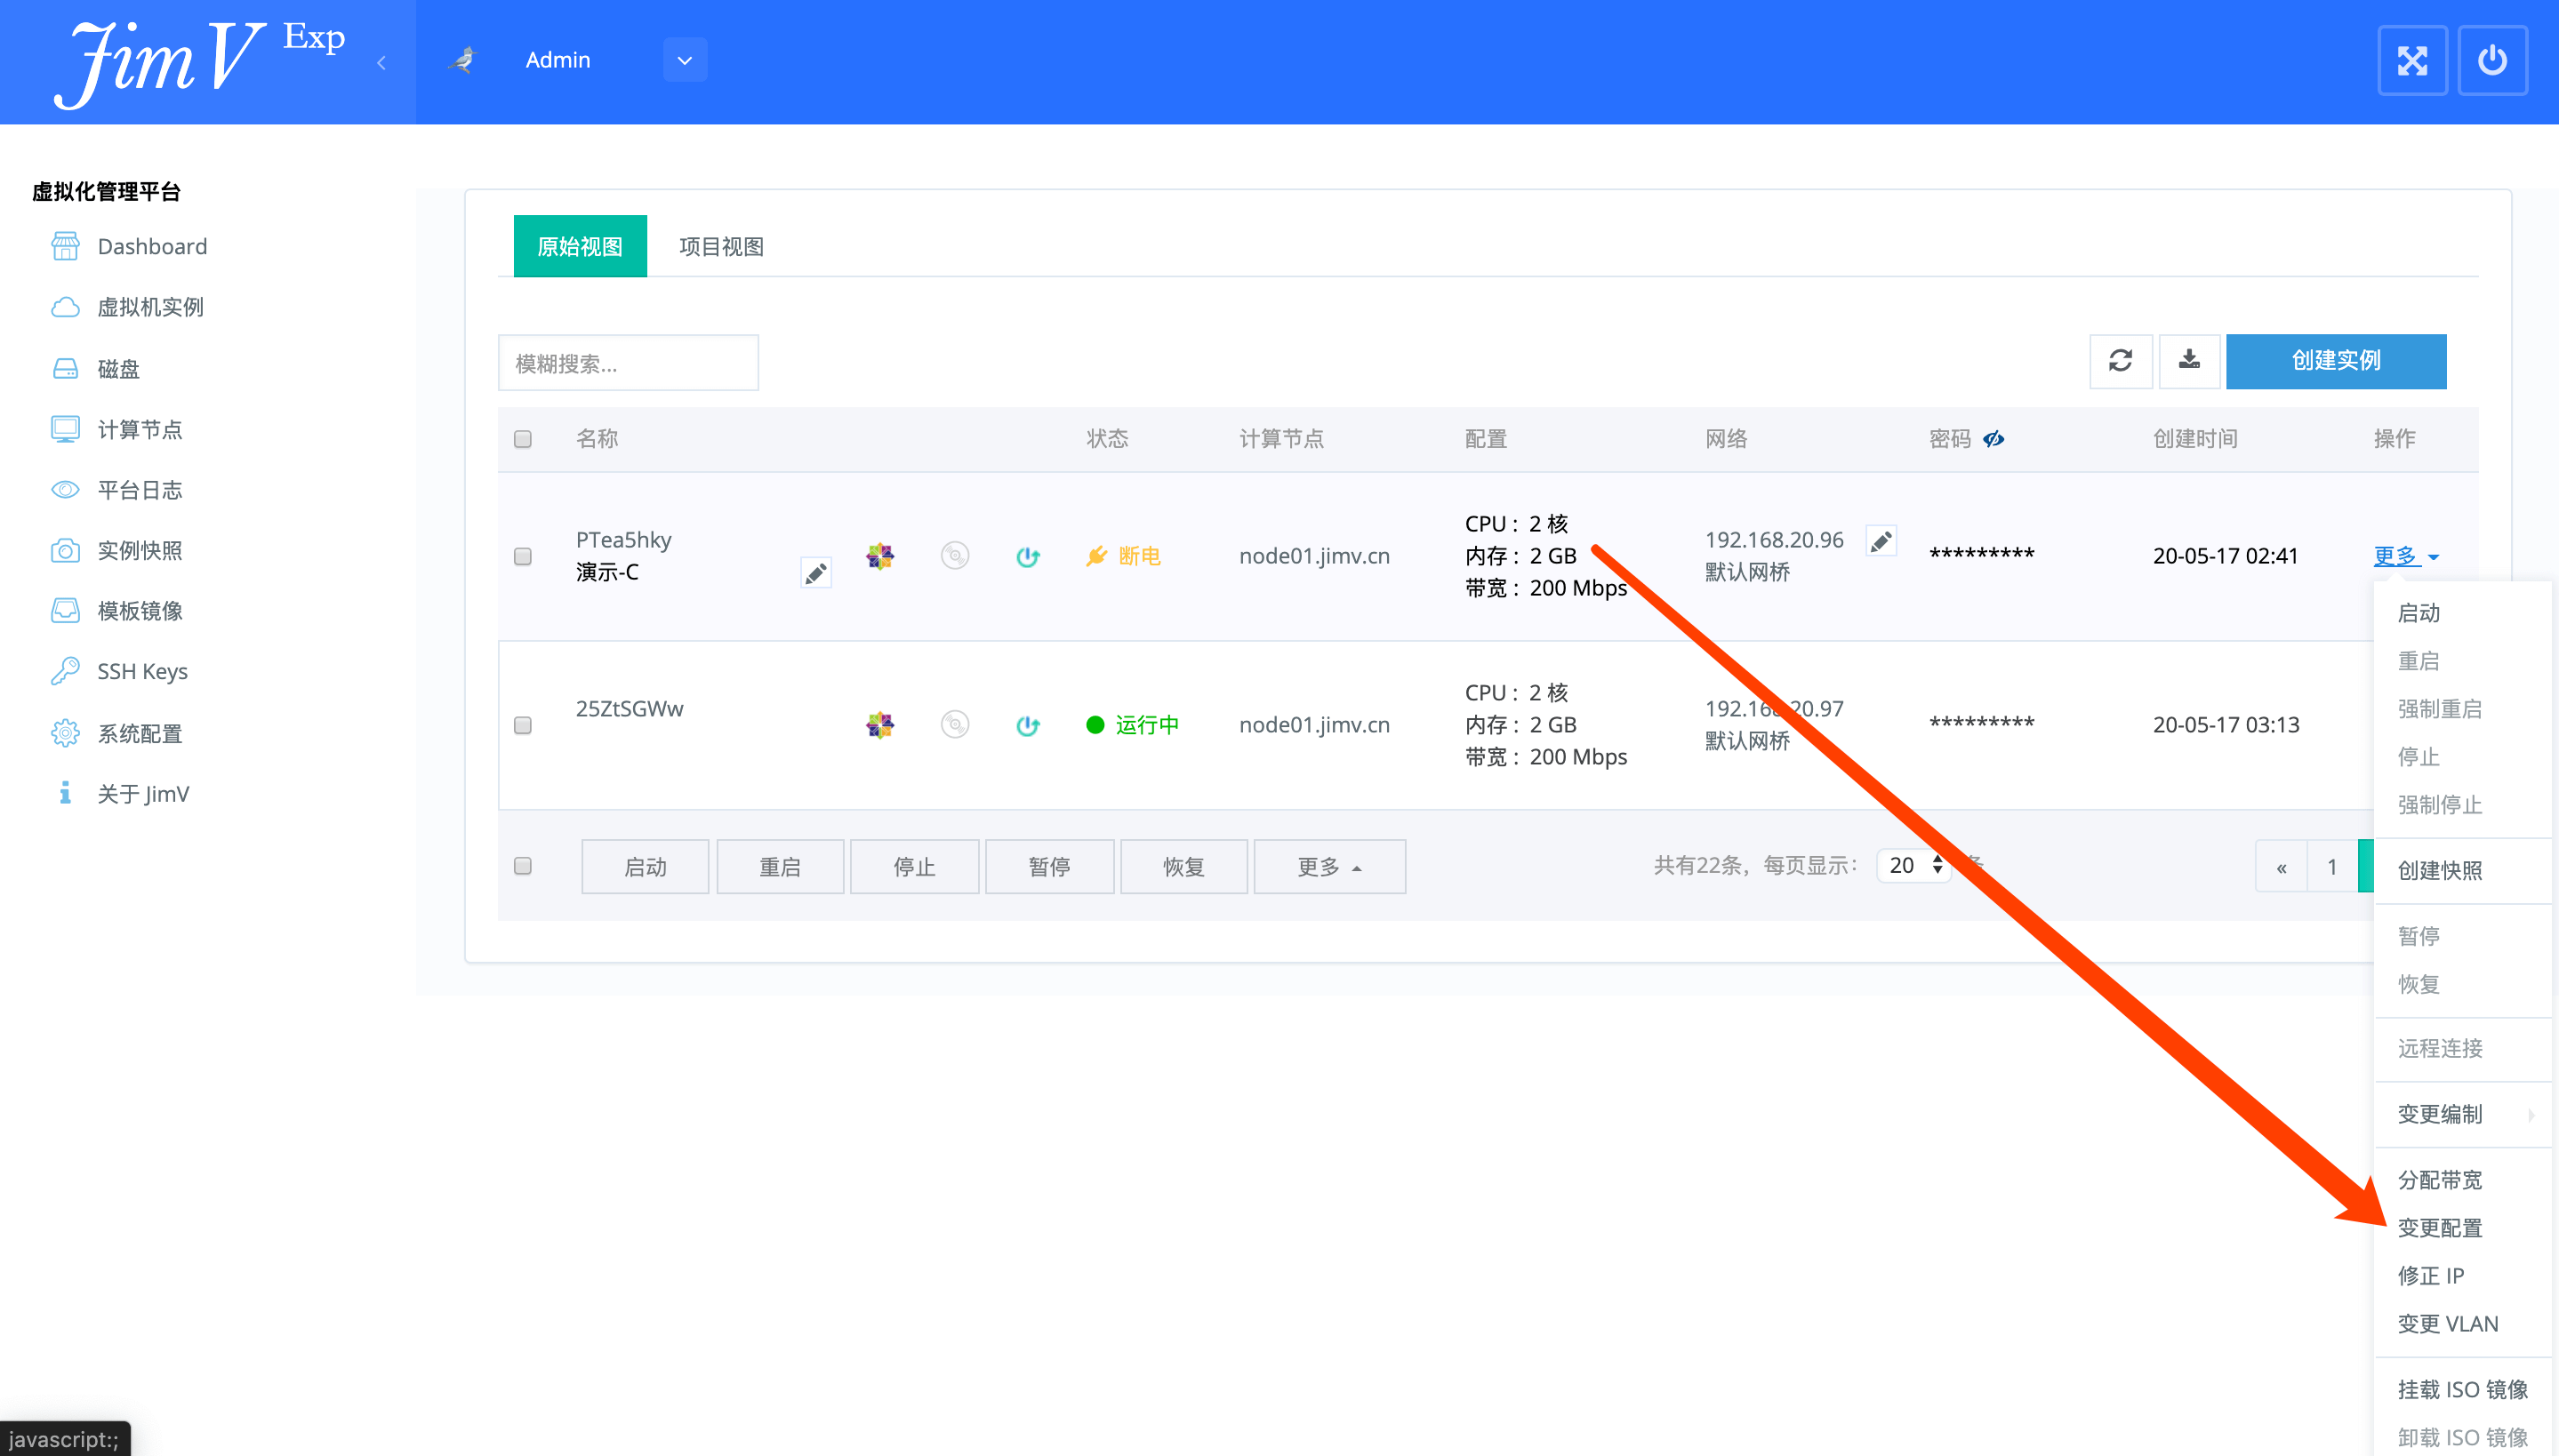
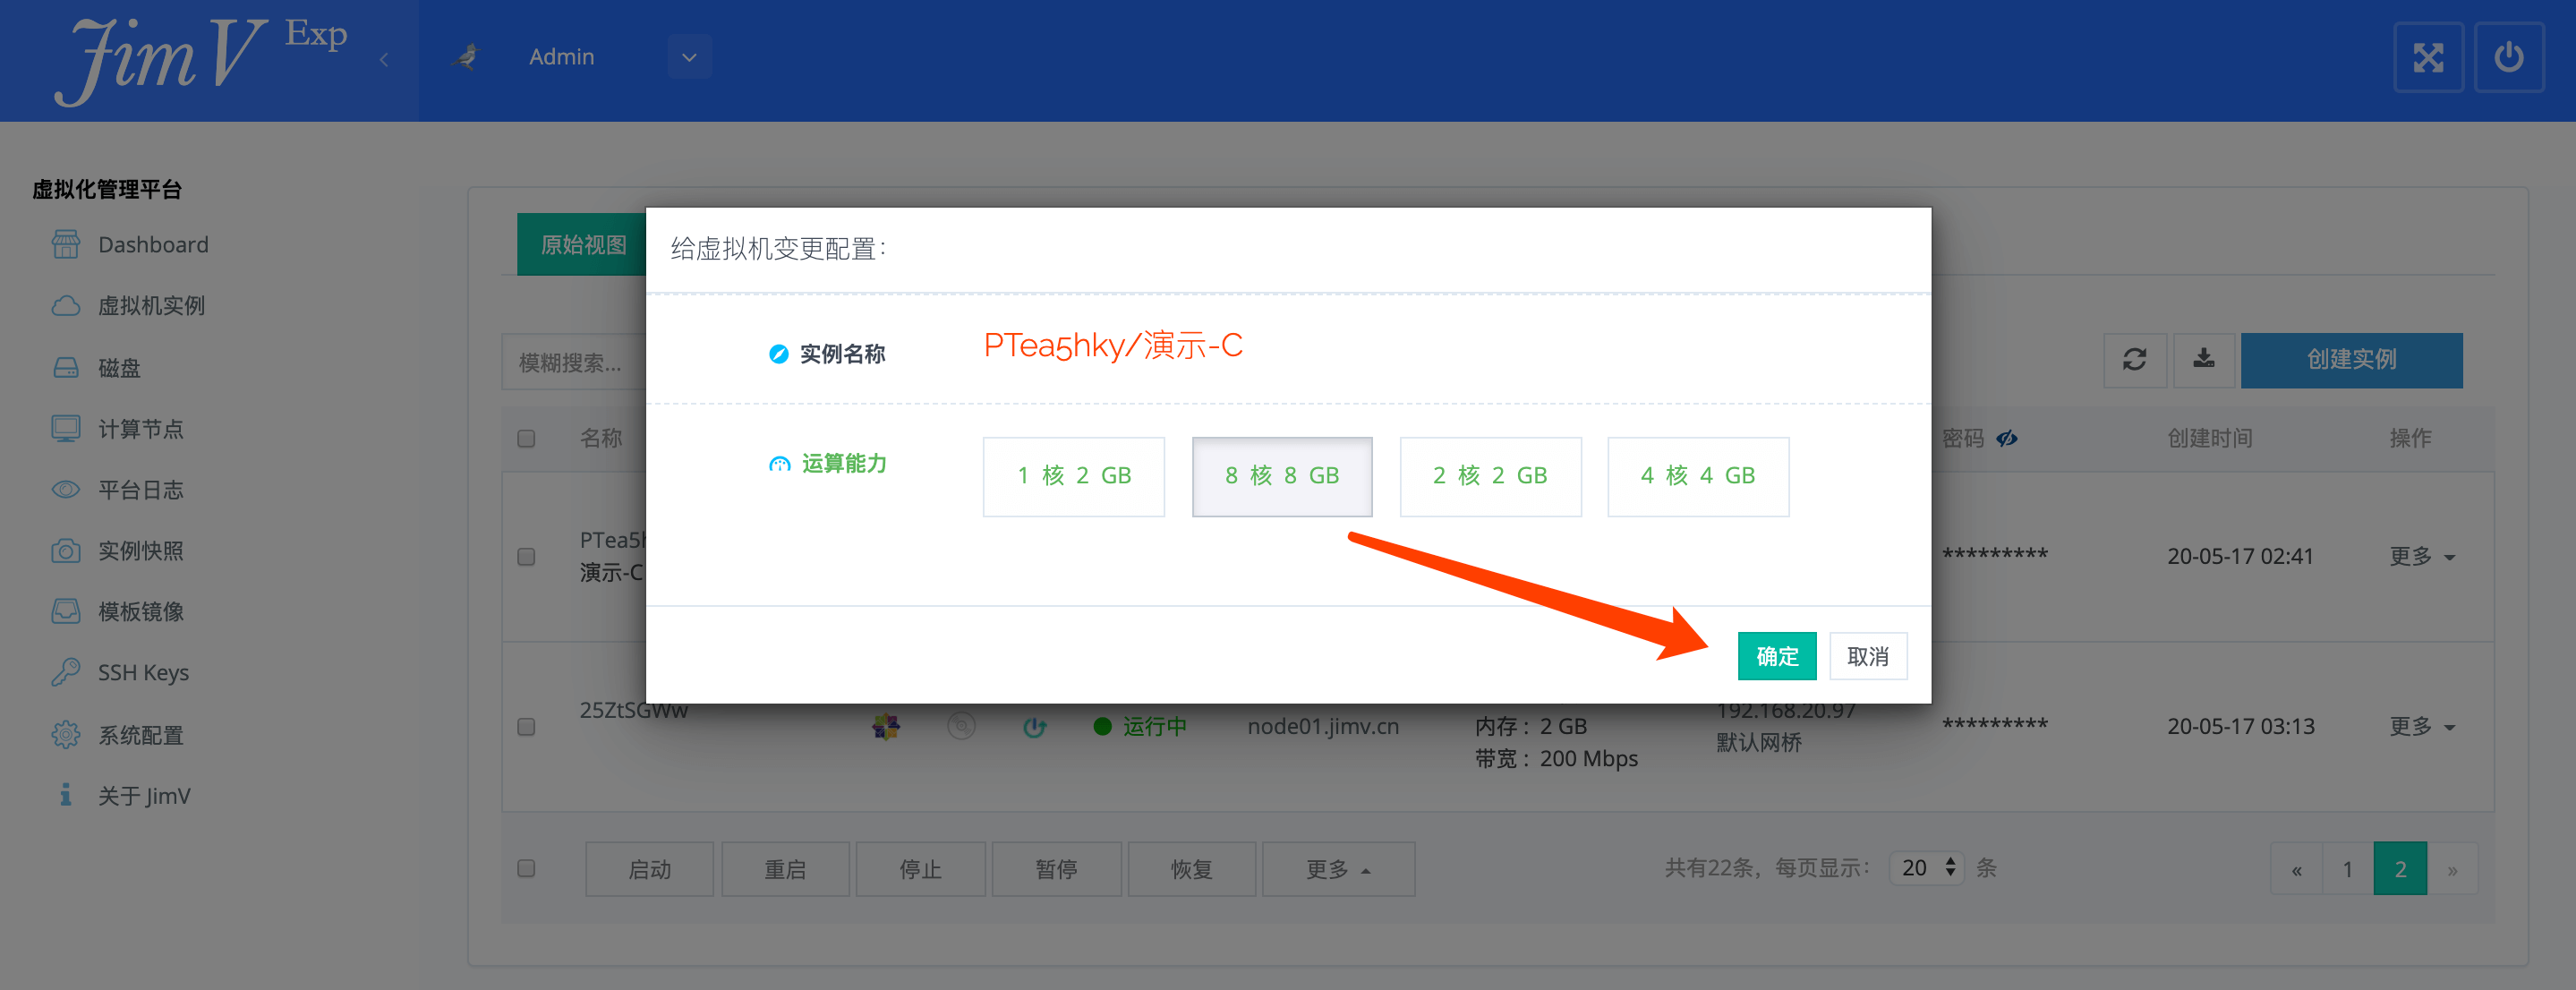
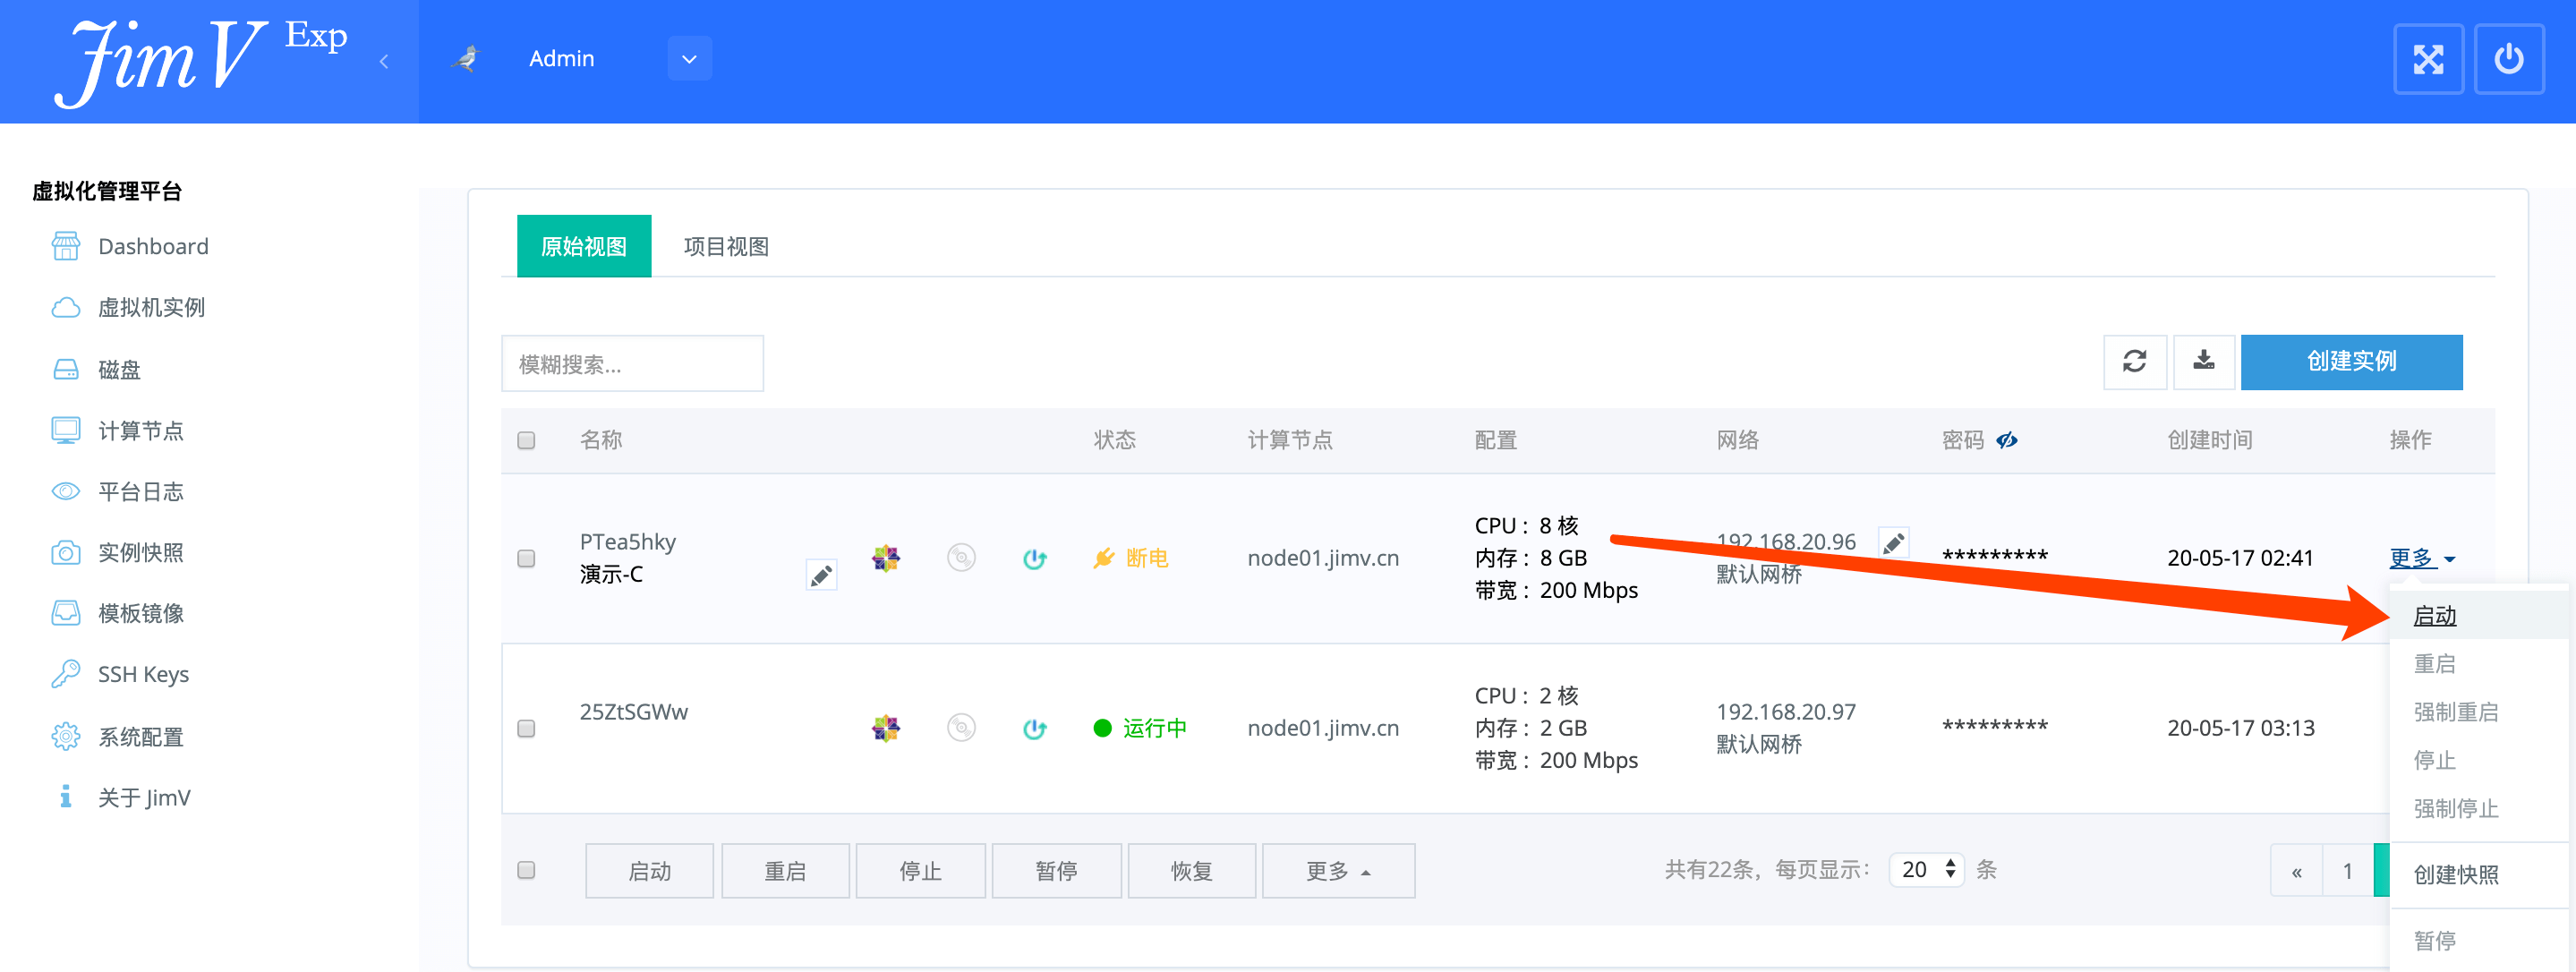
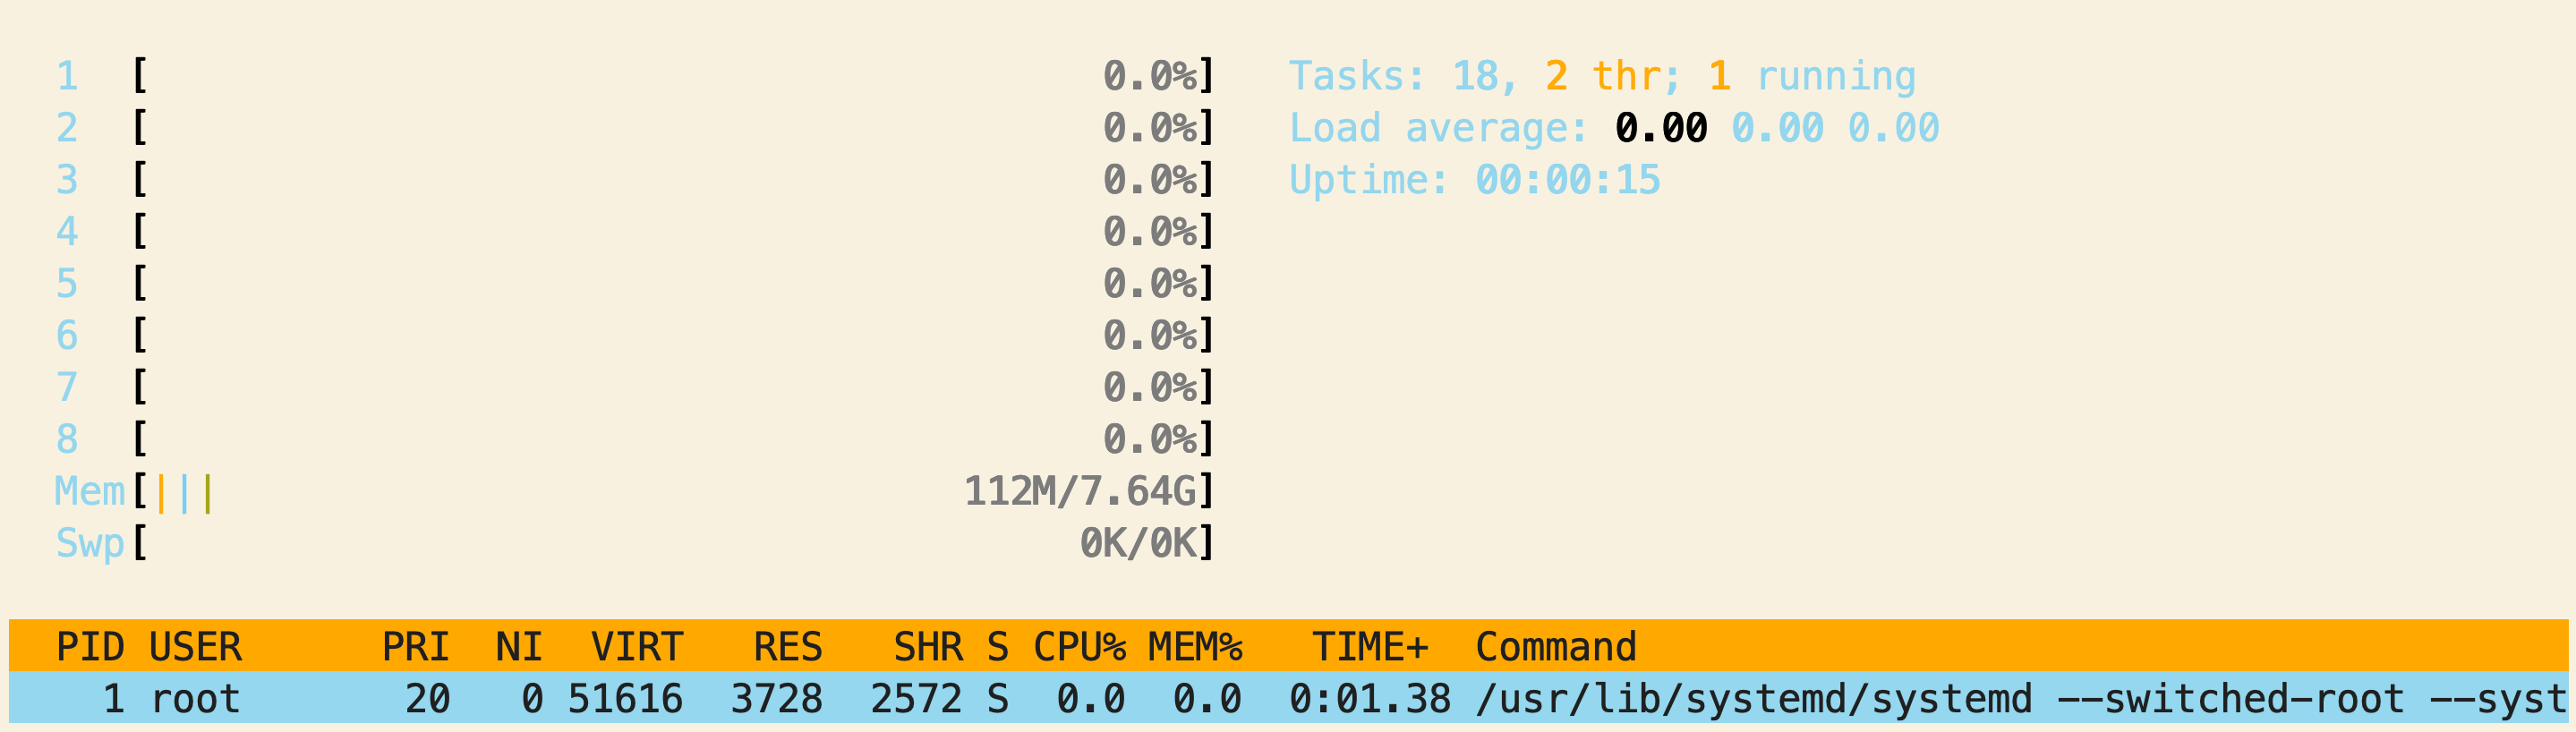
==虚拟机变更配置== | ==虚拟机变更配置== | ||
{{Note|提示:虚拟机的配置变更,必须在'''「断电」'''状态下完成。|reminder}} | {{Note|提示:虚拟机的配置变更,必须在'''「断电」'''状态下完成。|reminder}} | ||
| − | * | + | *<img style="max-width: 1170px;" src="https://wiki.jimv.cn/images/操作指南/变更配置.png" /> |
| − | * | + | *<img style="max-width: 1170px;" src="https://wiki.jimv.cn/images/操作指南/变更配置-2.png" /> |
| − | * | + | *<img style="max-width: 1170px;" src="https://wiki.jimv.cn/images/操作指南/变更配置-3.png" /> |
| − | * | + | *<img style="max-width: 1170px;" src="https://wiki.jimv.cn/images/操作指南/变更配置-4.png" /> |
| − | * | + | *<img style="max-width: 1170px;" src="https://wiki.jimv.cn/images/操作指南/变更配置-5.png" /> |
| − | * | + | *<img style="max-width: 1170px;" src="https://wiki.jimv.cn/images/操作指南/变更配置-6.png" /> |
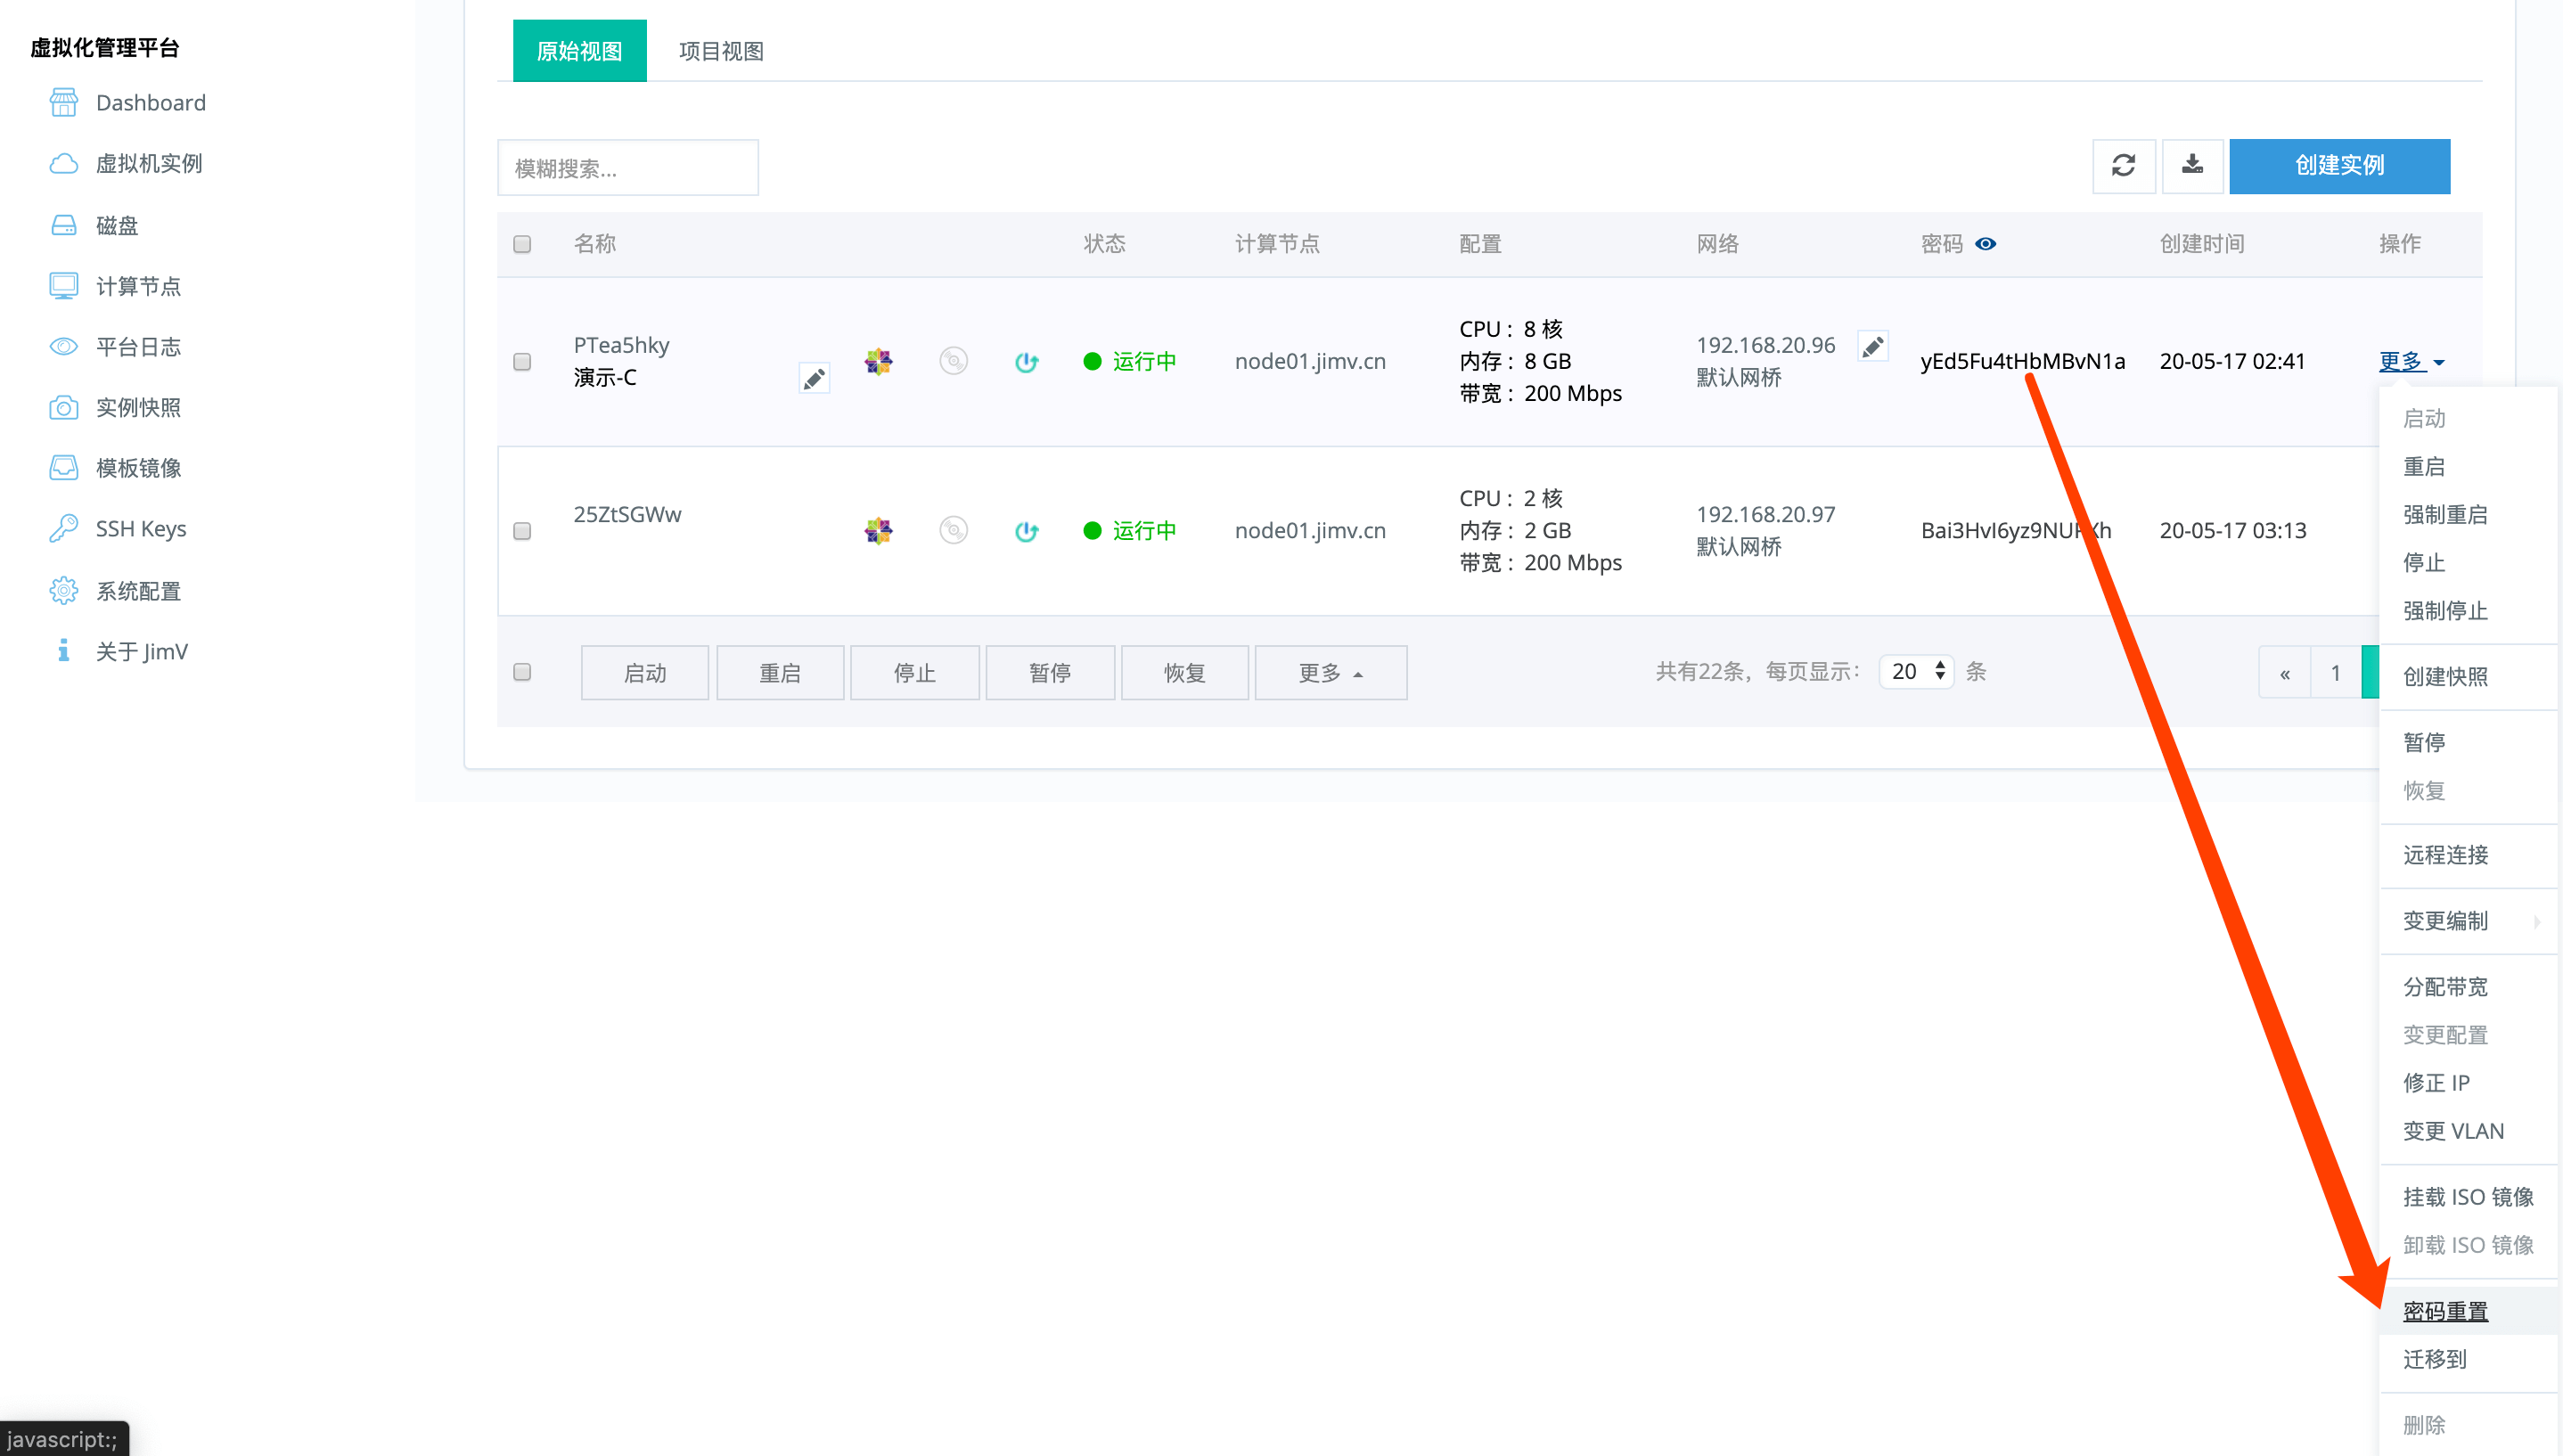
==在线重置密码== | ==在线重置密码== | ||
{{Note|提示:虚拟机密码重置,必须在'''「运行中」'''状态下完成。|reminder}} | {{Note|提示:虚拟机密码重置,必须在'''「运行中」'''状态下完成。|reminder}} | ||
| − | * | + | *<img style="max-width: 1170px;" src="https://wiki.jimv.cn/images/操作指南/密码重置.png" /> |
| − | * | + | *<img style="max-width: 1170px;" src="https://wiki.jimv.cn/images/操作指南/密码重置-2.png" /> |
| − | * | + | *<img style="max-width: 1170px;" src="https://wiki.jimv.cn/images/操作指南/密码重置-3.png" /> |
==热迁移== | ==热迁移== | ||
{{Note|提示:非共享存储模式下。虚拟机只支持热迁移,即'''「运行中」'''状态迁移。|reminder}} | {{Note|提示:非共享存储模式下。虚拟机只支持热迁移,即'''「运行中」'''状态迁移。|reminder}} | ||
| − | * | + | *<img style="max-width: 1170px;" src="https://wiki.jimv.cn/images/操作指南/迁移.png" /> |
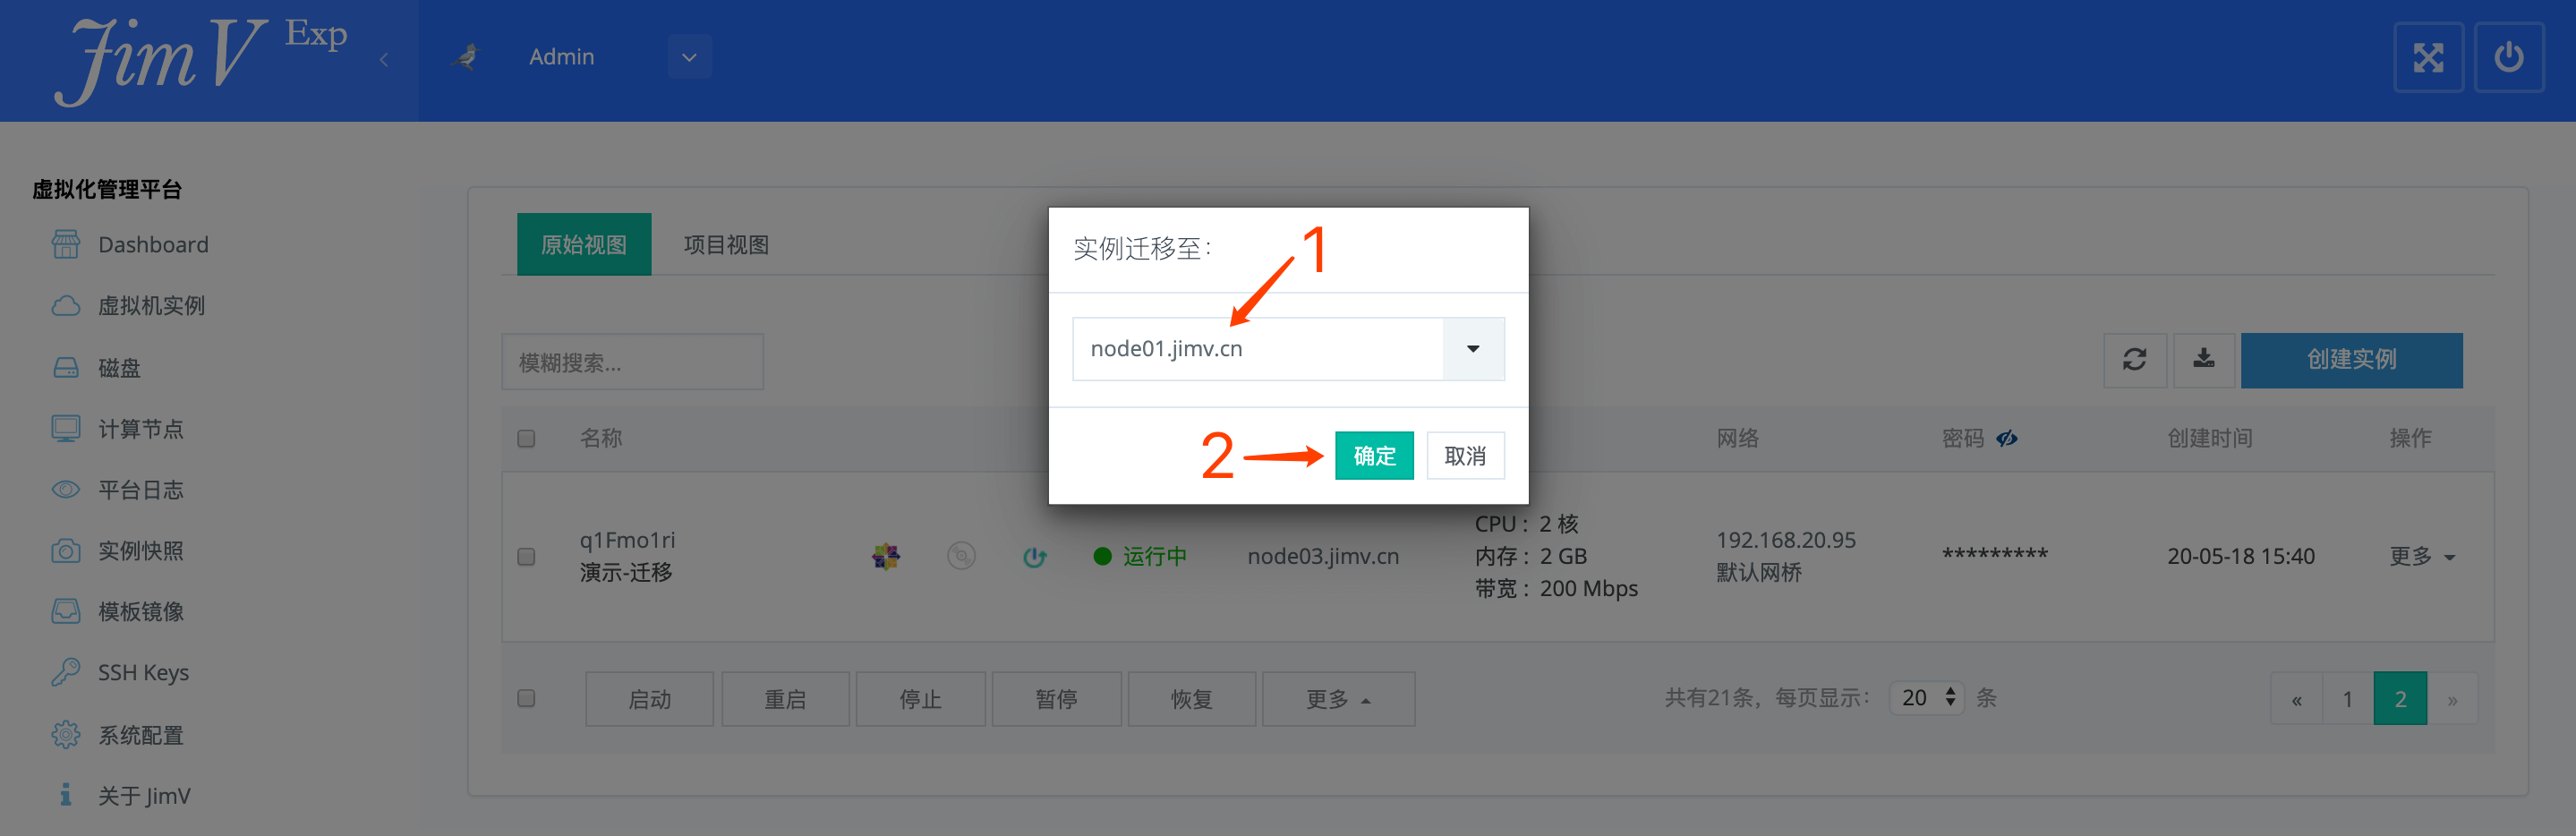
| − | * | + | *<img style="max-width: 1170px;" src="https://wiki.jimv.cn/images/操作指南/迁移-2.png" /> |
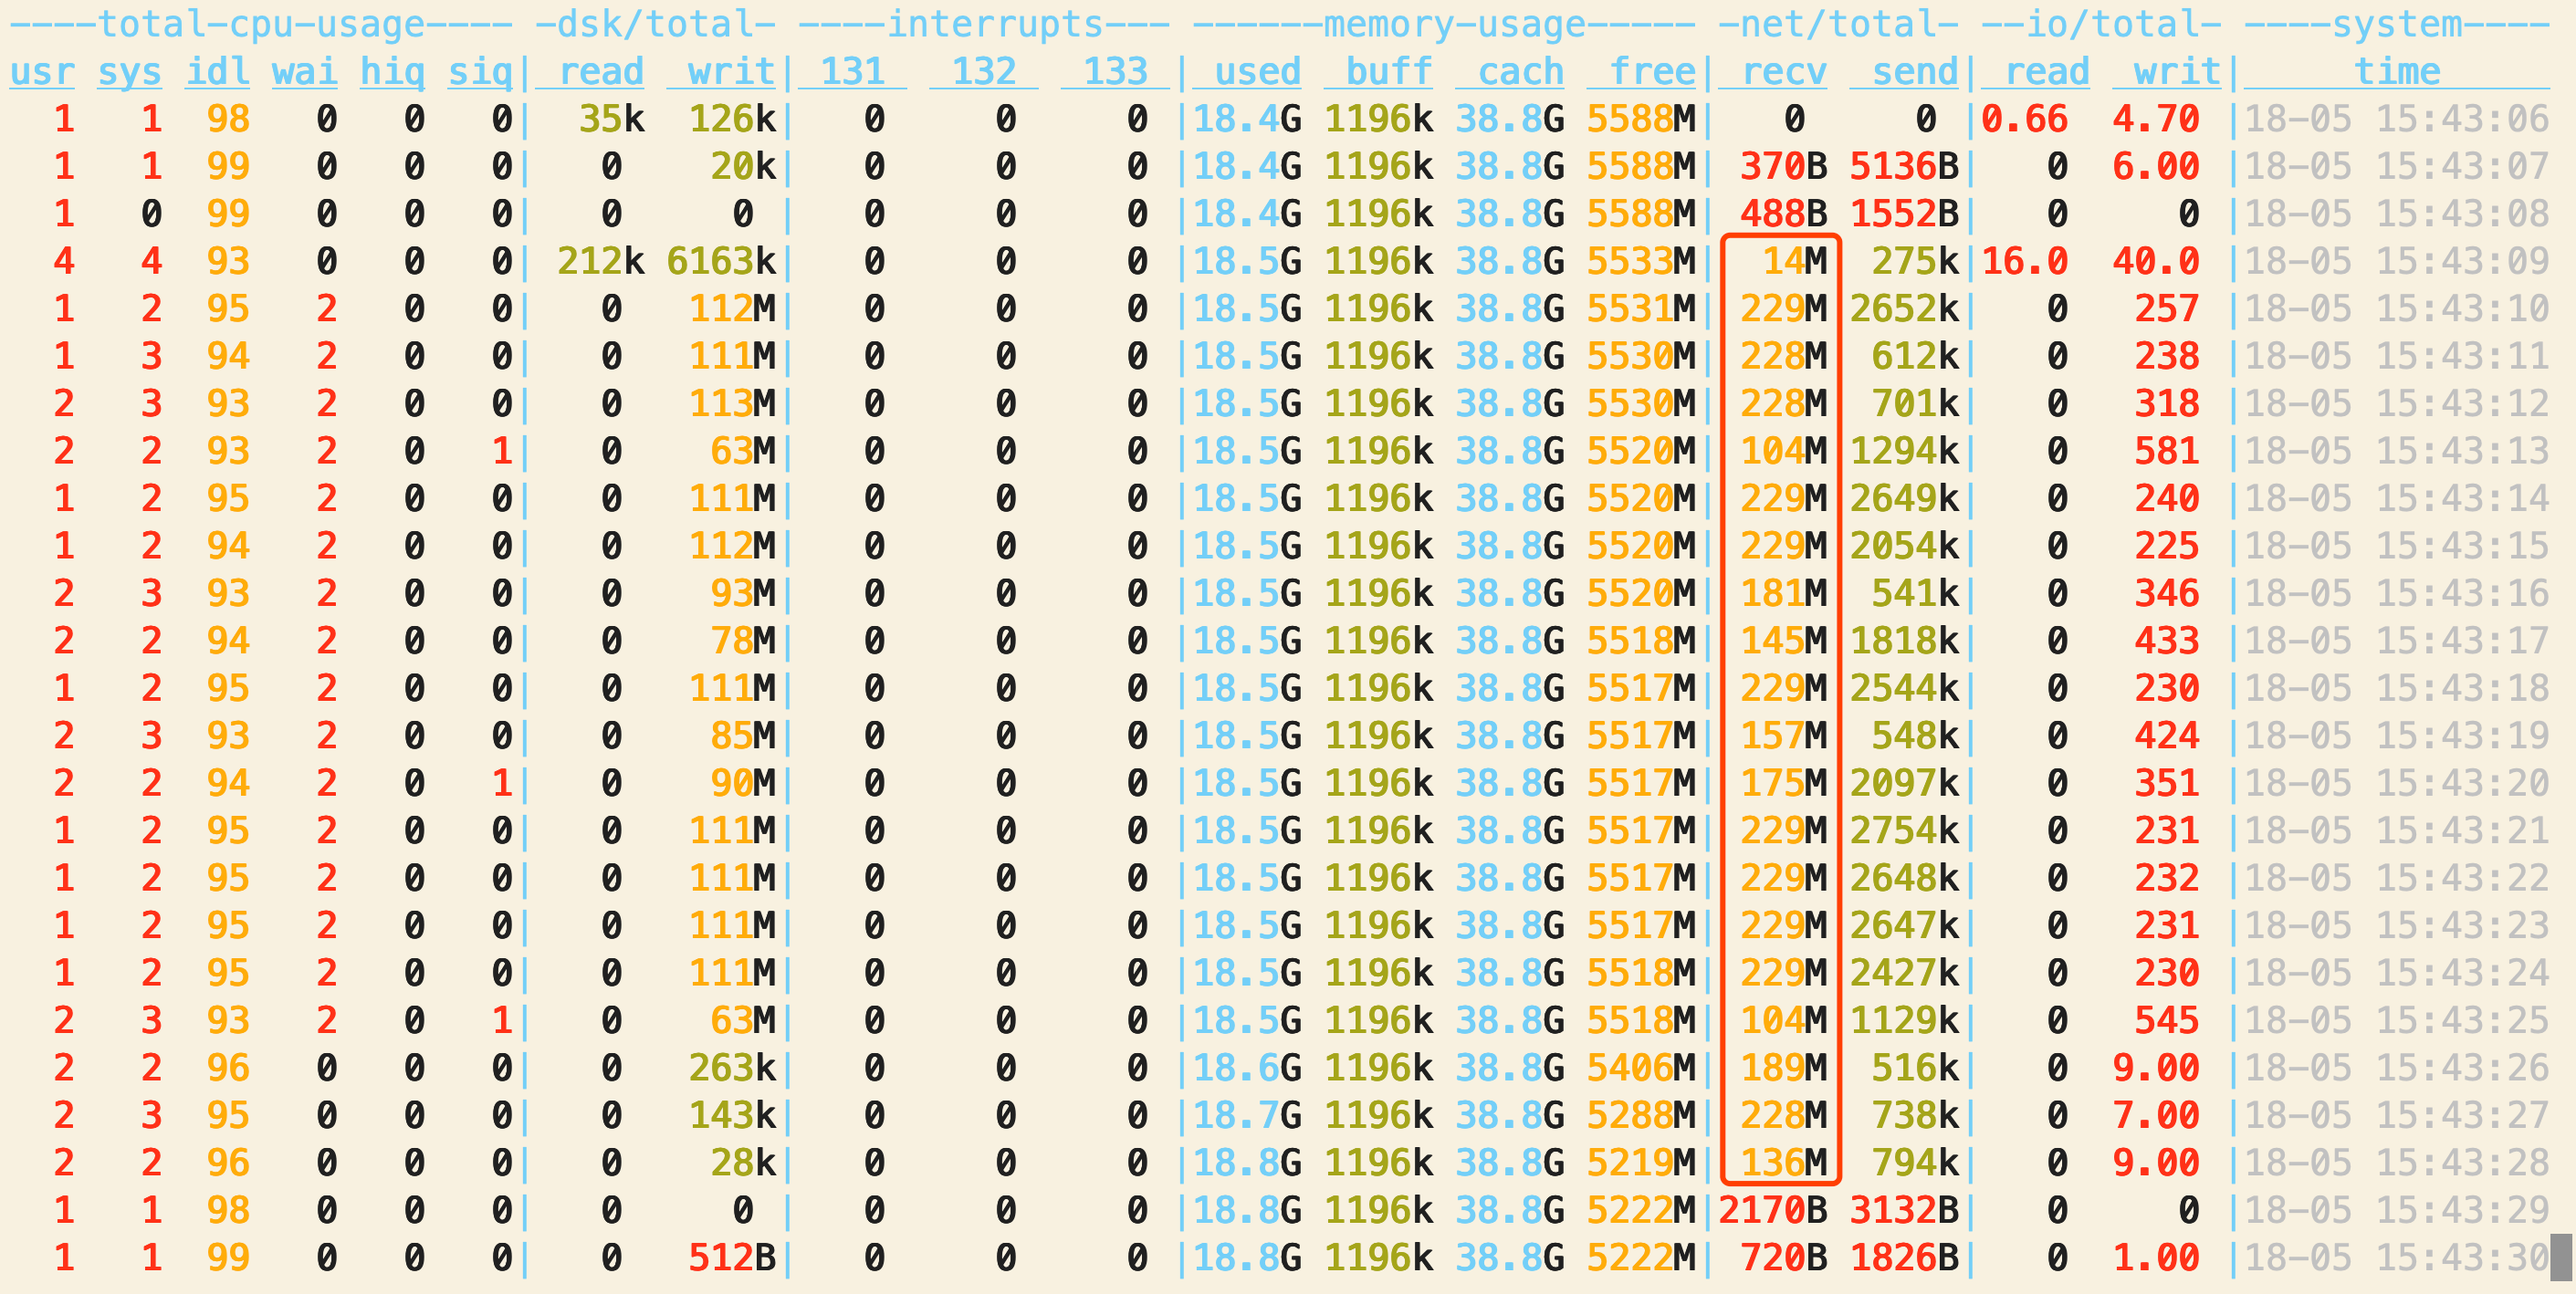
| − | * | + | *<img style="max-width: 1170px;" src="https://wiki.jimv.cn/images/操作指南/迁移-3.png" /> |
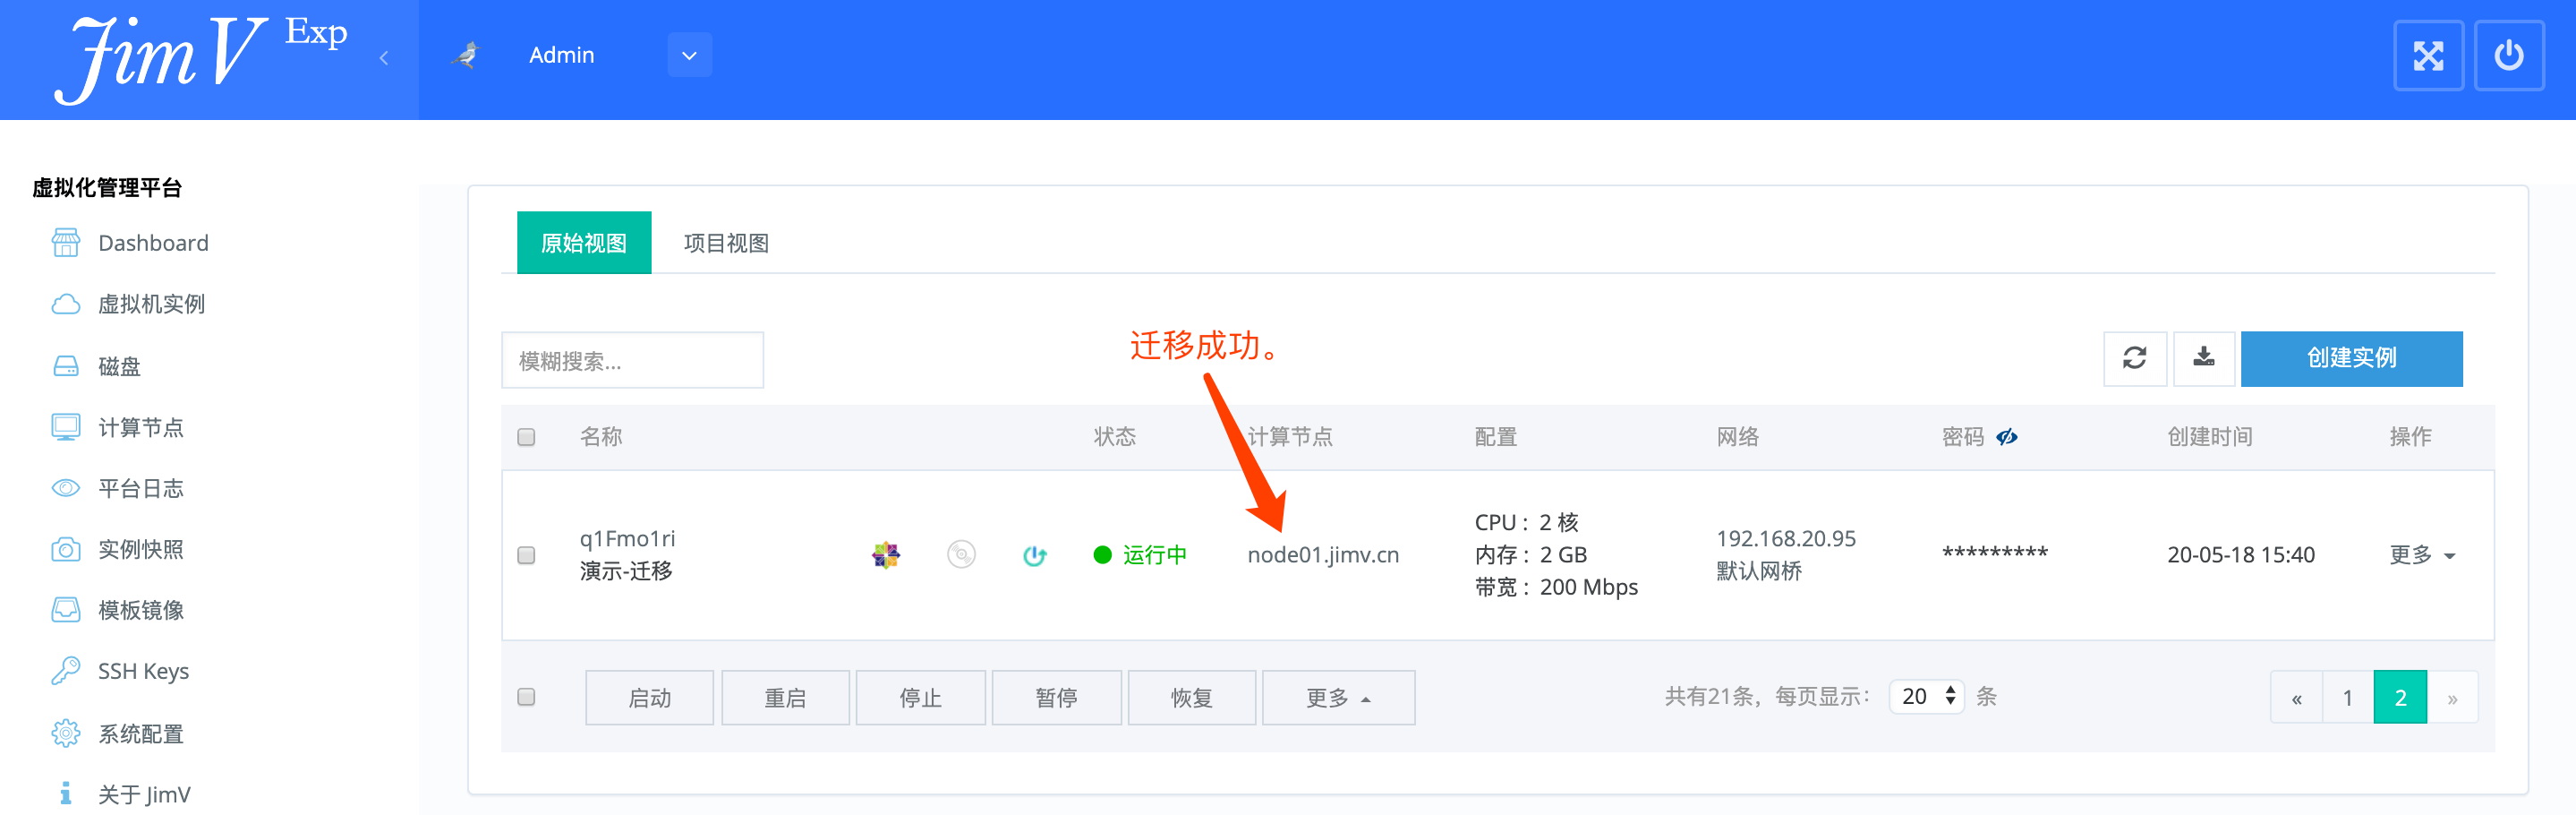
| − | * | + | *<img style="max-width: 1170px;" src="https://wiki.jimv.cn/images/操作指南/迁移-4.png" /> |
==VLAN== | ==VLAN== | ||
| 第217行: | 第217行: | ||
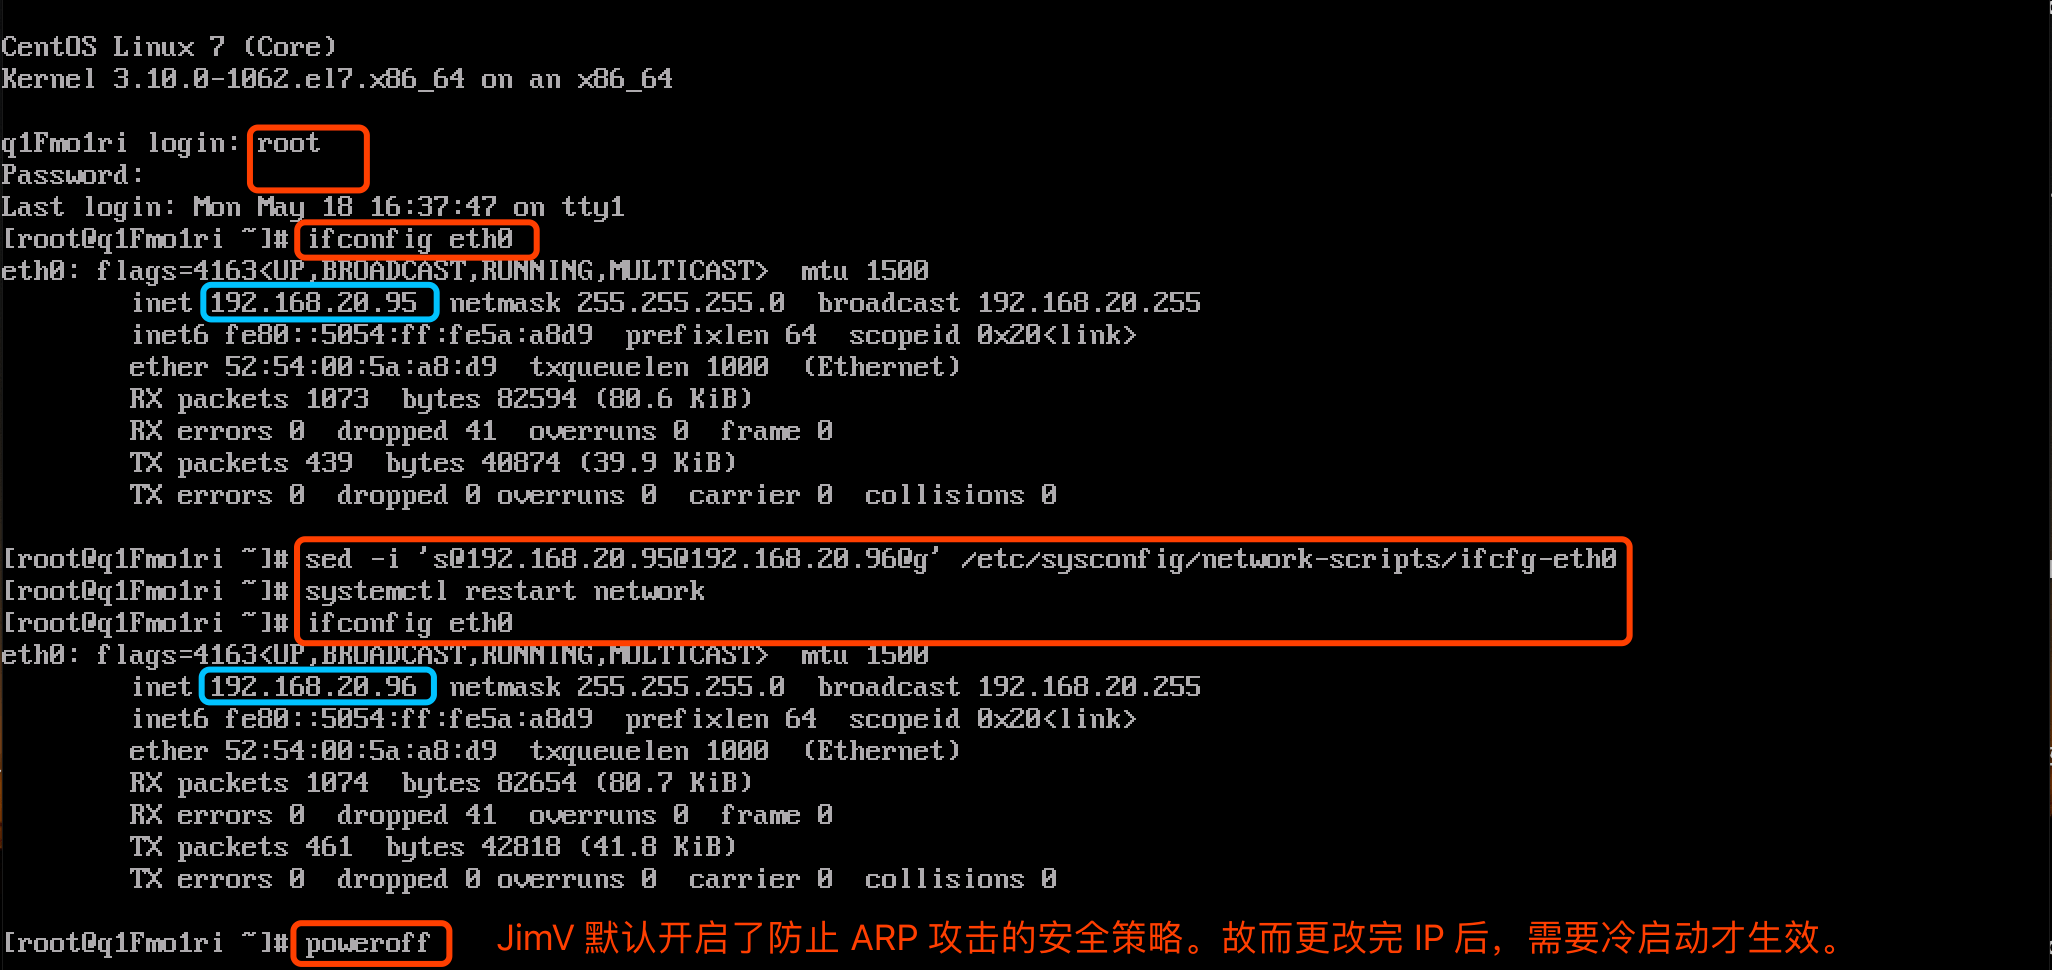
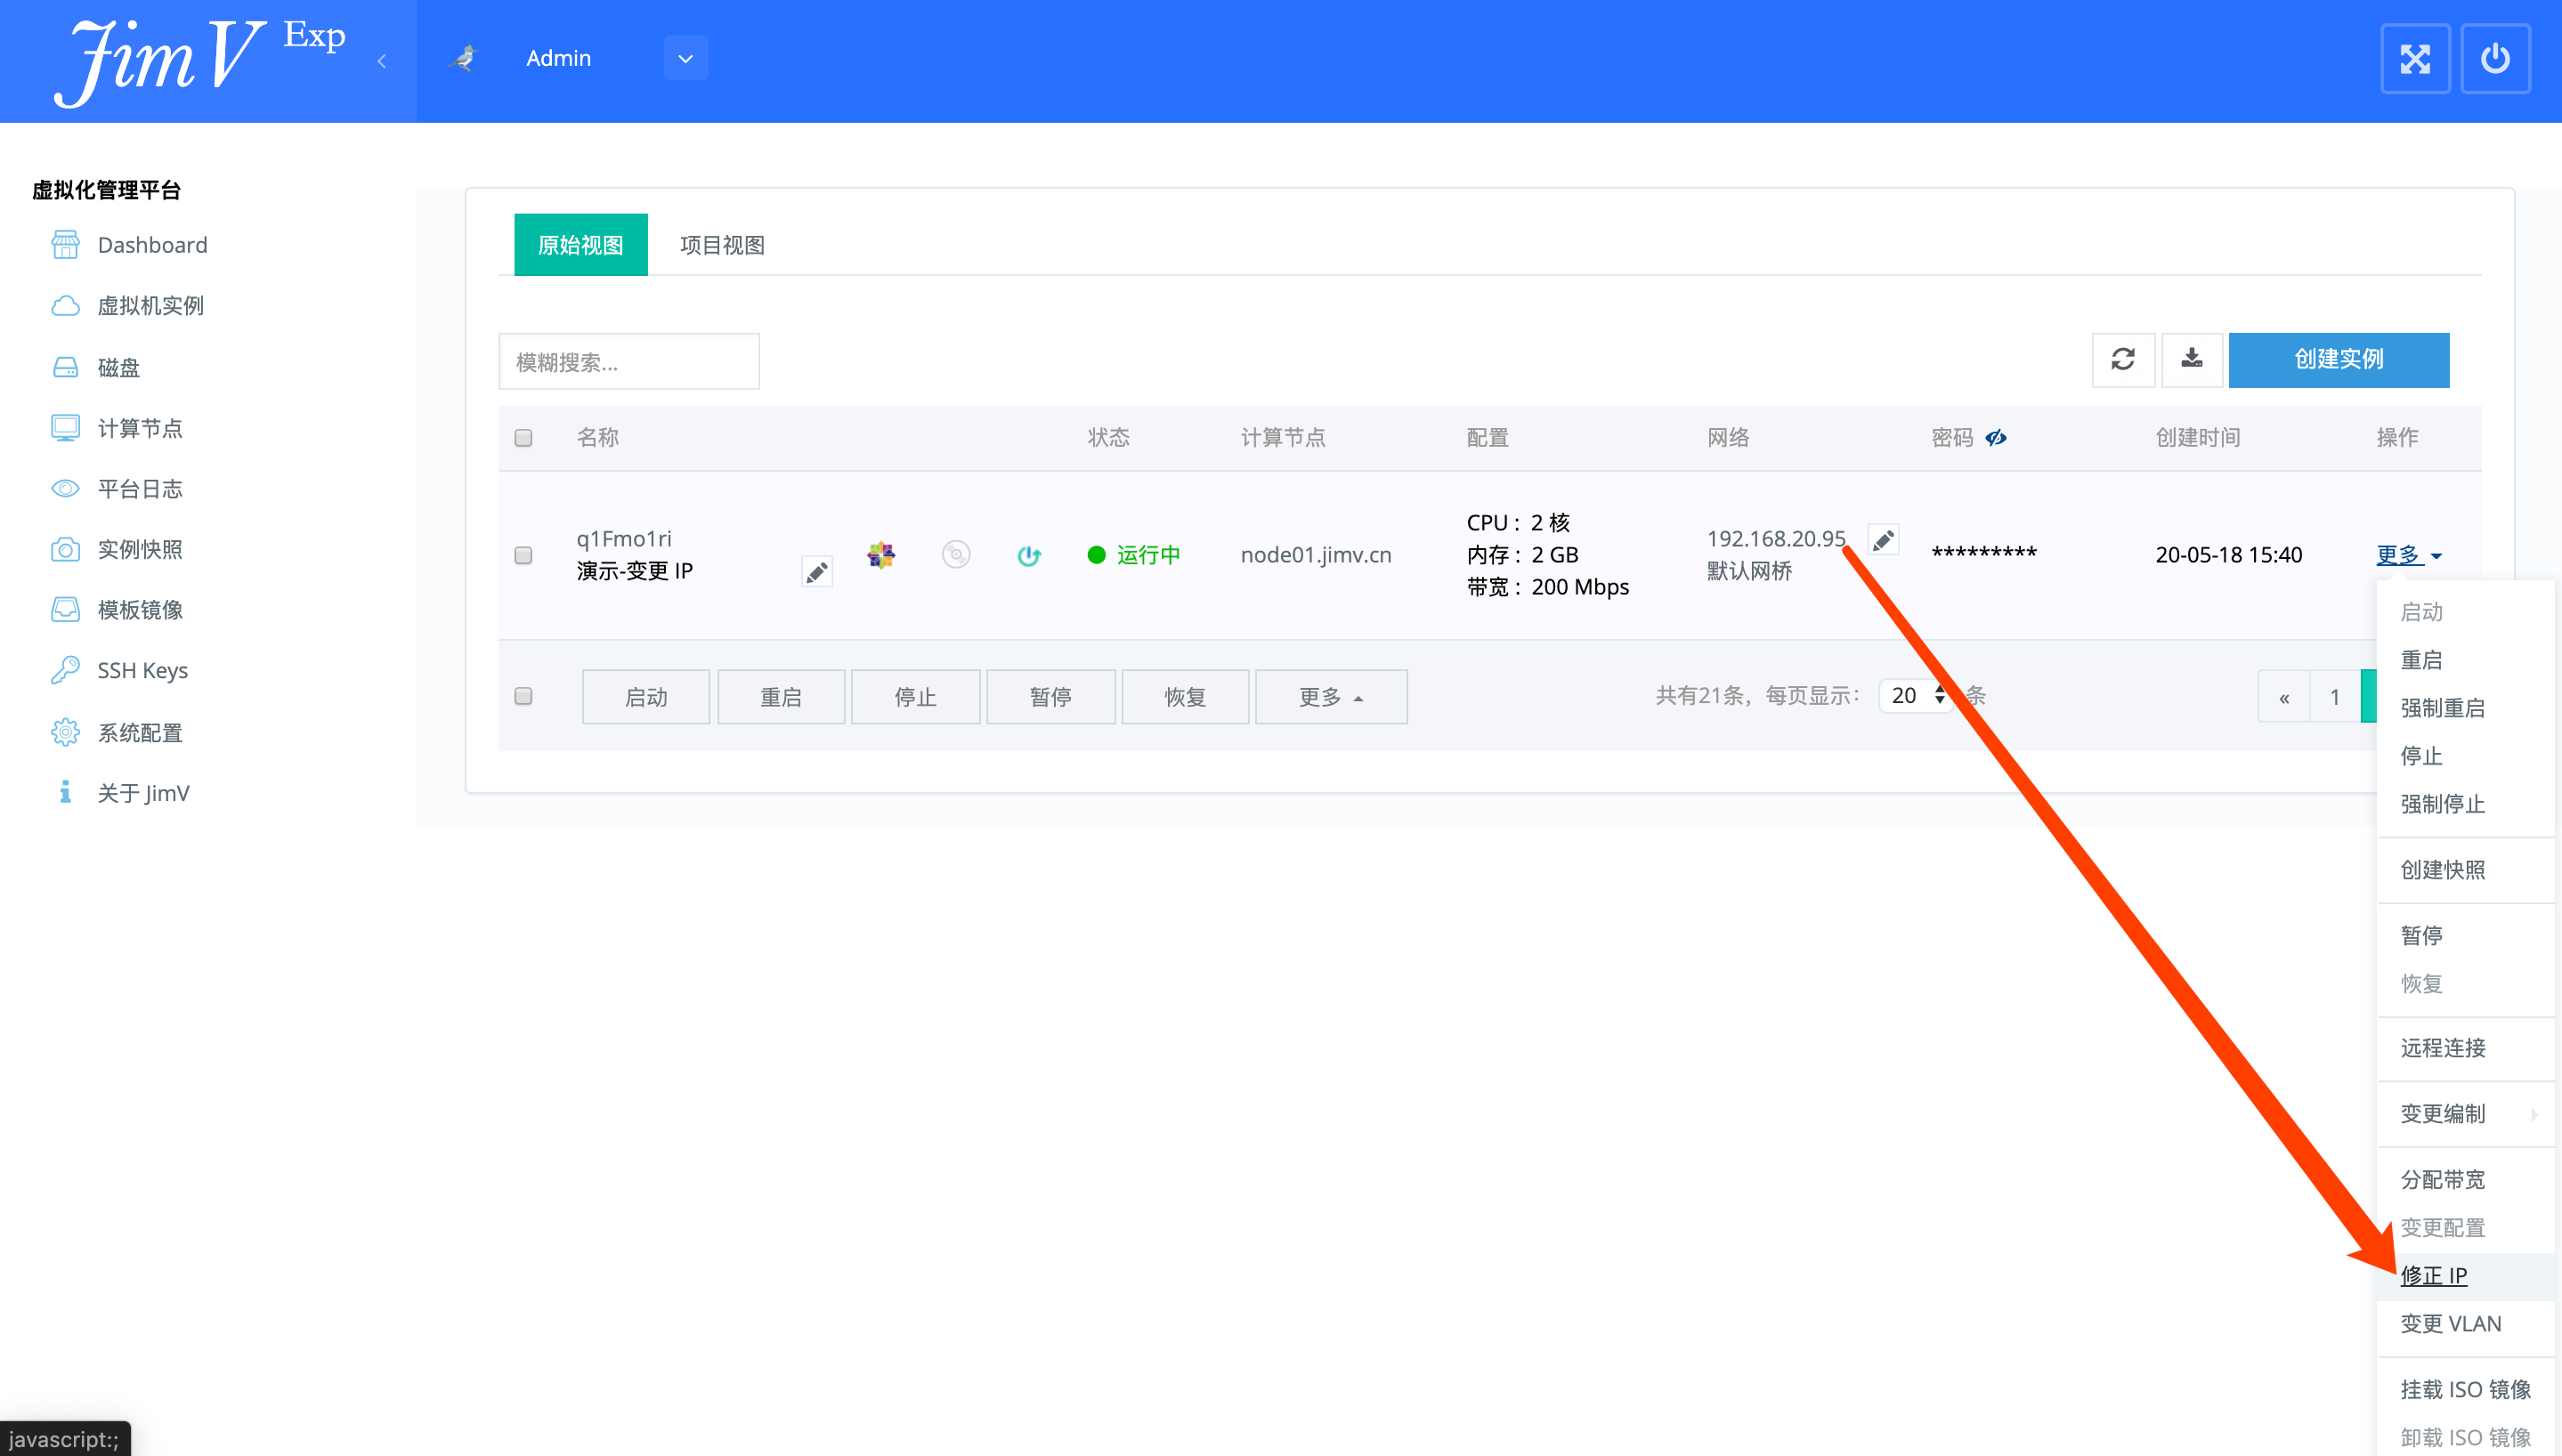
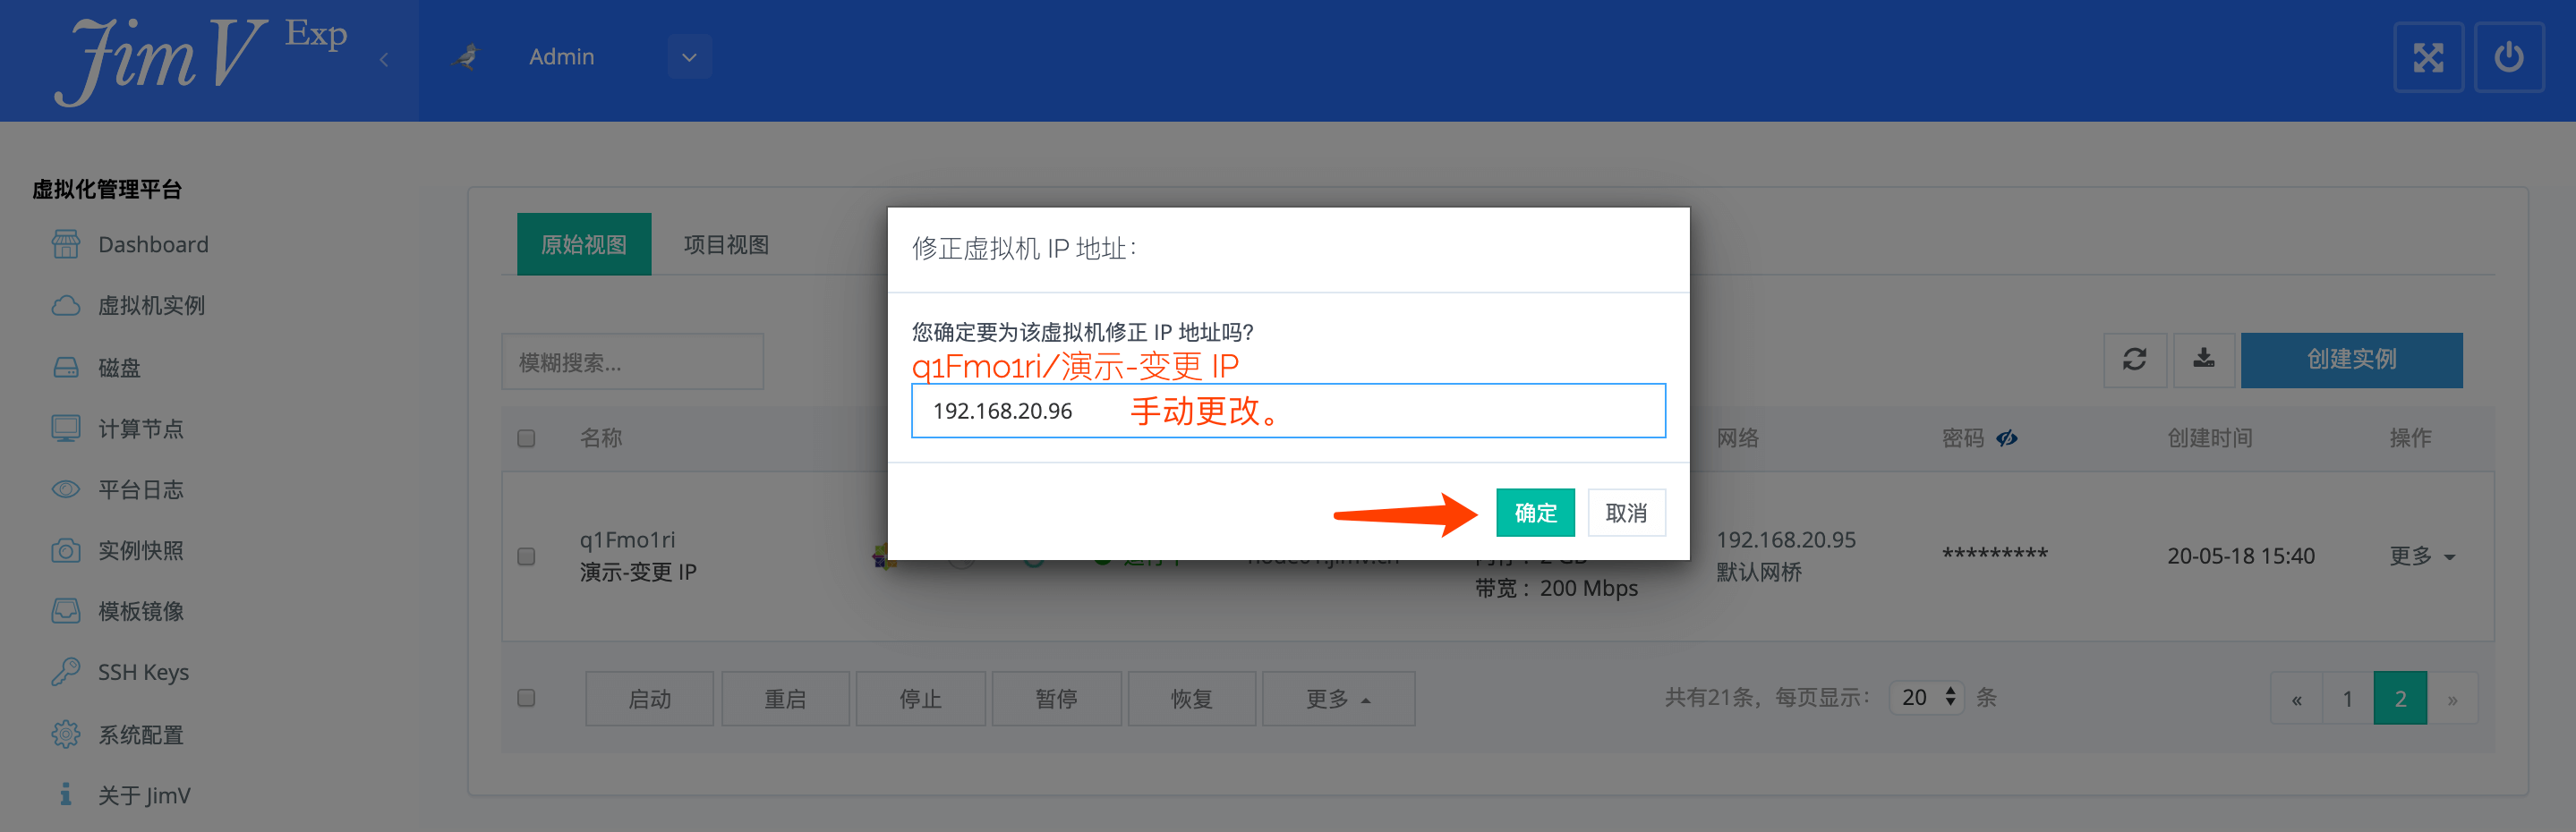
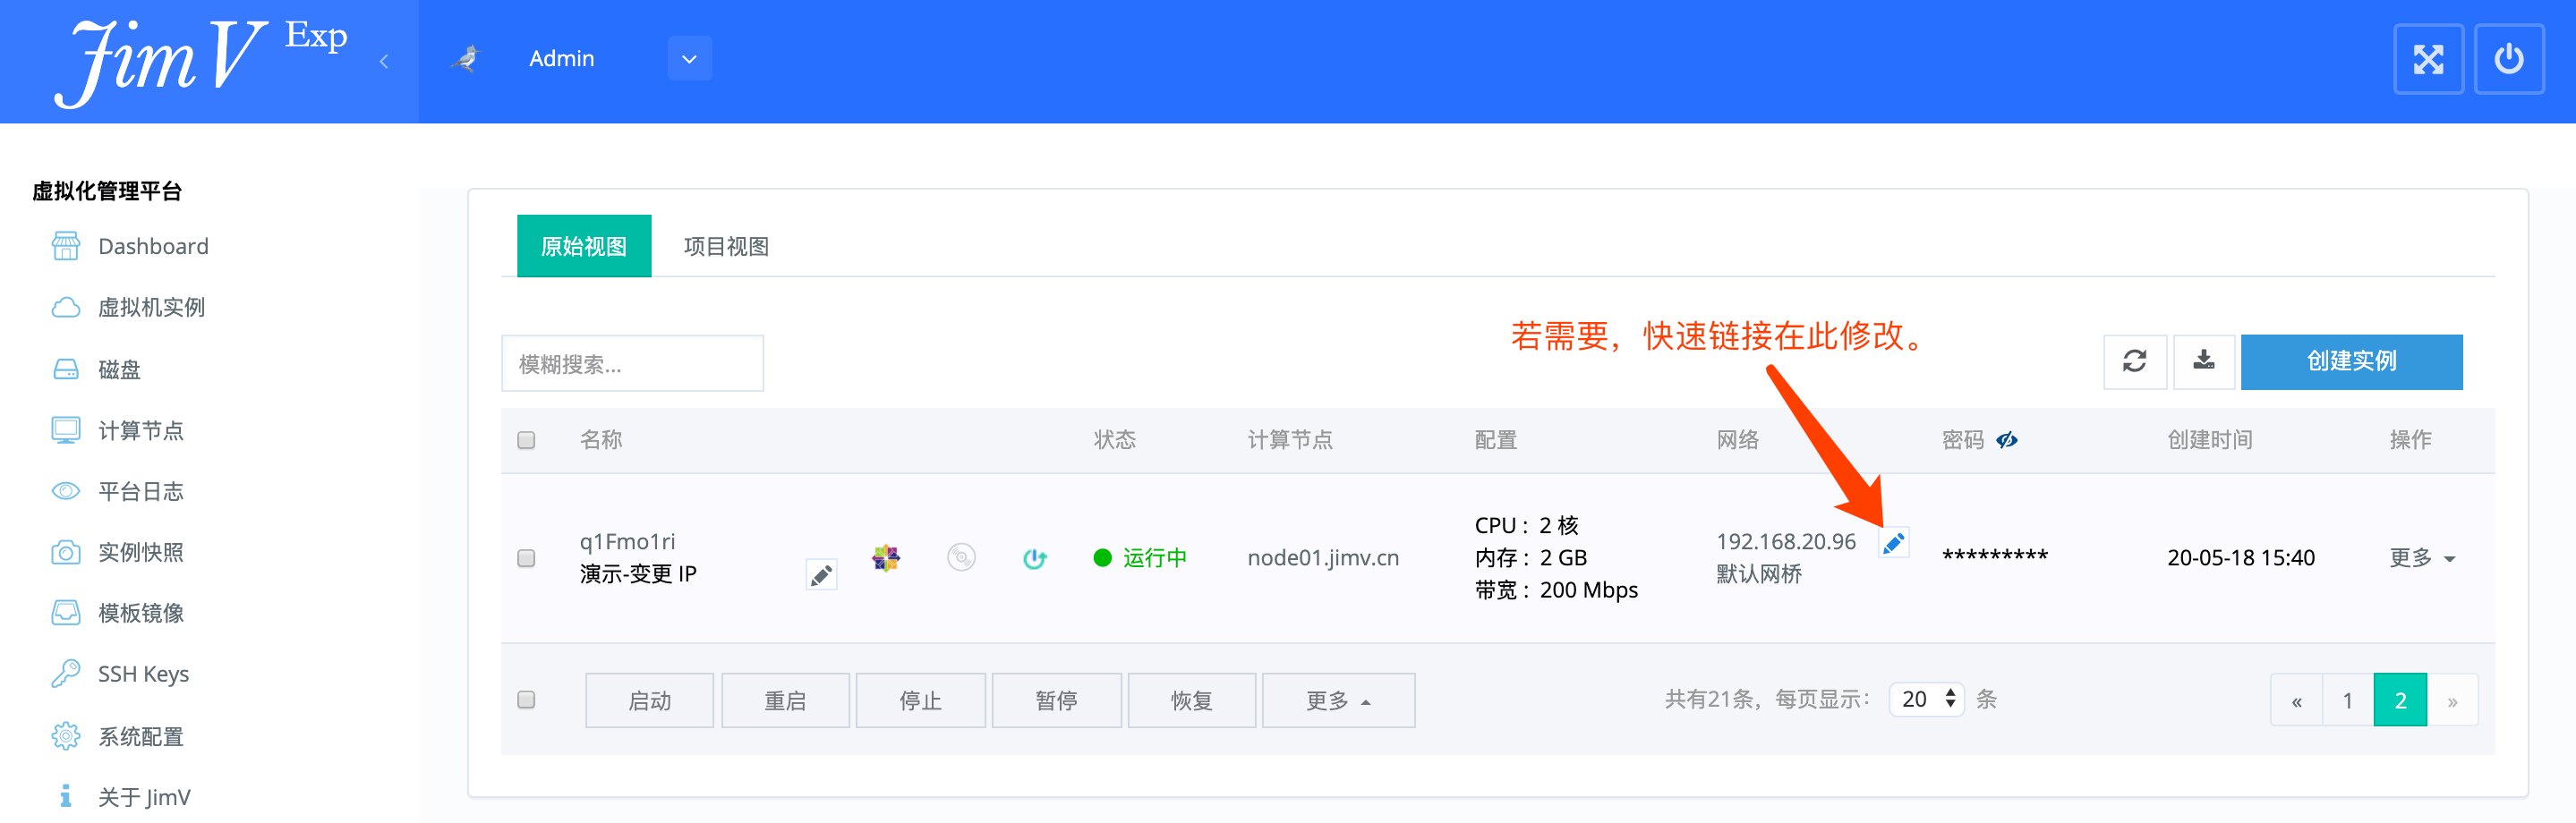
==变更虚拟机 IP== | ==变更虚拟机 IP== | ||
| − | * | + | *<img style="max-width: 1170px;" src="https://wiki.jimv.cn/images/操作指南/更改IP.png" /> |
| − | * | + | *<img style="max-width: 1170px;" src="https://wiki.jimv.cn/images/操作指南/更改IP-2.png" /> |
| − | * | + | *<img style="max-width: 1170px;" src="https://wiki.jimv.cn/images/操作指南/更改IP-3.png" /> |
| − | * | + | *<img style="max-width: 1170px;" src="https://wiki.jimv.cn/images/操作指南/更改IP-4.png" /> |
==从 VMWare 导入== | ==从 VMWare 导入== | ||
| − | * | + | *<img style="max-width: 1170px;" src="https://wiki.jimv.cn/images/操作指南/Vmware2jimv.png" /> |
| − | * | + | *<img style="max-width: 1170px;" src="https://wiki.jimv.cn/images/操作指南/Vmware2jimv-2.png" /> |
| − | * | + | *<img style="max-width: 1170px;" src="https://wiki.jimv.cn/images/操作指南/Vmware2jimv-3.png" /> |
| − | * | + | *<img style="max-width: 1170px;" src="https://wiki.jimv.cn/images/操作指南/Vmware2jimv-4.png" /> |
| − | * | + | *<img style="max-width: 1170px;" src="https://wiki.jimv.cn/images/操作指南/Vmware2jimv-5-1.png" /> |
| − | * | + | *<img style="max-width: 1170px;" src="https://wiki.jimv.cn/images/操作指南/Vmware2jimv-5-2.png" /> |
| − | * | + | *<img style="max-width: 1170px;" src="https://wiki.jimv.cn/images/操作指南/Vmware2jimv-6.png" /> |
| − | * | + | *<img style="max-width: 1170px;" src="https://wiki.jimv.cn/images/操作指南/Vmware2jimv-7.png" /> |
==接纳已有的 KVM 虚拟机== | ==接纳已有的 KVM 虚拟机== | ||
| 第241行: | 第241行: | ||
Q1. 从 VMware 迁移到 JimV 到虚拟机,启动时出现如下异常该如何处理? | Q1. 从 VMware 迁移到 JimV 到虚拟机,启动时出现如下异常该如何处理? | ||
| − | * | + | *<img style="max-width: 1170px;" src="https://wiki.jimv.cn/images/操作指南/Vmware2jimv-异常.png" /> |
| − | * | + | *<img style="max-width: 1170px;" src="https://wiki.jimv.cn/images/操作指南/Vmware2jimv-异常-2.png" /> |
A1. 如上异常属于操作系统无法正常识别所在的硬件环境。重新生成一次 initramfs 文件即可。 | A1. 如上异常属于操作系统无法正常识别所在的硬件环境。重新生成一次 initramfs 文件即可。 | ||
| − | * | + | *<img style="max-width: 1170px;" src="https://wiki.jimv.cn/images/操作指南/Vmware2jimv-异常-3.png" /> |
| − | * | + | *<img style="max-width: 1170px;" src="https://wiki.jimv.cn/images/操作指南/Vmware2jimv-异常-4.png" /> |
2020年5月21日 (四) 02:56的版本
目录
JimV 操作权威指南
IP 池
保留 IP
提示:出现在保留 IP 列表里面的资源,将不会在创建虚拟机时被分配出去。
添加运算能力

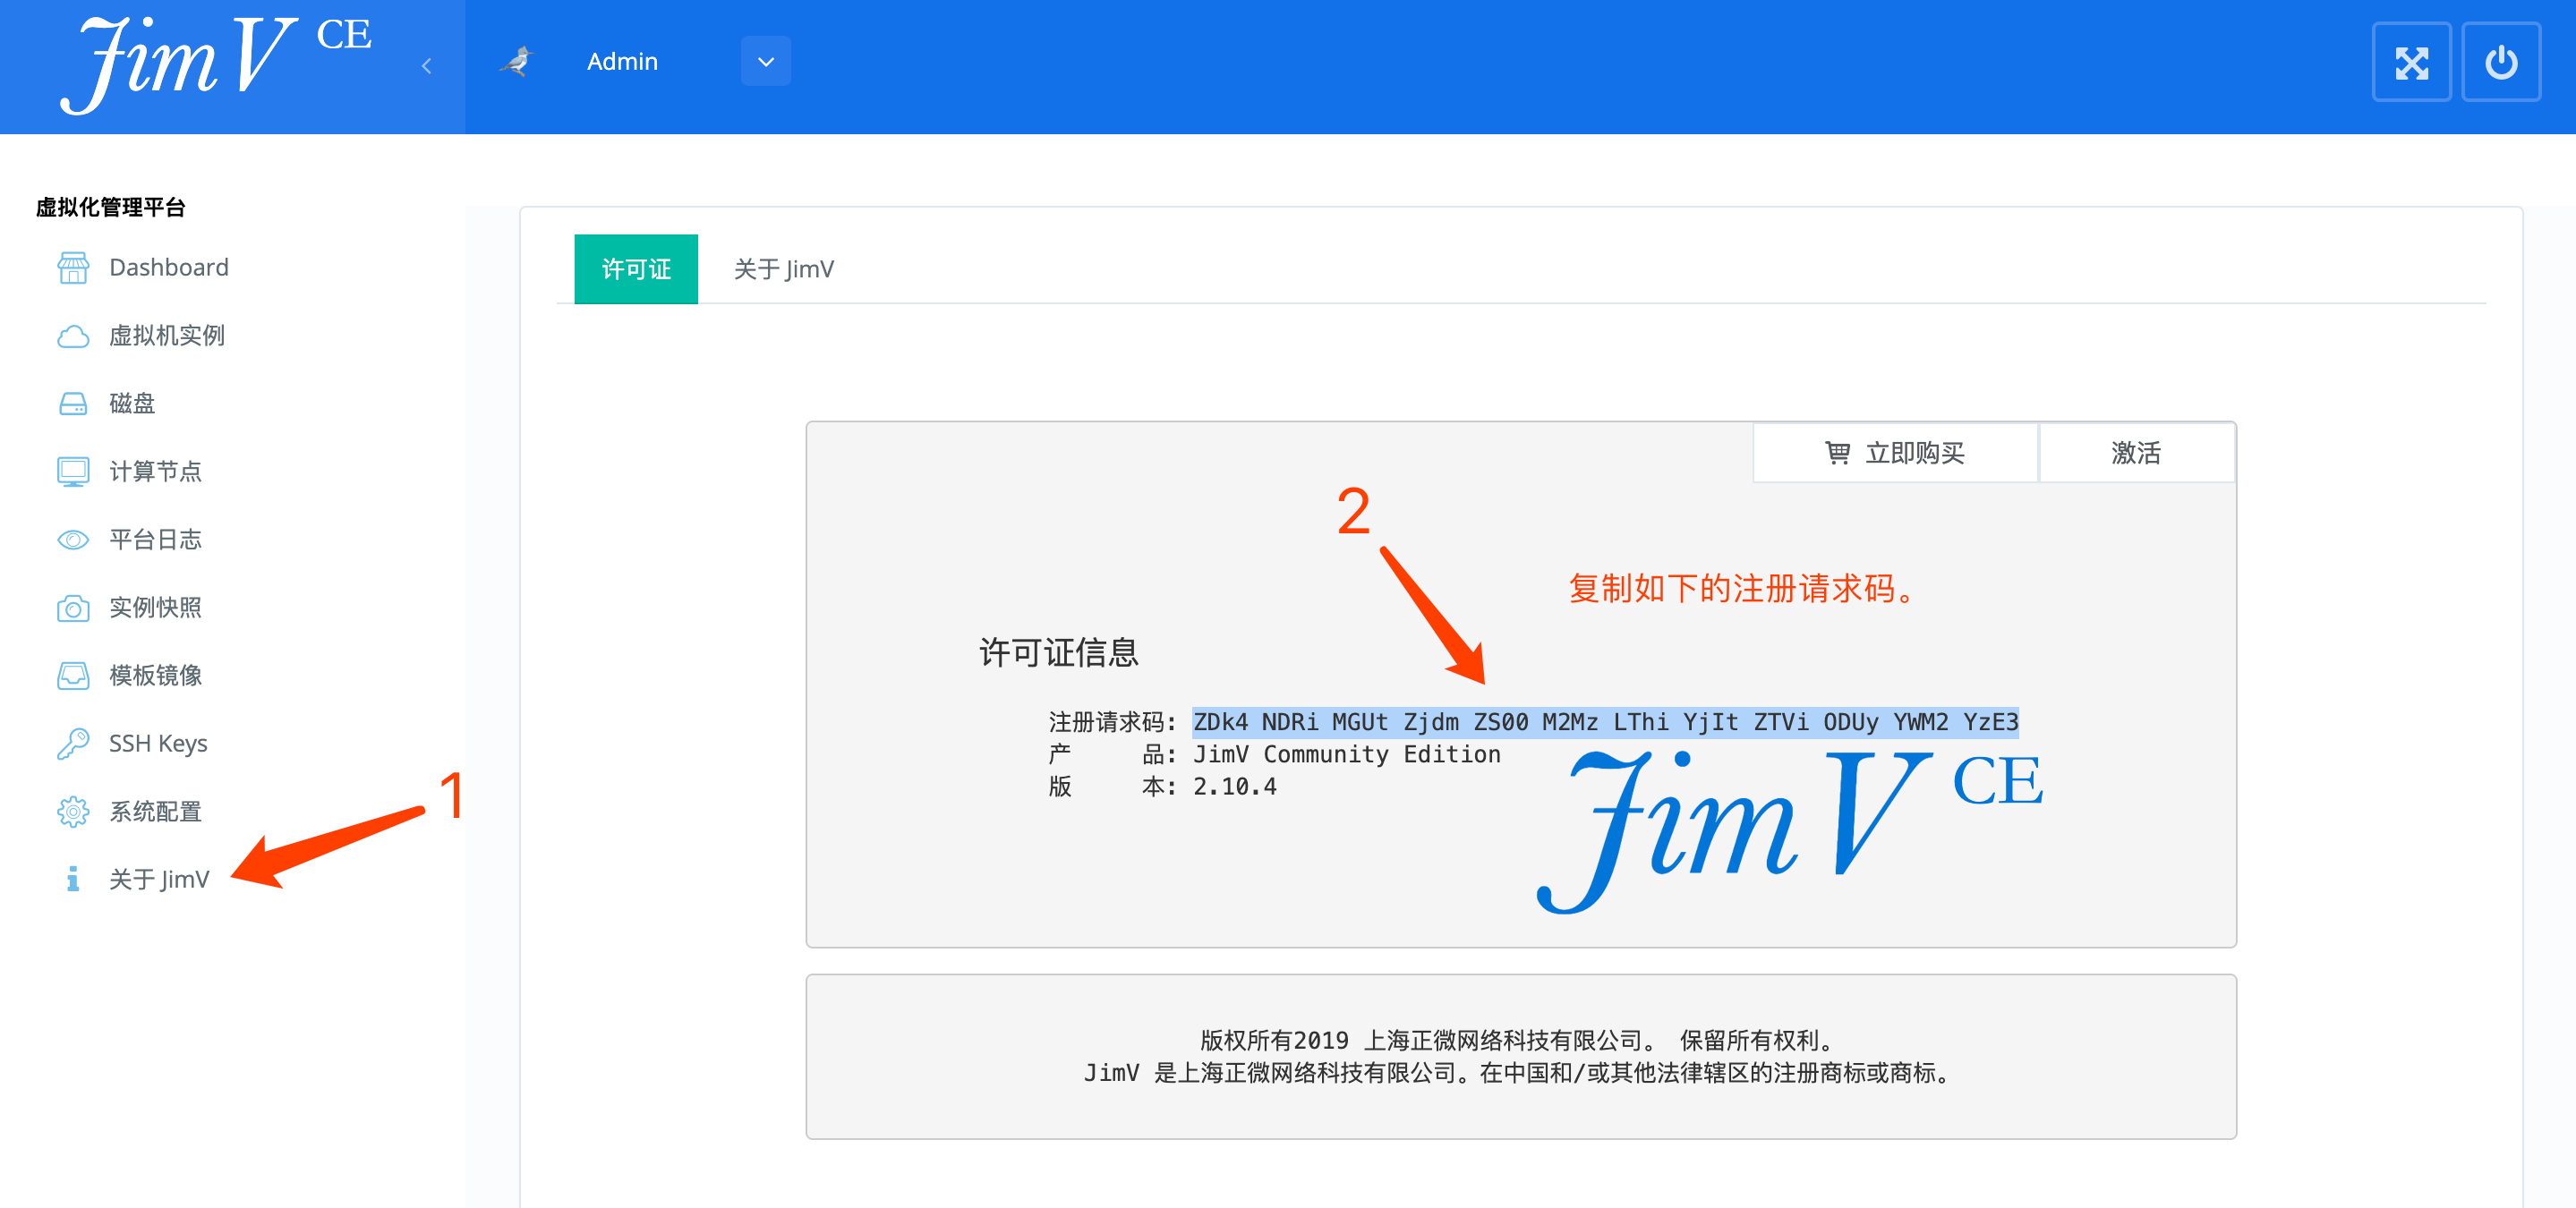
模版镜像
从 JimV-Store 获取
提示:只有商业版的授权许可,才可以访问 JimV-Store。
绑定设备
授权商业版
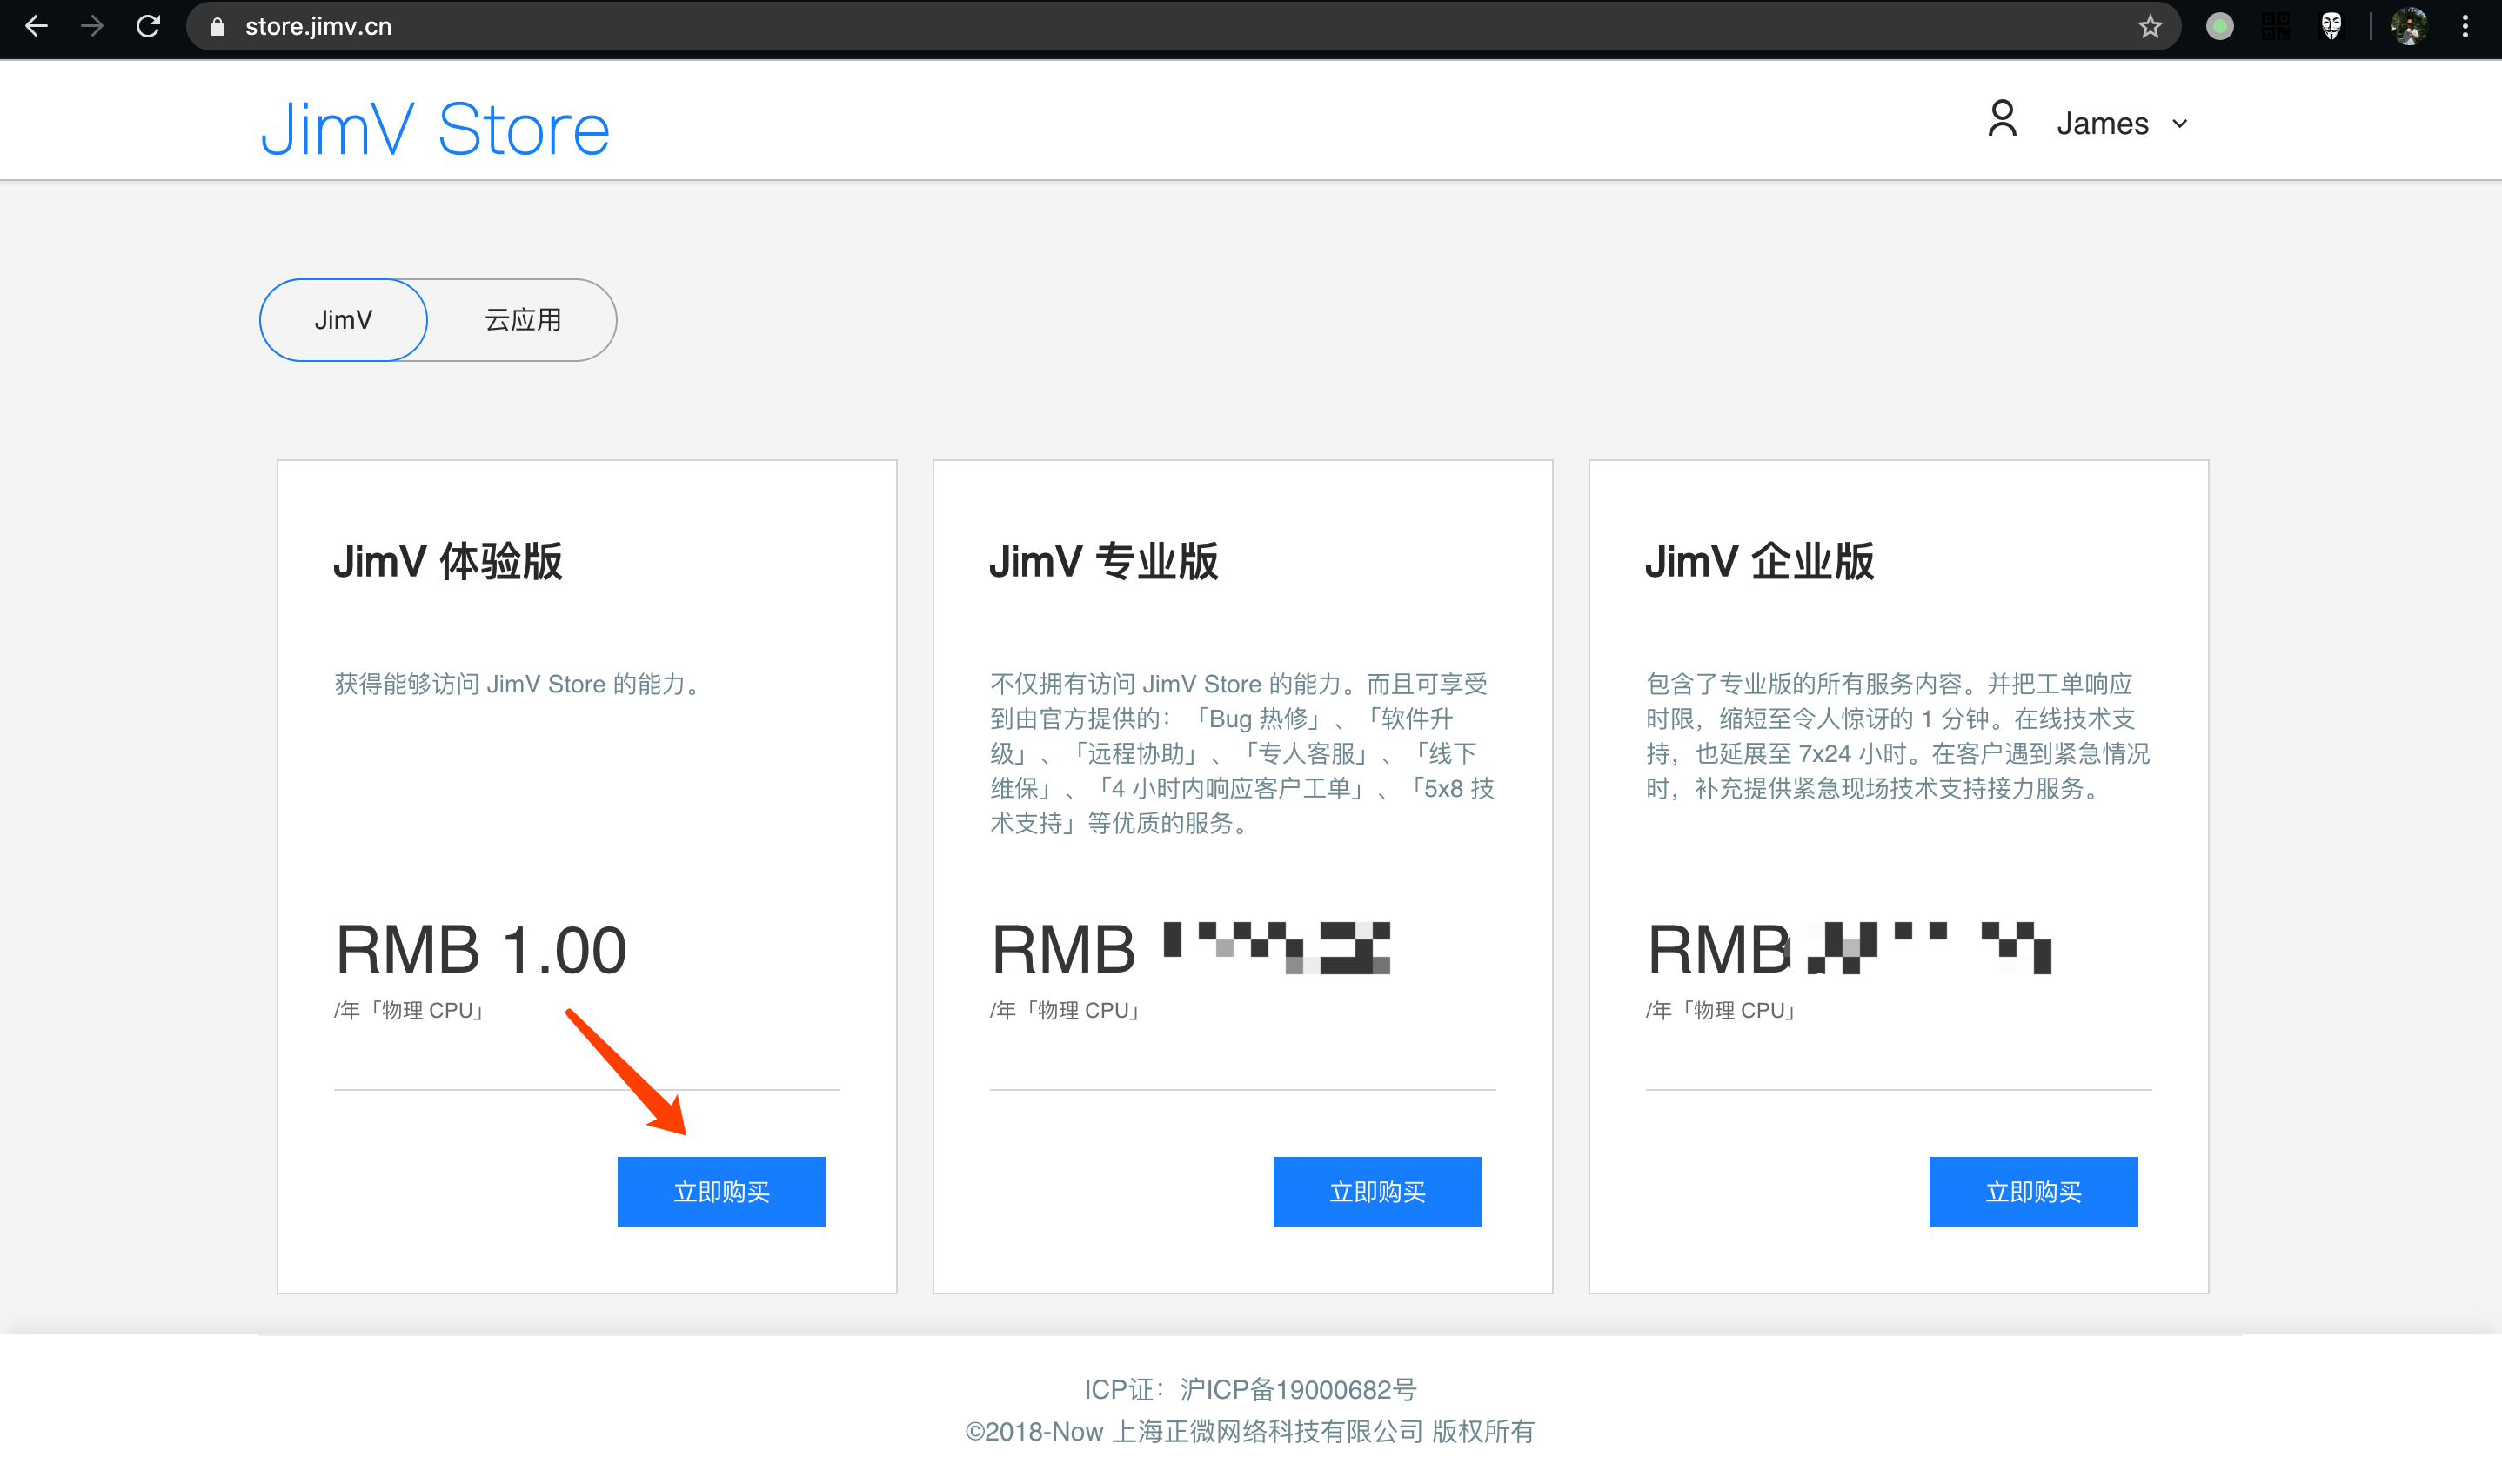
购买镜像
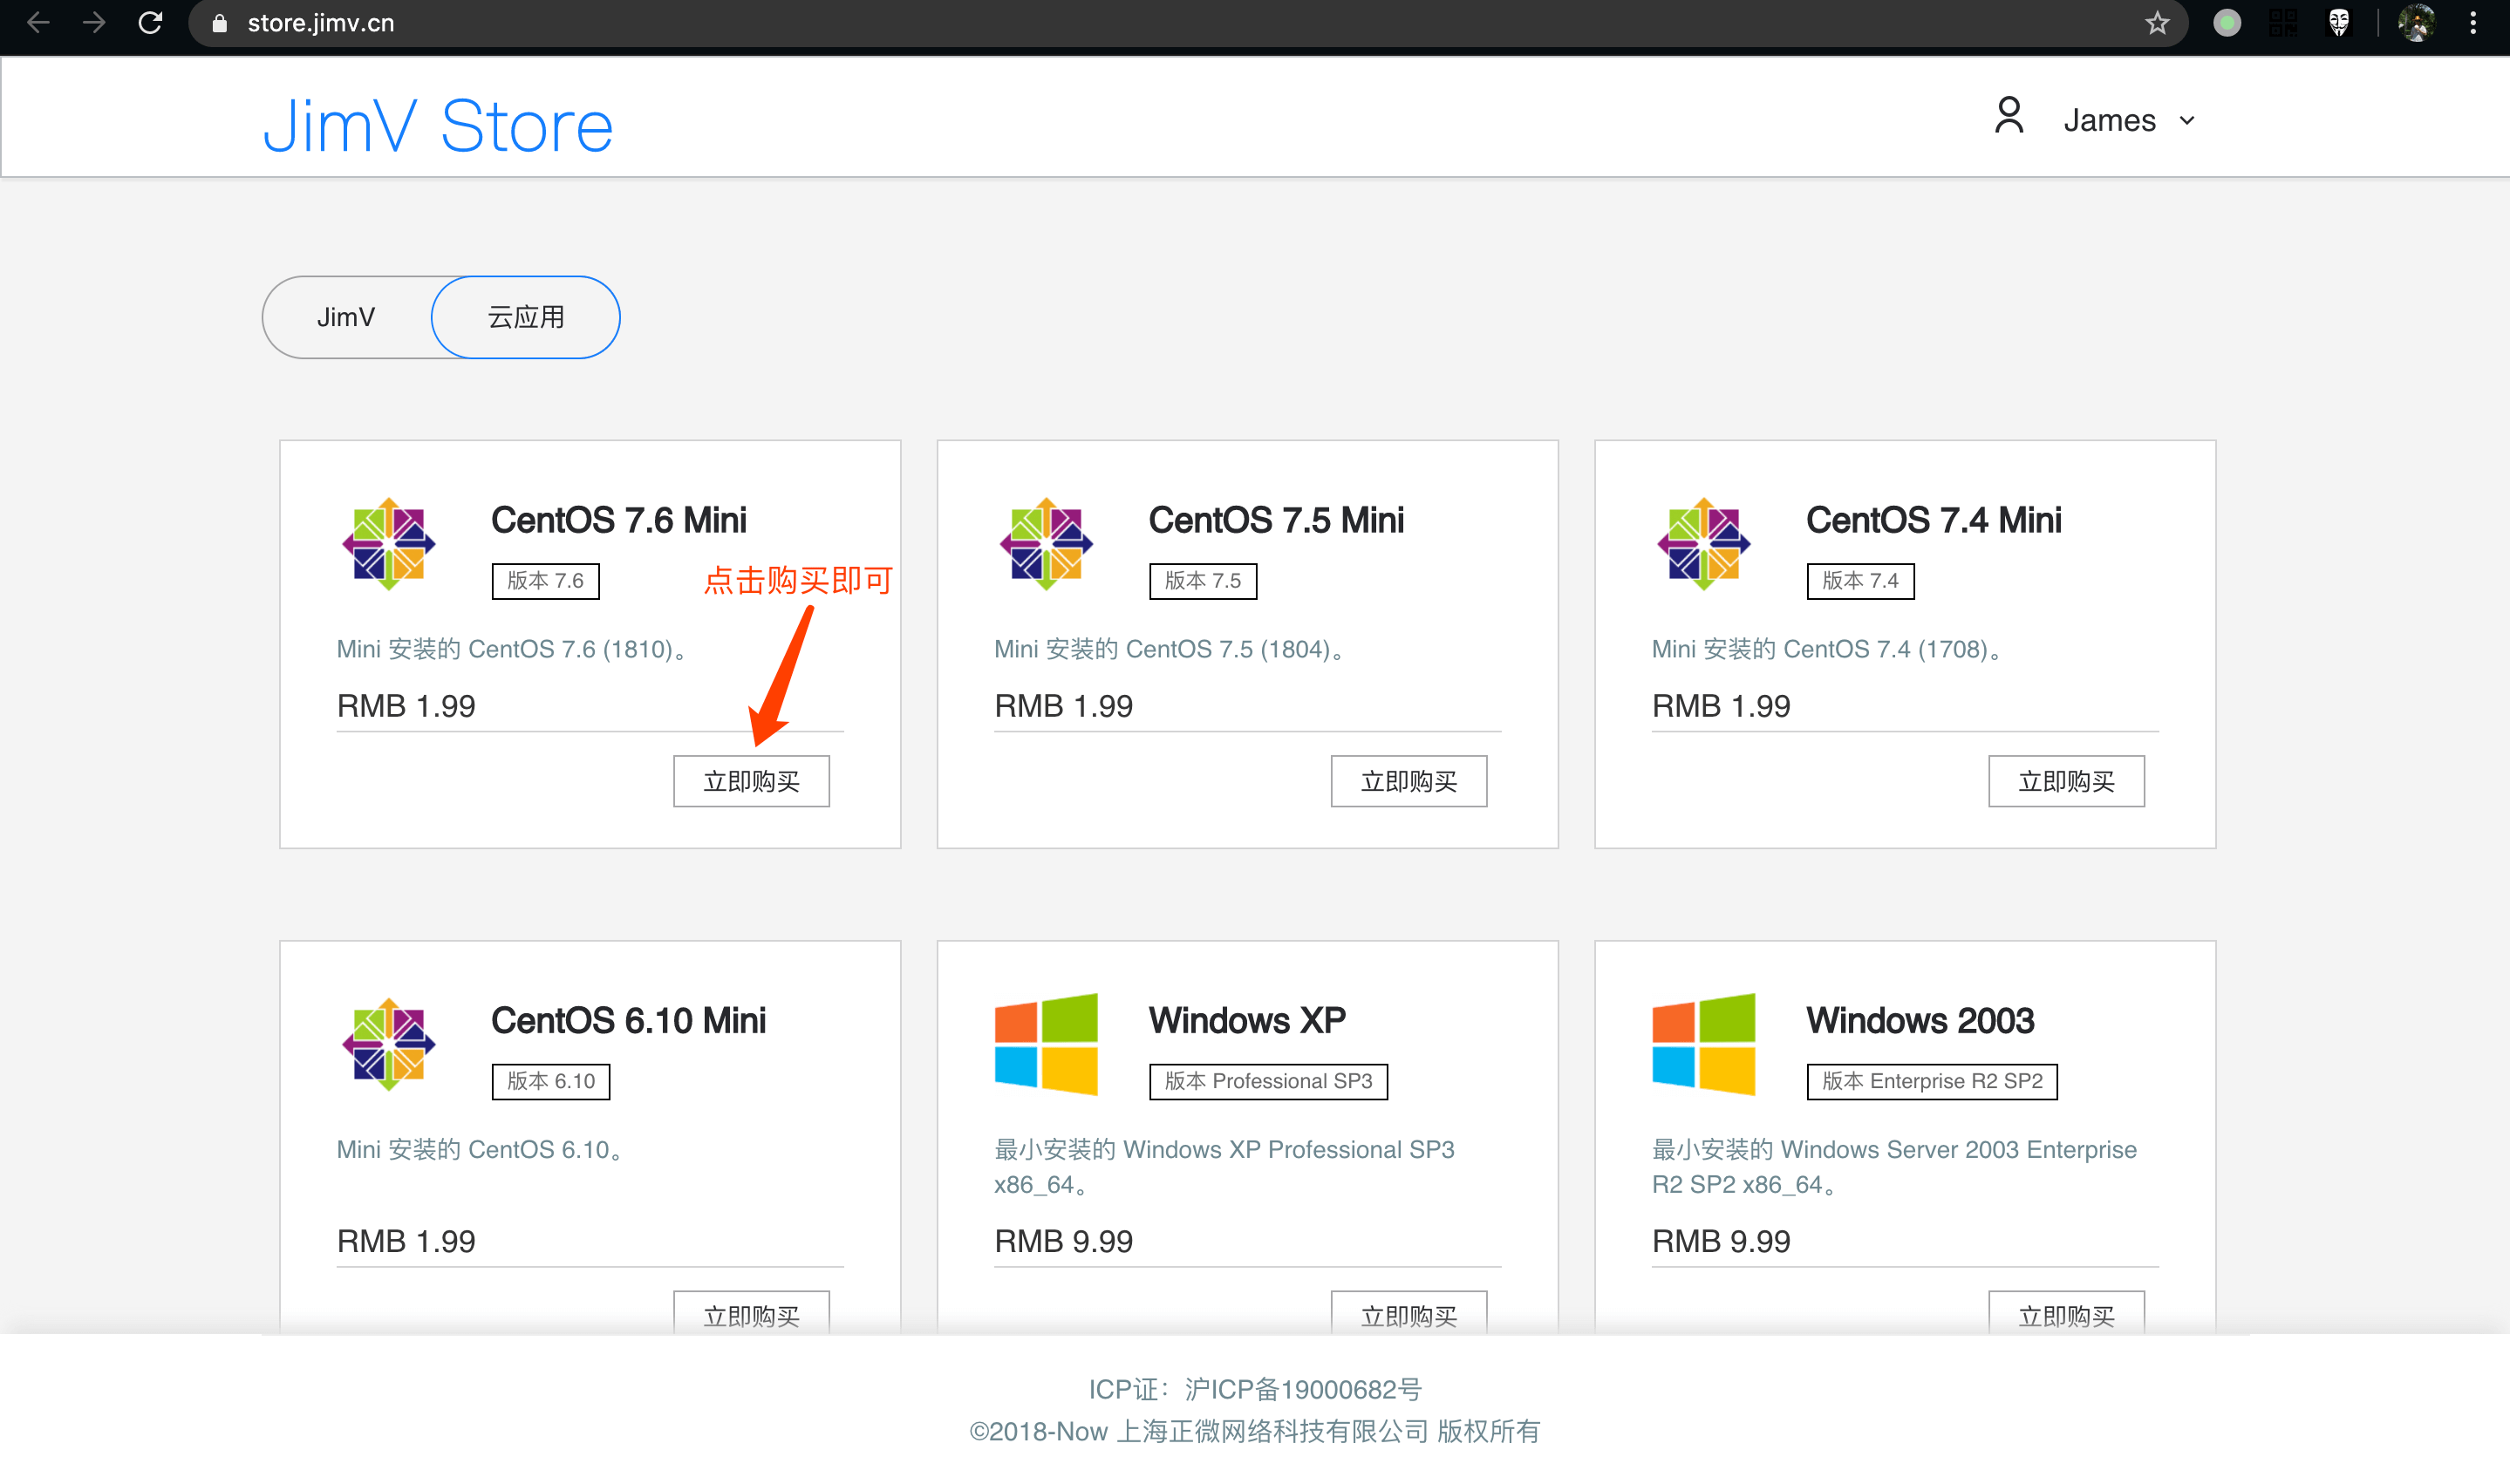
绑定购买到的镜像
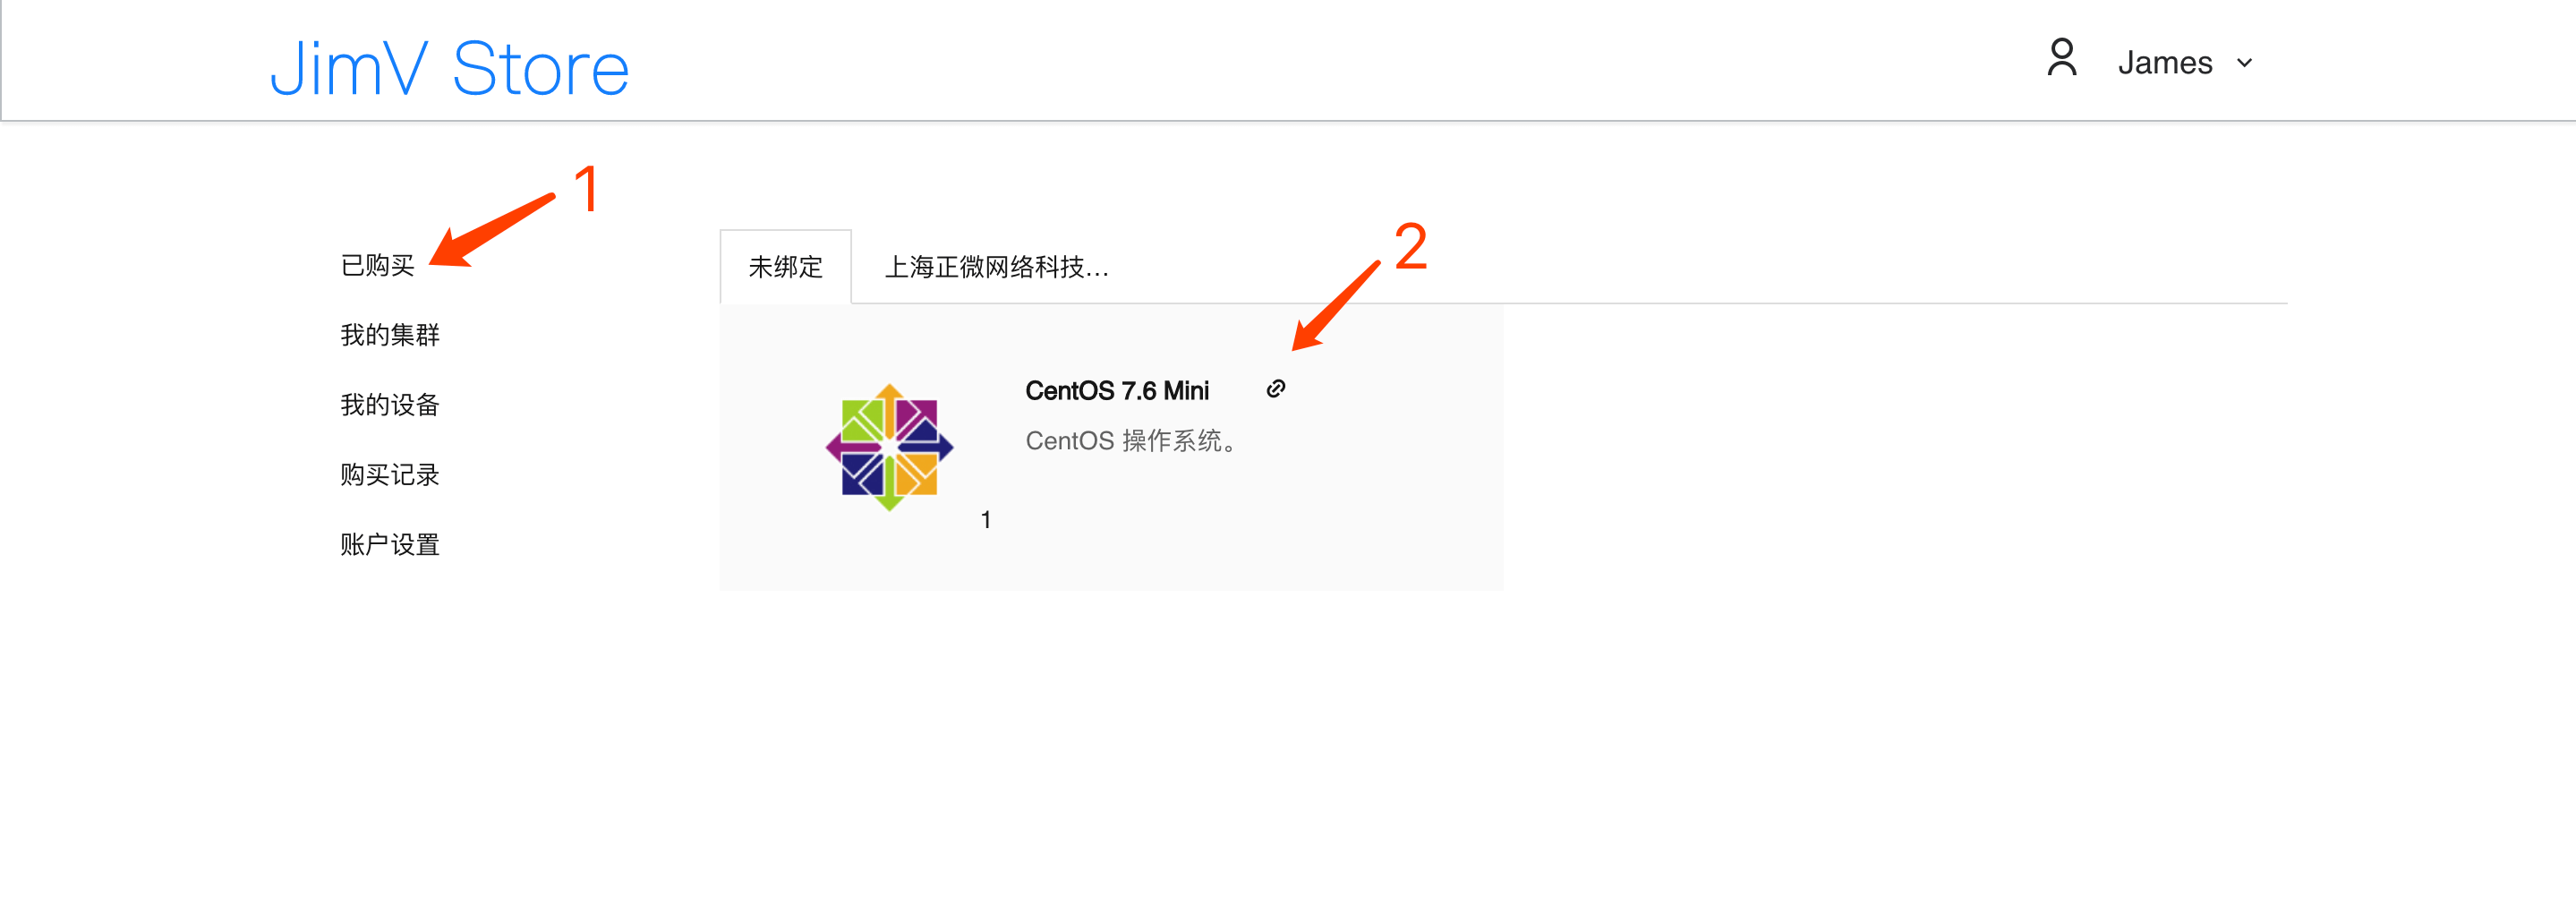
获取购买到的镜像
从第三方导入
获取模版
- 前往 JimV BBS 论坛注册账号;
- 进入「JimV镜像下载」区域获取所需模版;

搭建模版发布服务
- 整理将要被发布的模版镜像资源目录;

- 通过 HFS 把资源发布出来;

导入模版
- 获取模版的资源路径;

- 导入模版镜像;

模版制作
Linux 模版制作
Windows 模版制作
ISO 导入
搭建 ISO 资源发布服务
- 整理将要被发布的 ISO 资源目录;
- 通过 HFS 把资源发布出来;
导入 ISO 资源
- 获取模版的资源路径;
- 导入 ISO 镜像;
ISO 挂载

从 ISO 创建虚拟机
磁盘性能配额
- 进入详情页;
- 进入磁盘详情页;
- 变更配额;
IOPS 性能配额测试
- fio 工具测试 IOPS;
[root@qpTegaRk ~]# fio --iodepth=1 --ioengine=libaio --filename=/opt/testfile --direct=1 -size=10G --runtime=3600s --bs=4K --name=iops_test -rw=write

- 测试结果;
吞吐量性能配额测试
- fio 工具测试 BPS;
[root@qpTegaRk ~]# fio --iodepth=1 --ioengine=libaio --filename=/opt/testfile --direct=1 --size=40G --runtime=3600s --bs=4M --name=bps_test --rw=write

- 测试结果;
「桶」的概念
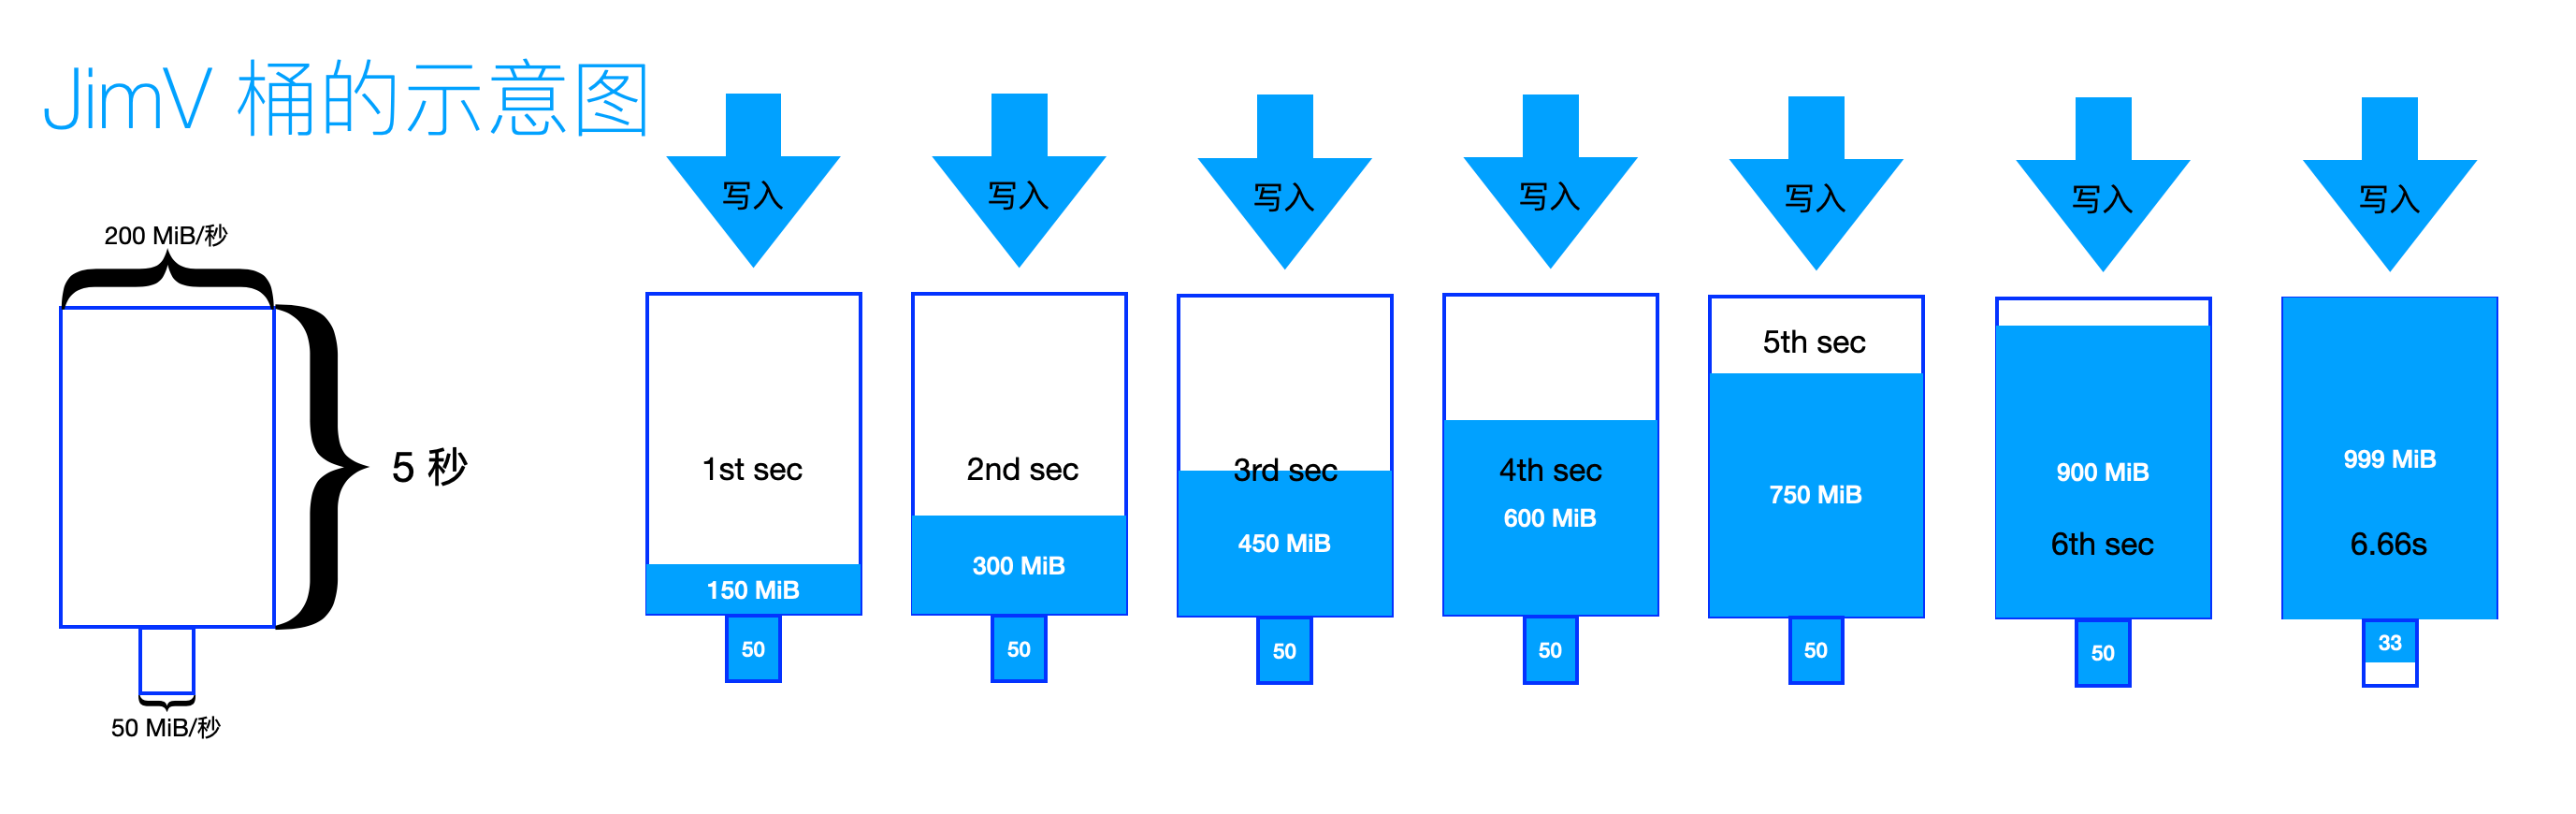
提示:如下几个公式,可以方便用户快速计算出所需的技术指标。
桶满时间 = 桶宽 * 桶高 / (桶宽 - 管宽)
快速通道容积 = 桶宽 * 桶满时间
数据穿越时间 = (数据体积 - 桶宽 * 桶满时间) / 管宽 + 桶满时间
桶满时间 = 桶宽 * 桶高 / (桶宽 - 管宽)
快速通道容积 = 桶宽 * 桶满时间
数据穿越时间 = (数据体积 - 桶宽 * 桶满时间) / 管宽 + 桶满时间
桶的测试之 BPS
- 设置桶的尺寸;
- 预测数据穿越时间;
<img style="max-width: 1170px;" src="https://wiki.jimv.cn/images/操作指南/桶的测试之BPS数据穿越时间预测.png%7C400px%7C桶的测试之BPS数据穿越时间预测]]预期写入的 BPS 序列 200 200 200 200 200 200 150 50 50 50 50 50 50 50 50 50 50 50 50 50 48
- 数据穿越实践;

在线磁盘扩容
查看当前磁盘状态
找到目标磁盘并扩容
- 找到目标磁盘;
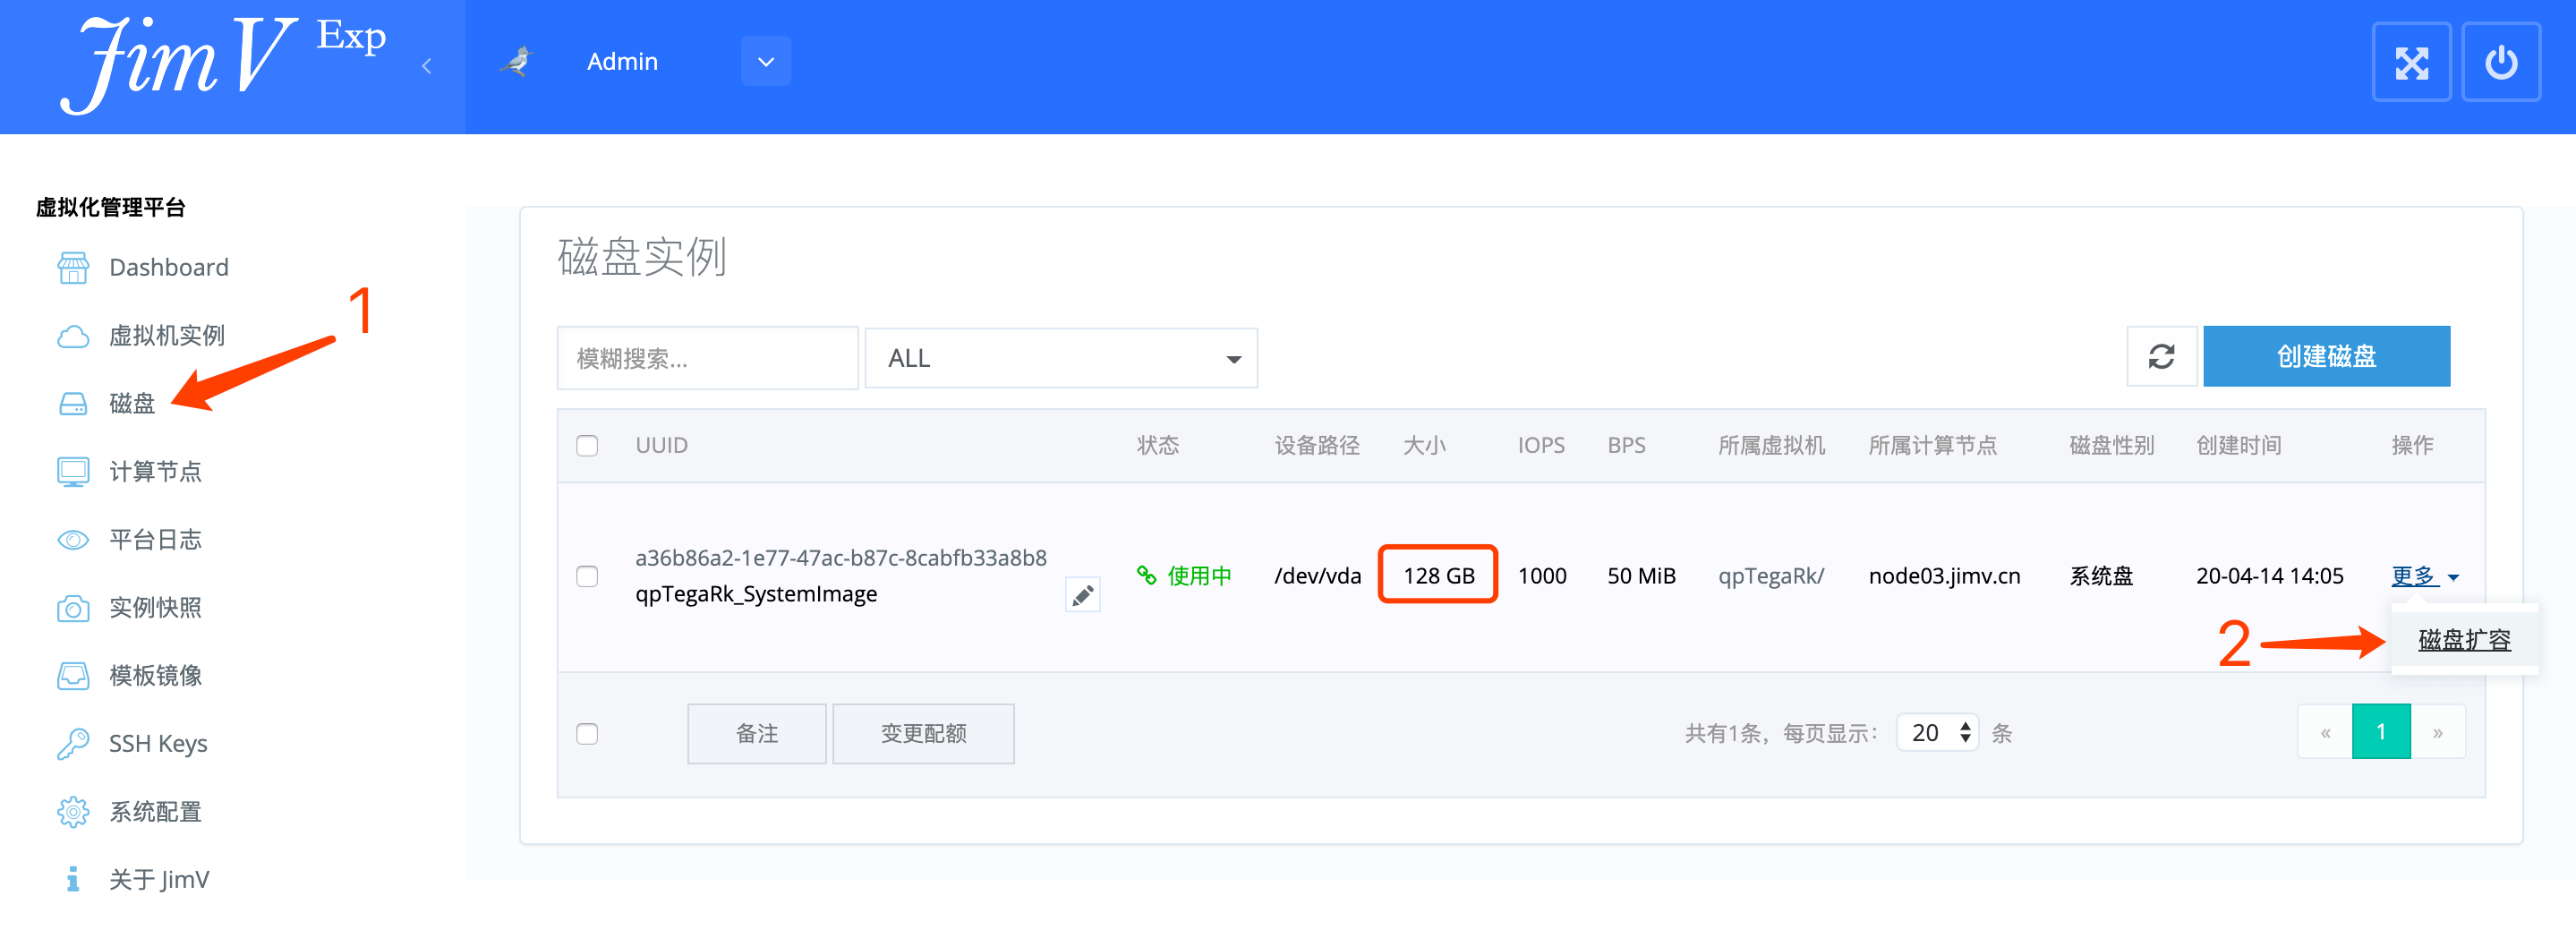
- 磁盘扩容;

- LVM 卷扩容;

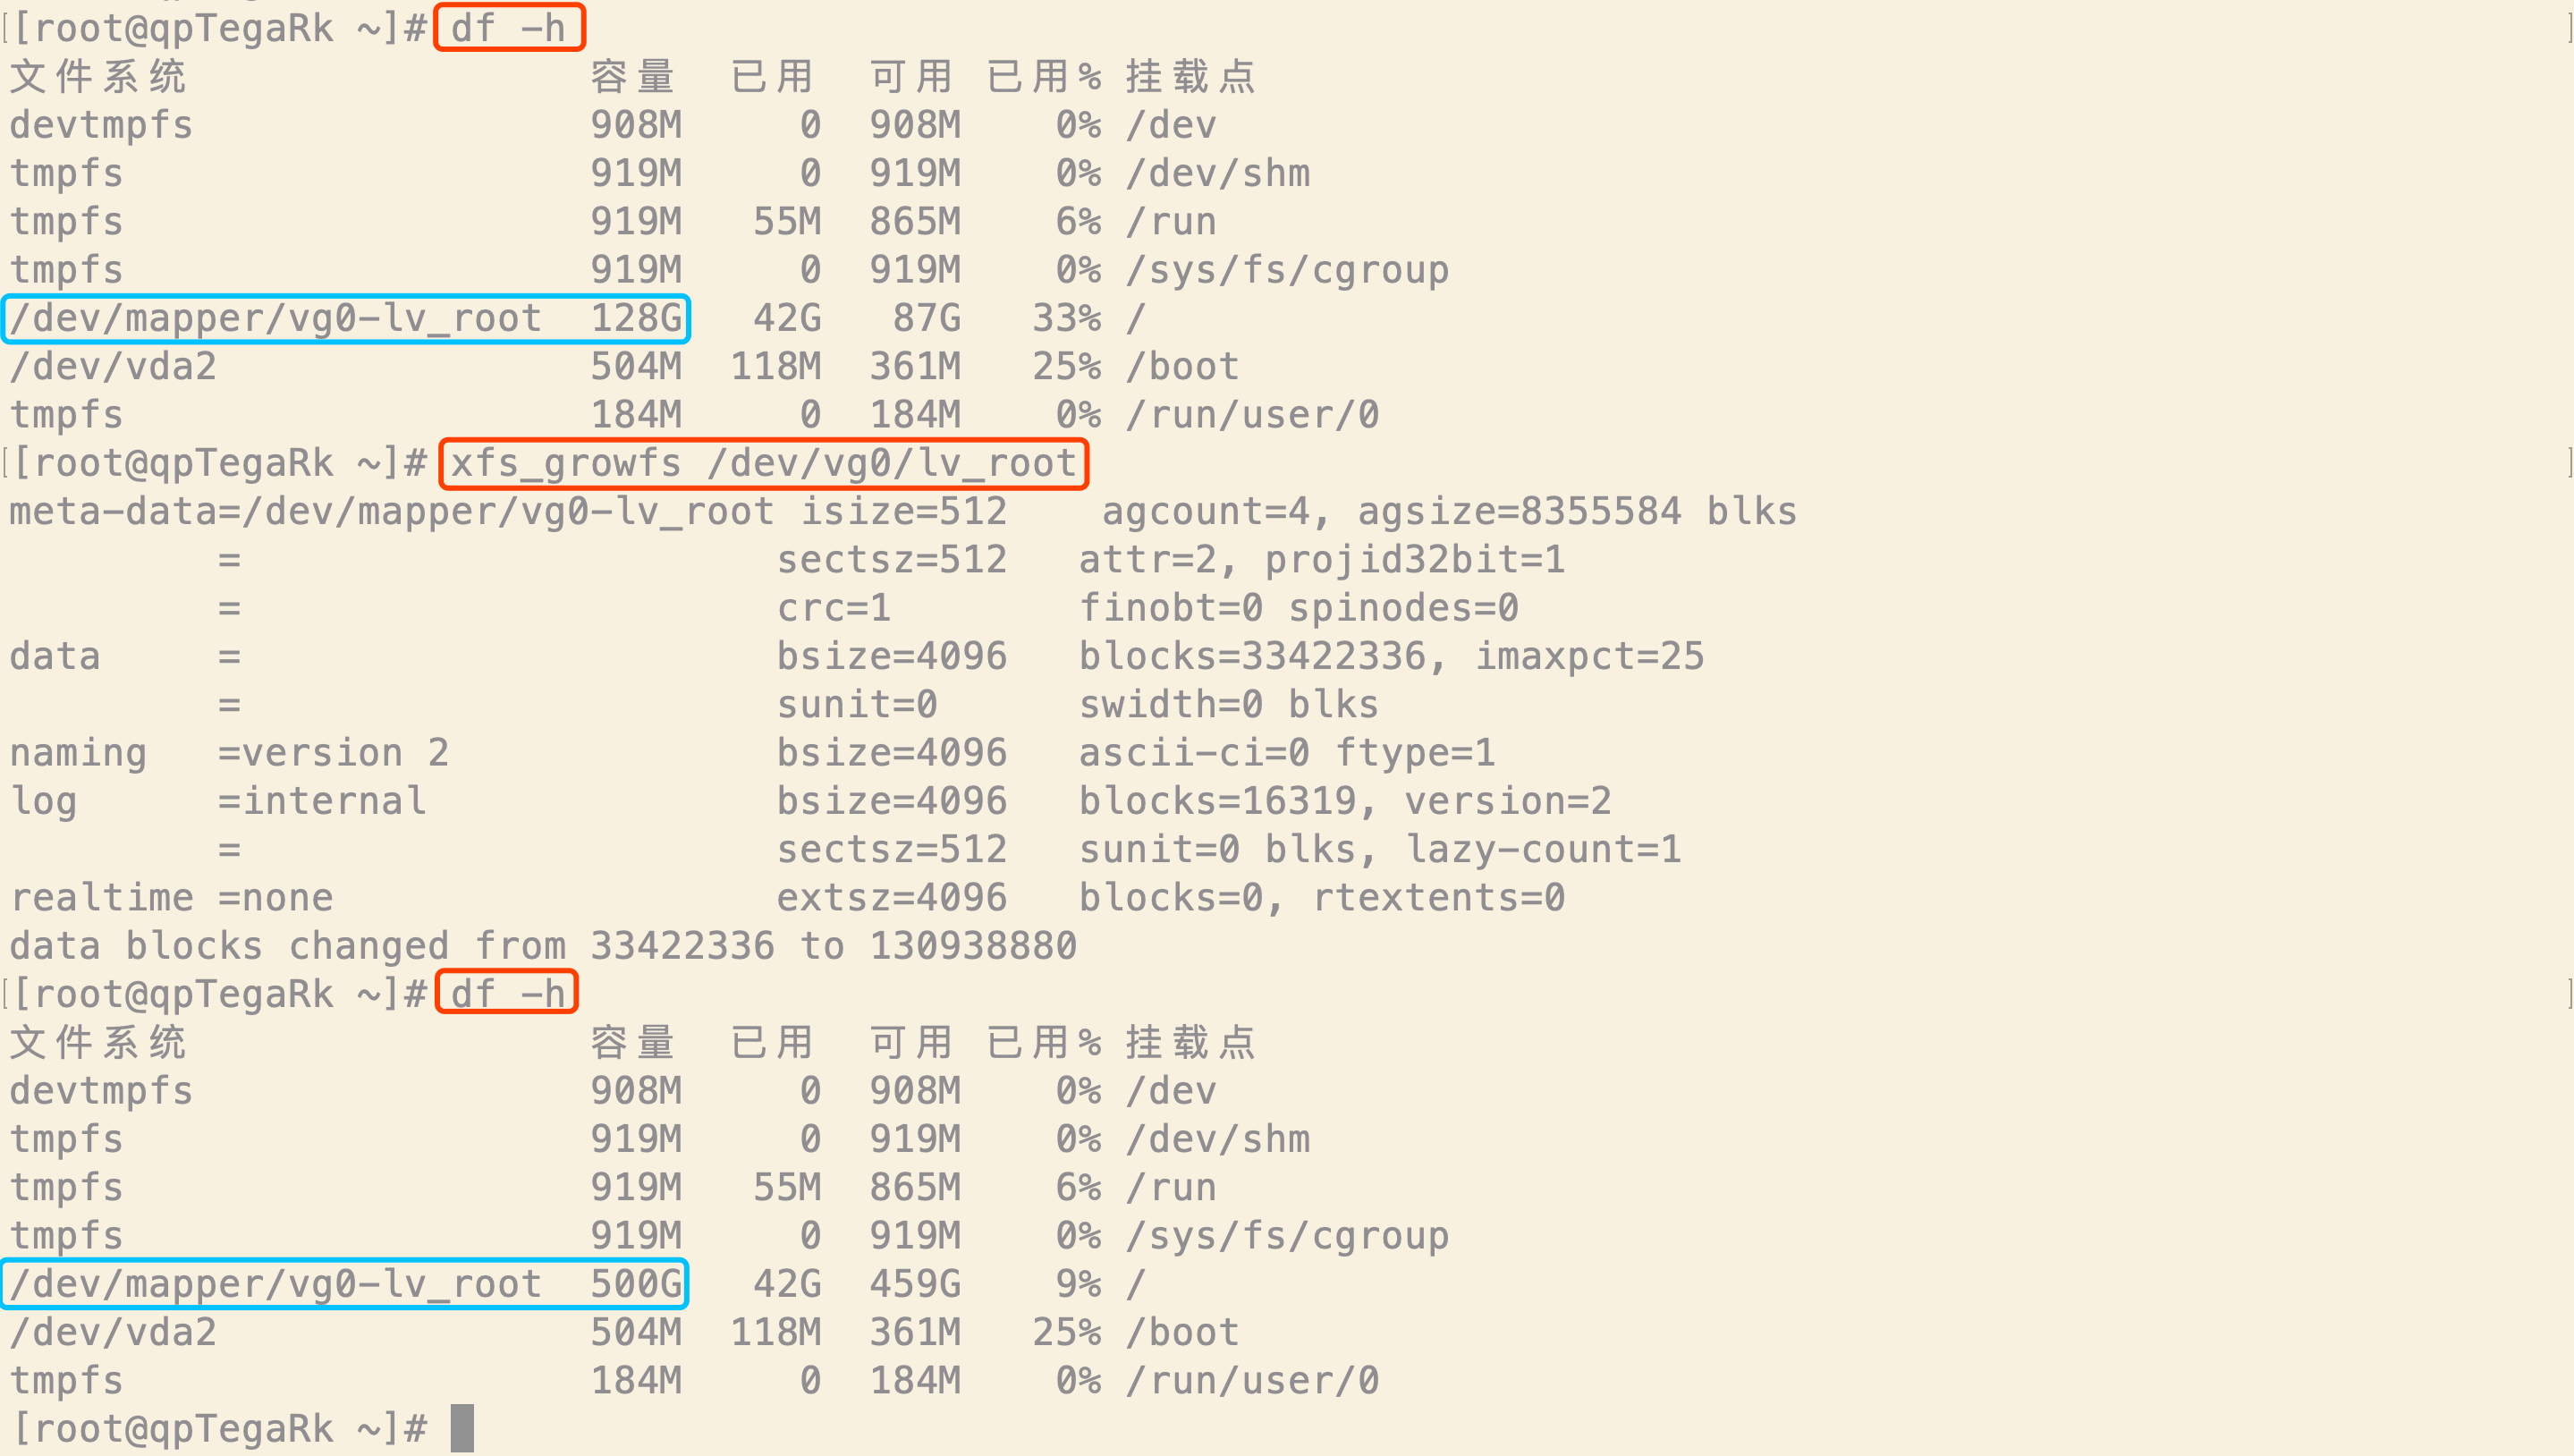
- 文件系统扩容;
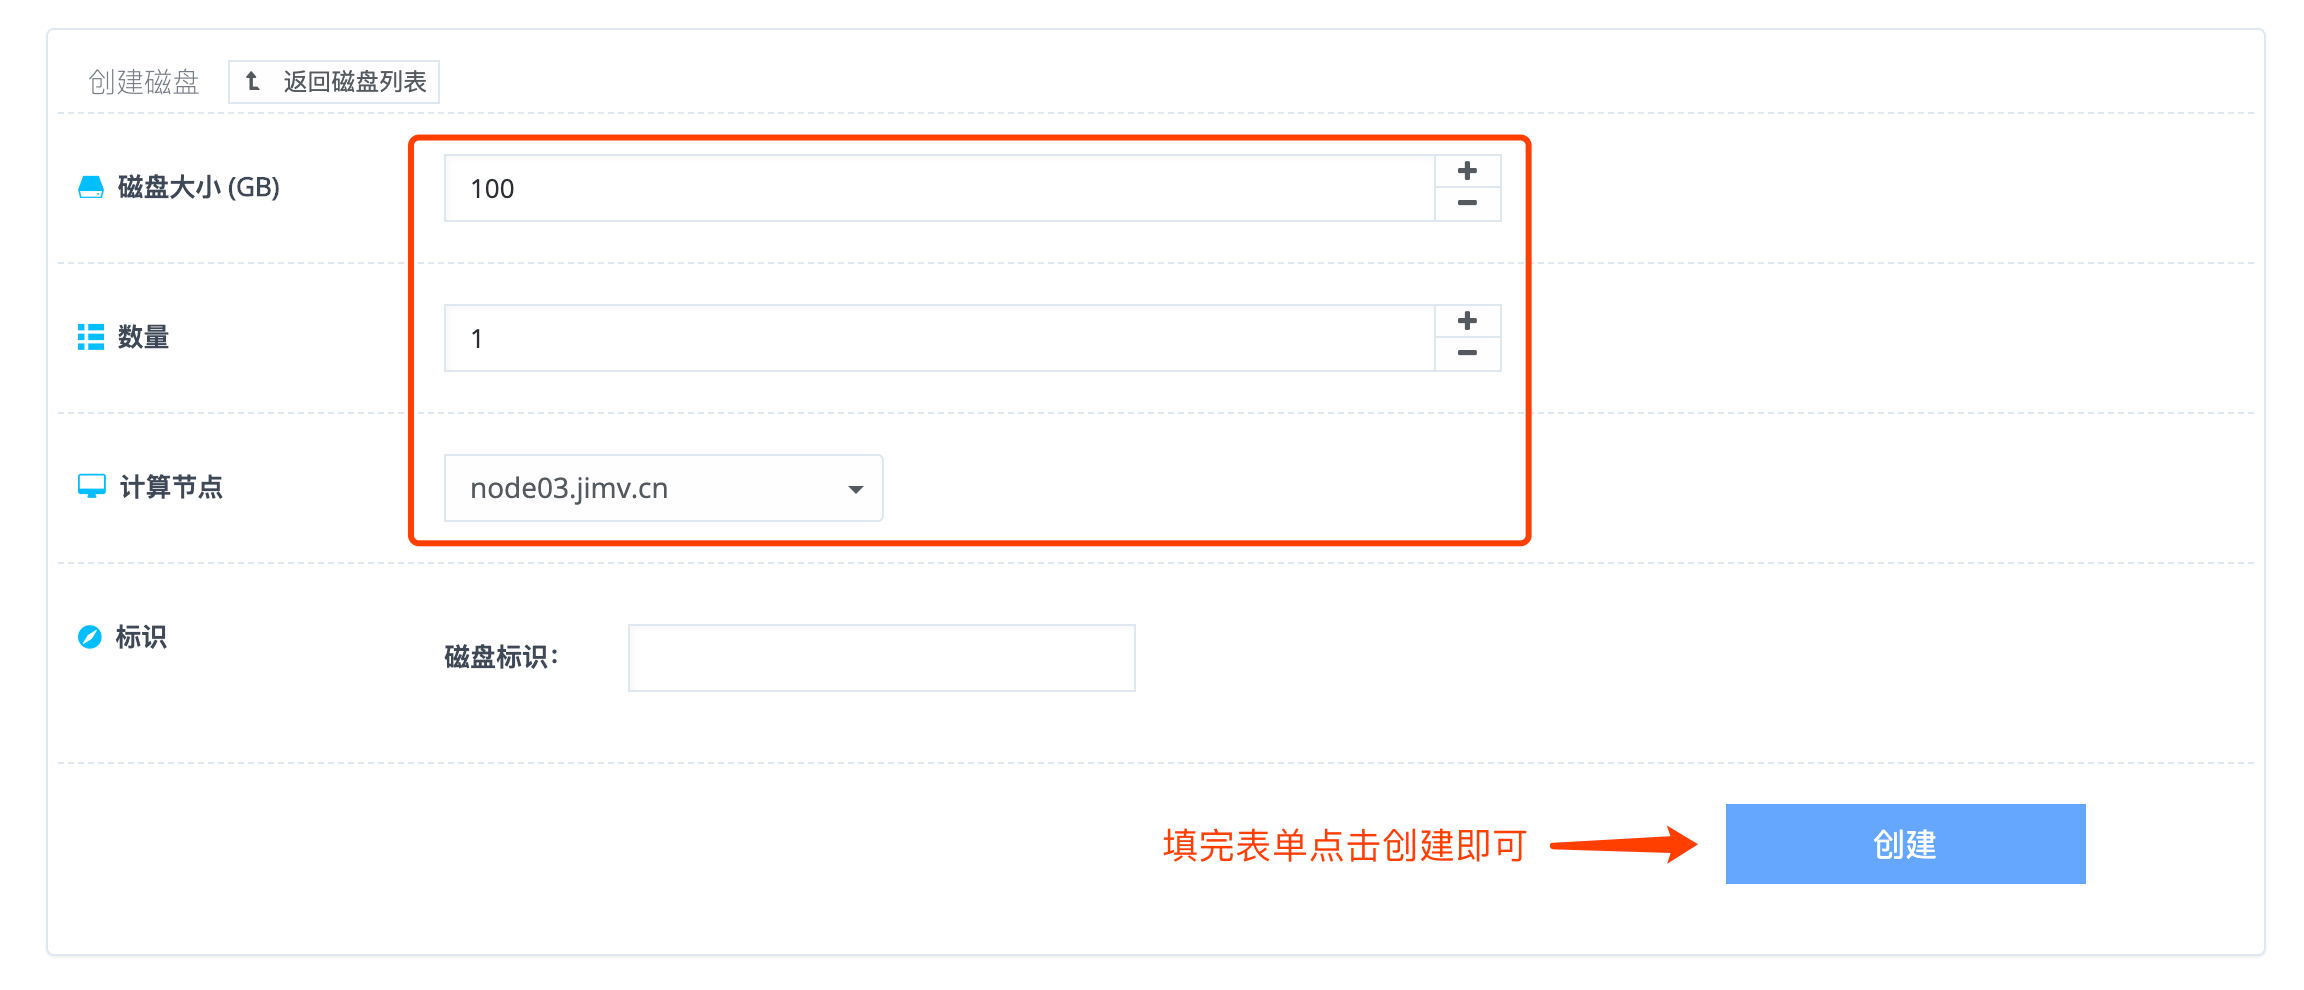
云盘创建
提示:非共享存储模式下。欲挂载的磁盘,需与目标虚拟机处于同一个计算节点。
云盘挂载

磁盘修剪
网络带宽配额
带宽分配
配额测试

SSH-Key 注入
- 导入 SSH-Key;
- 注入 SSH-Key 到虚拟机;
- 验证;
虚拟机快照
创建快照
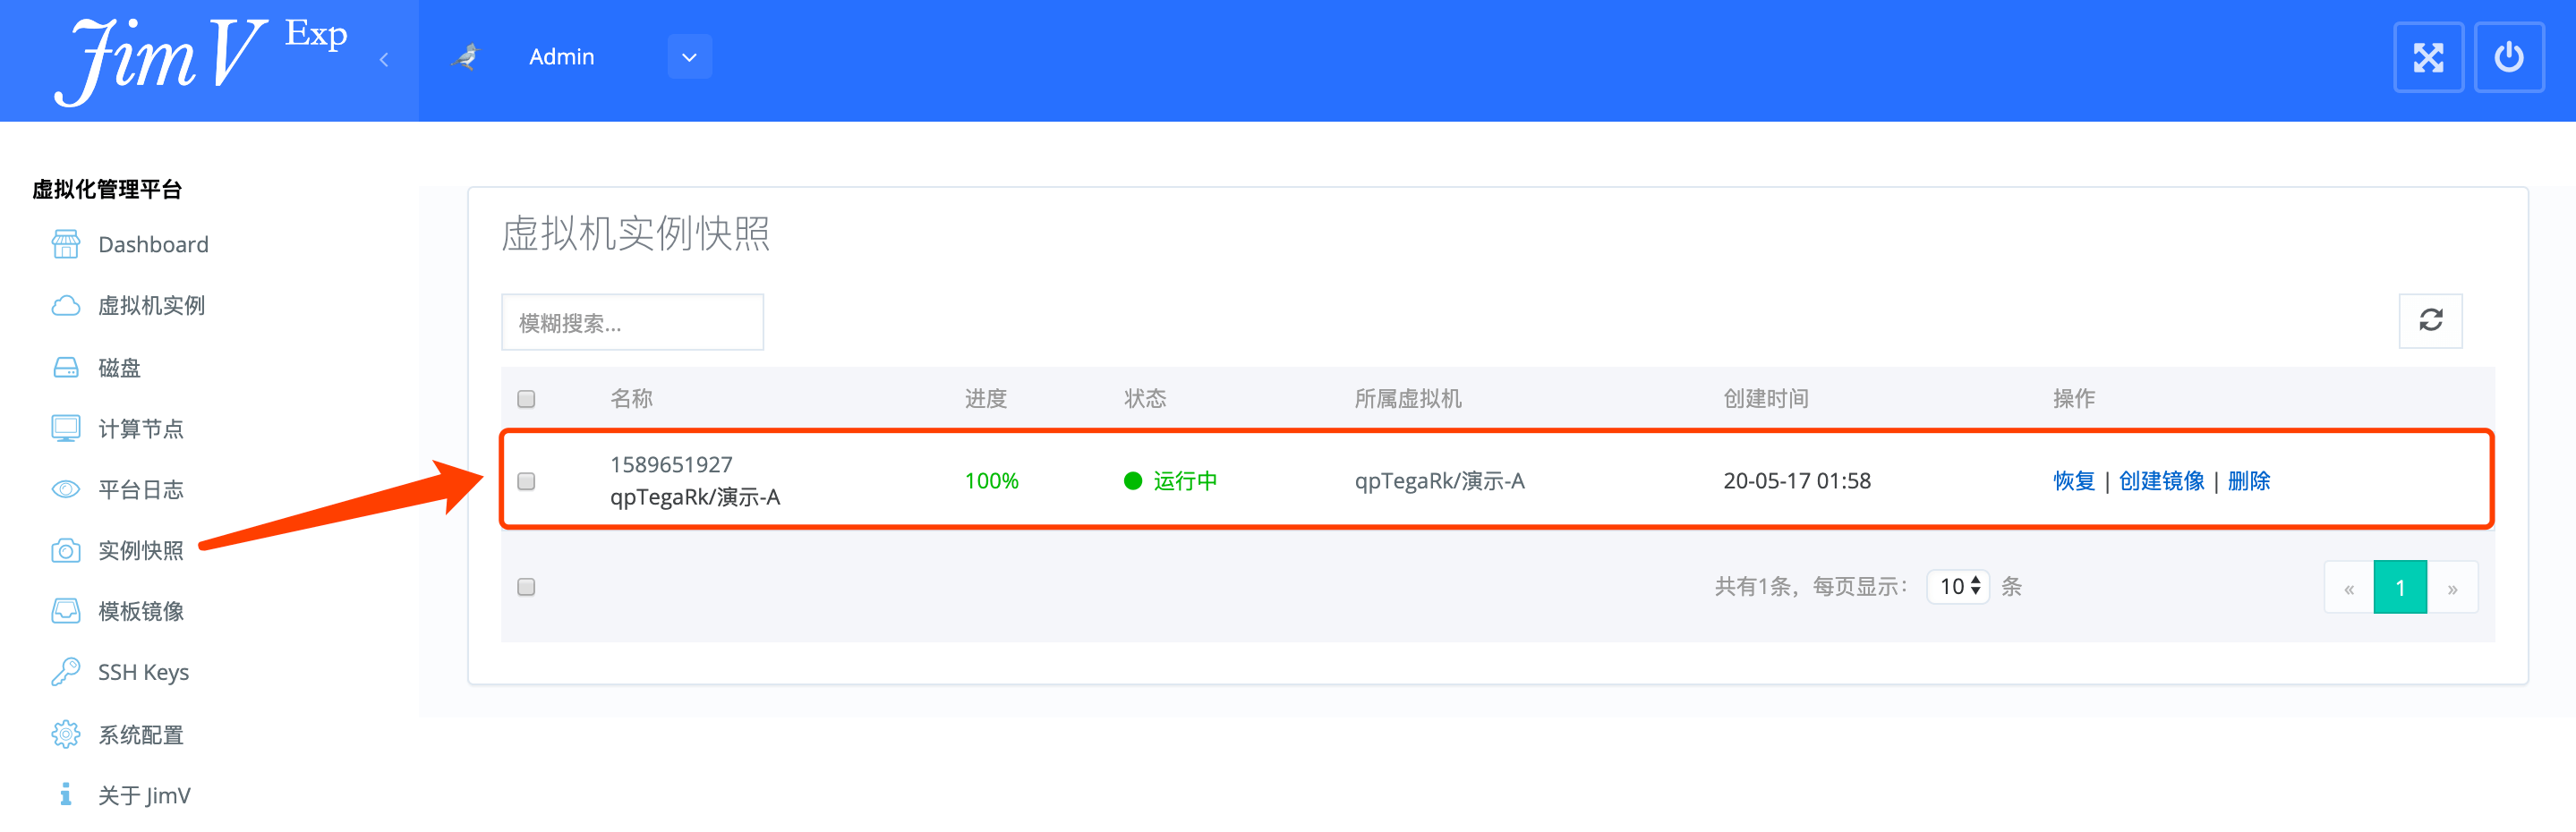
从快照恢复

从快照制作模版
创建模版
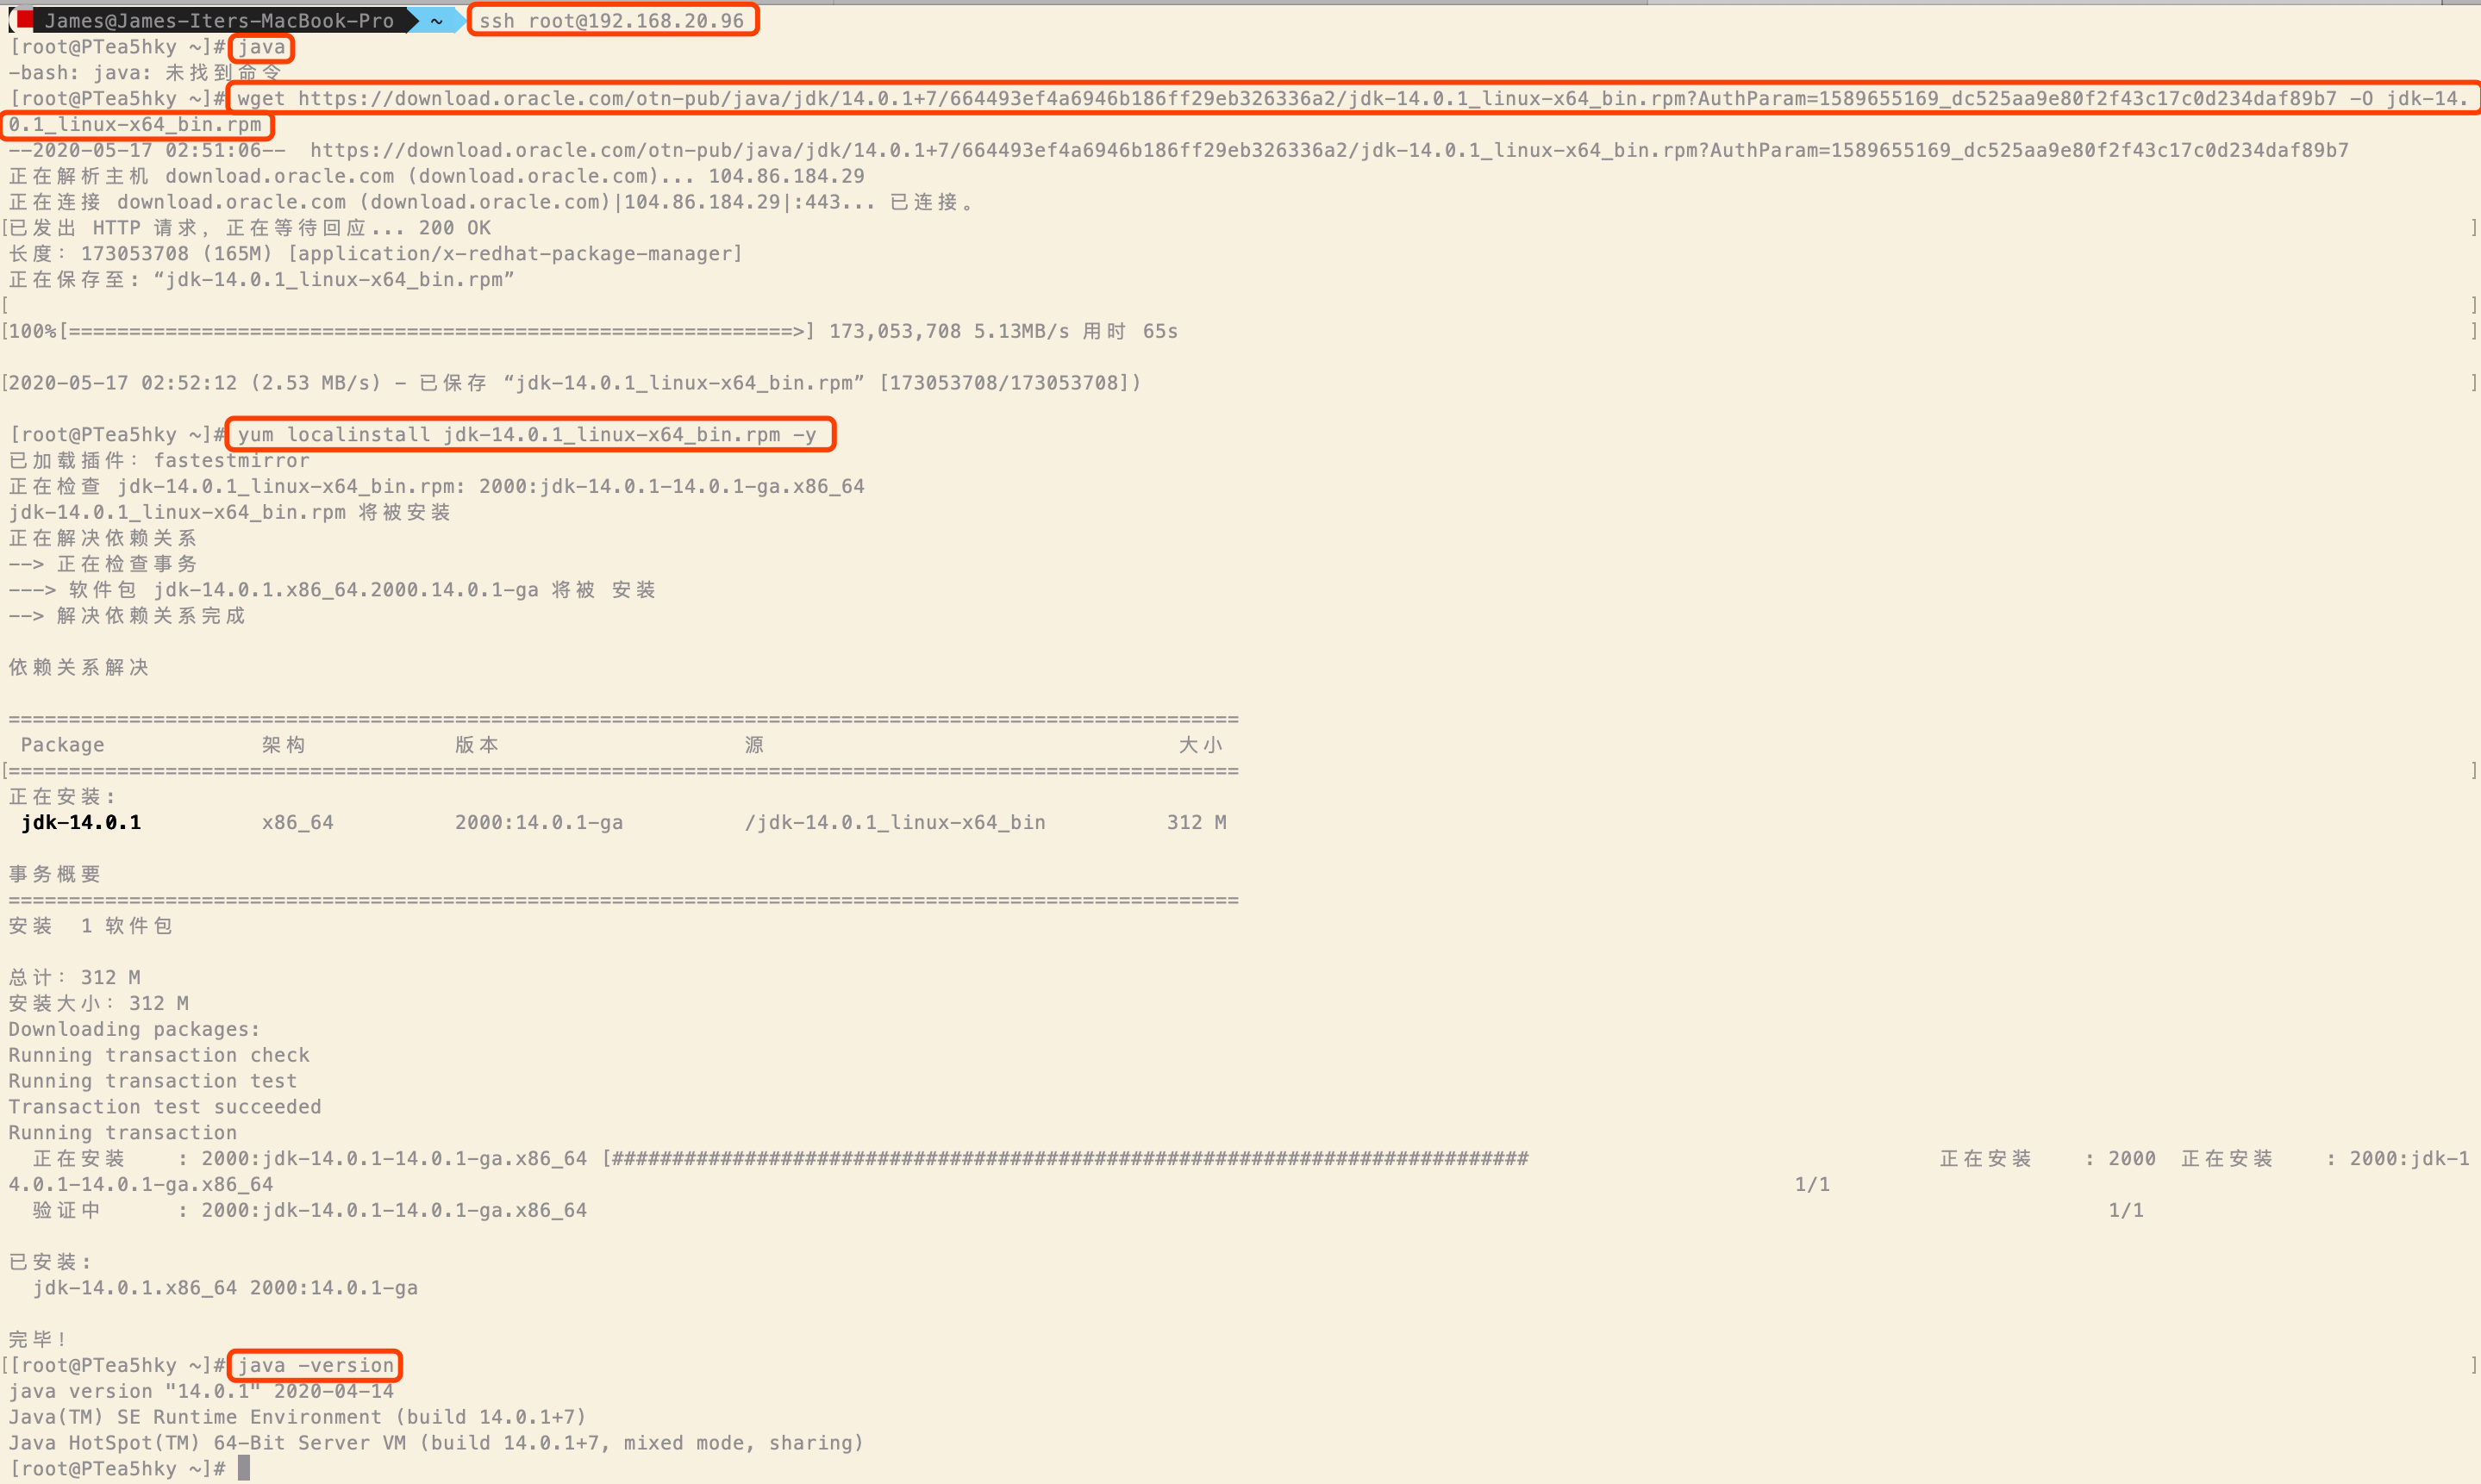
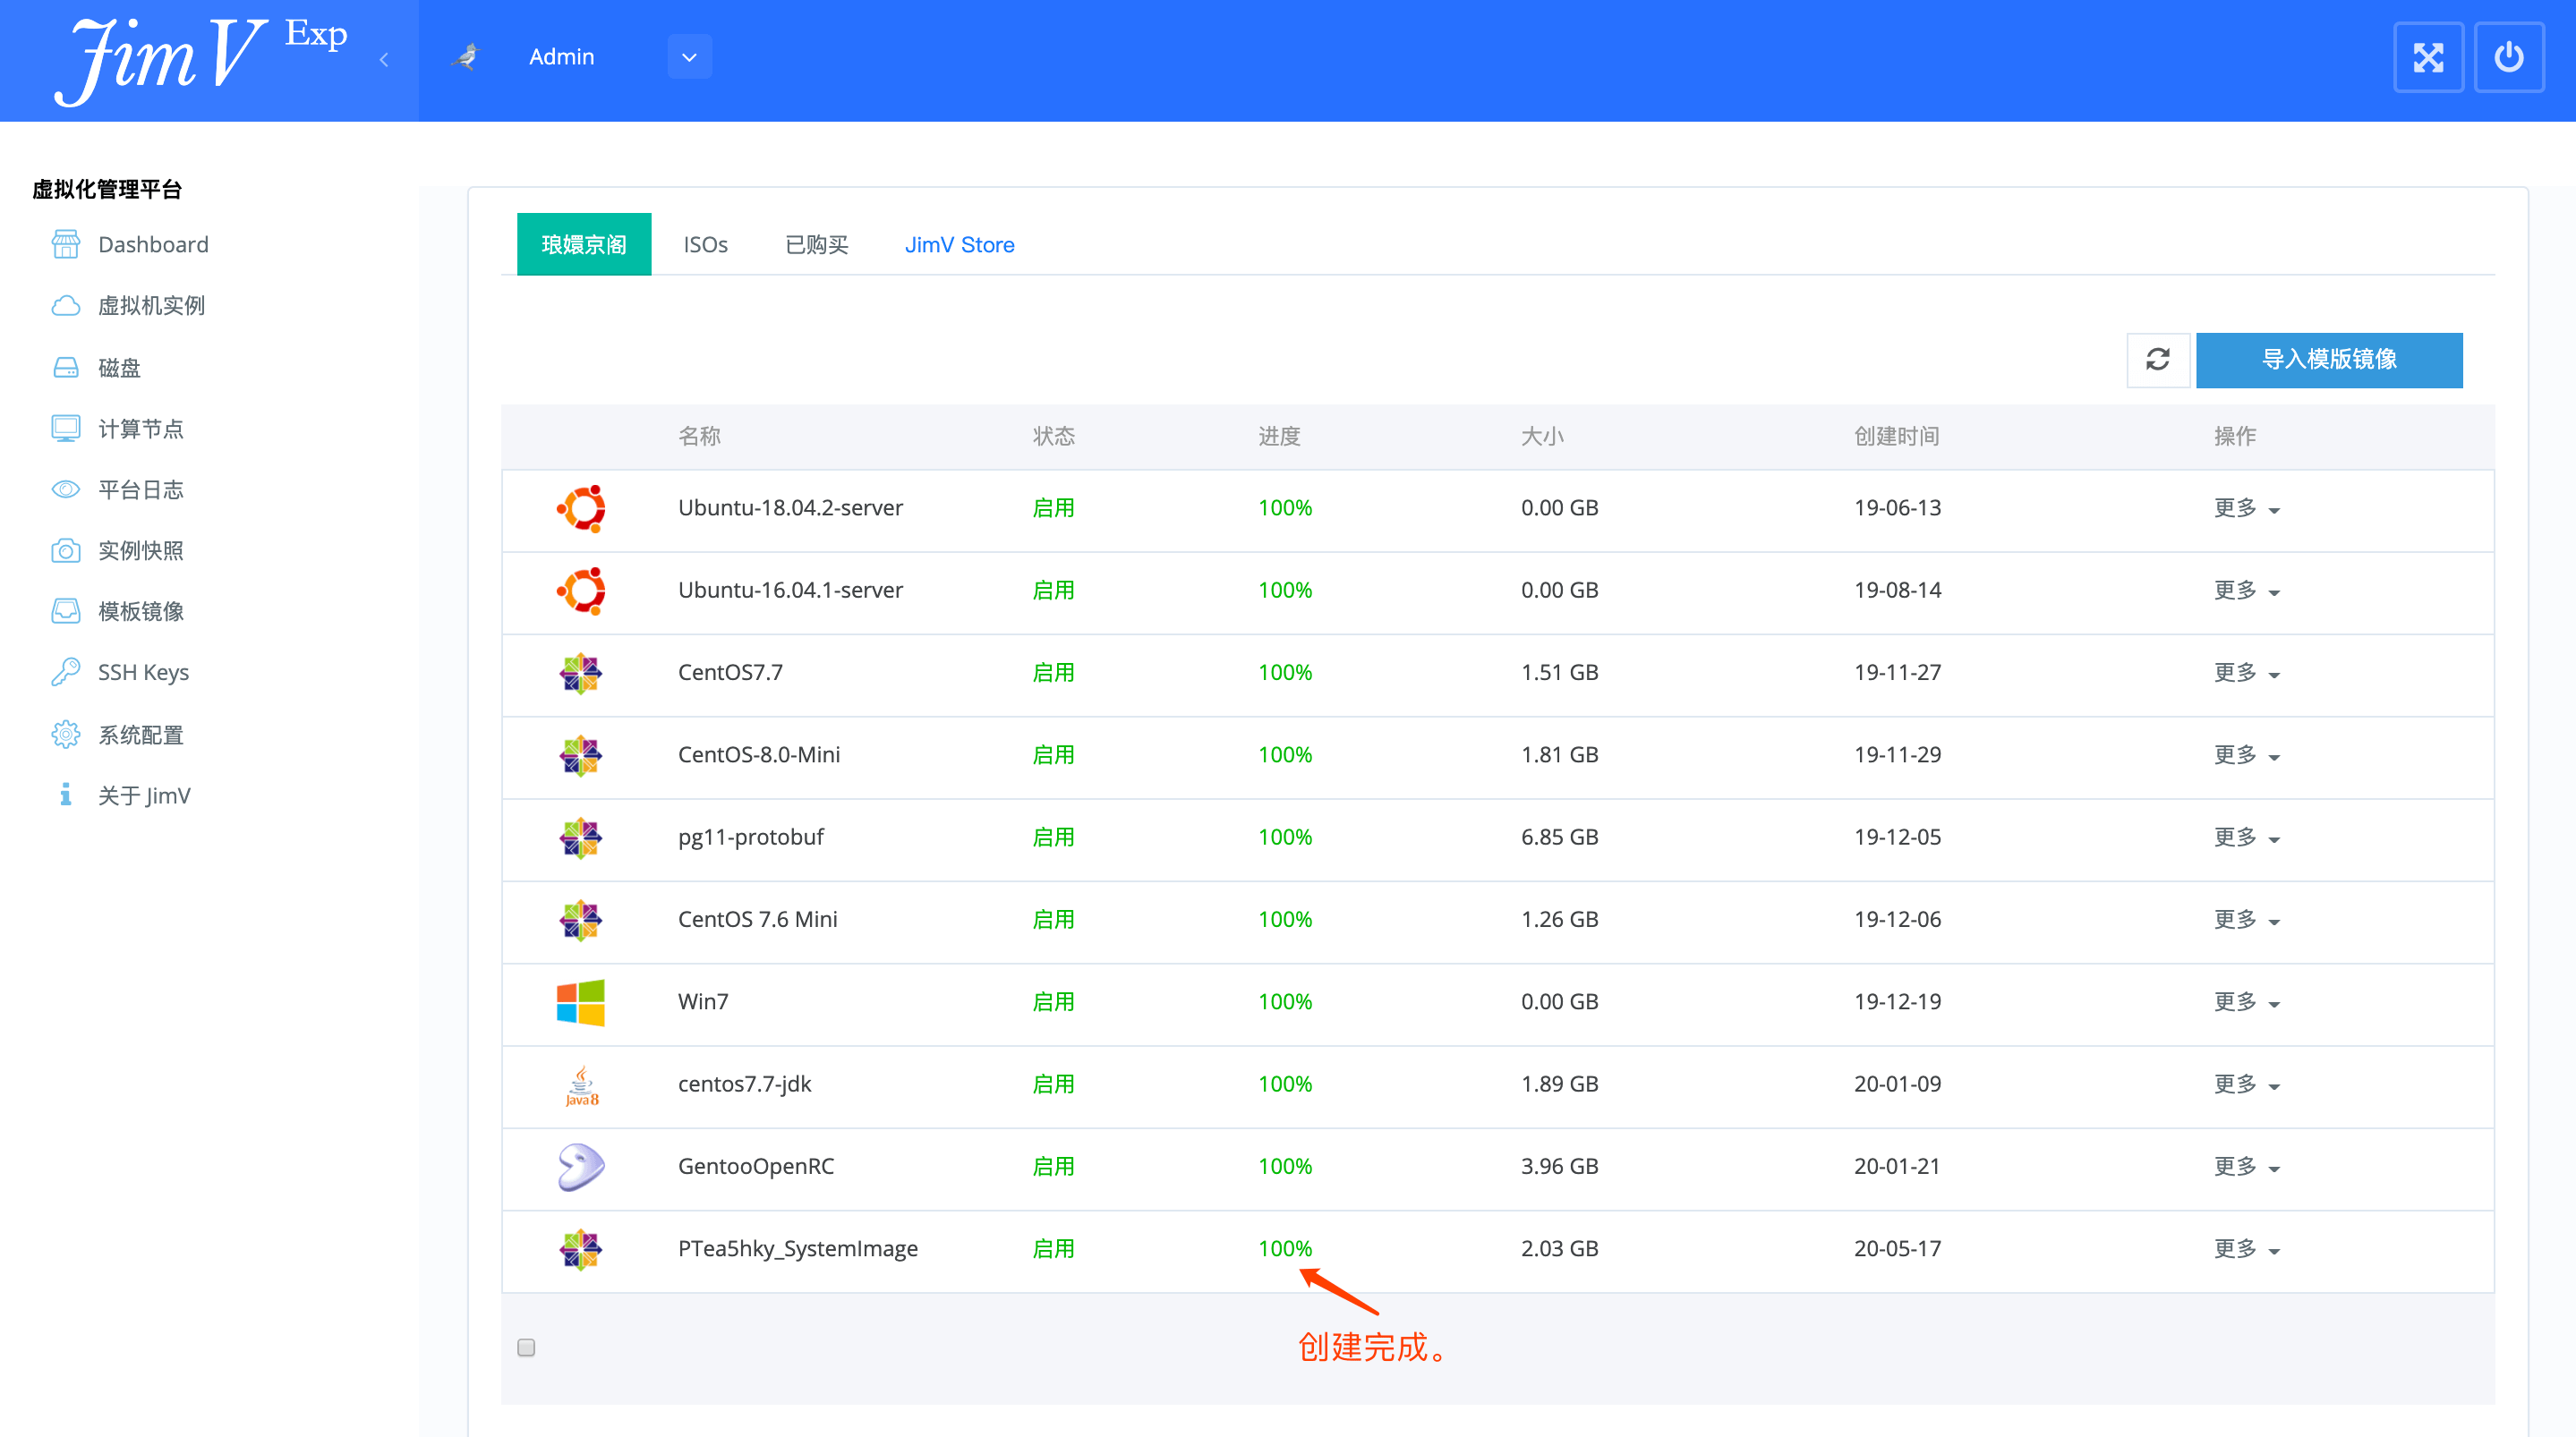
验证模版

虚拟机变更配置
提示:虚拟机的配置变更,必须在「断电」状态下完成。


在线重置密码
提示:虚拟机密码重置,必须在「运行中」状态下完成。

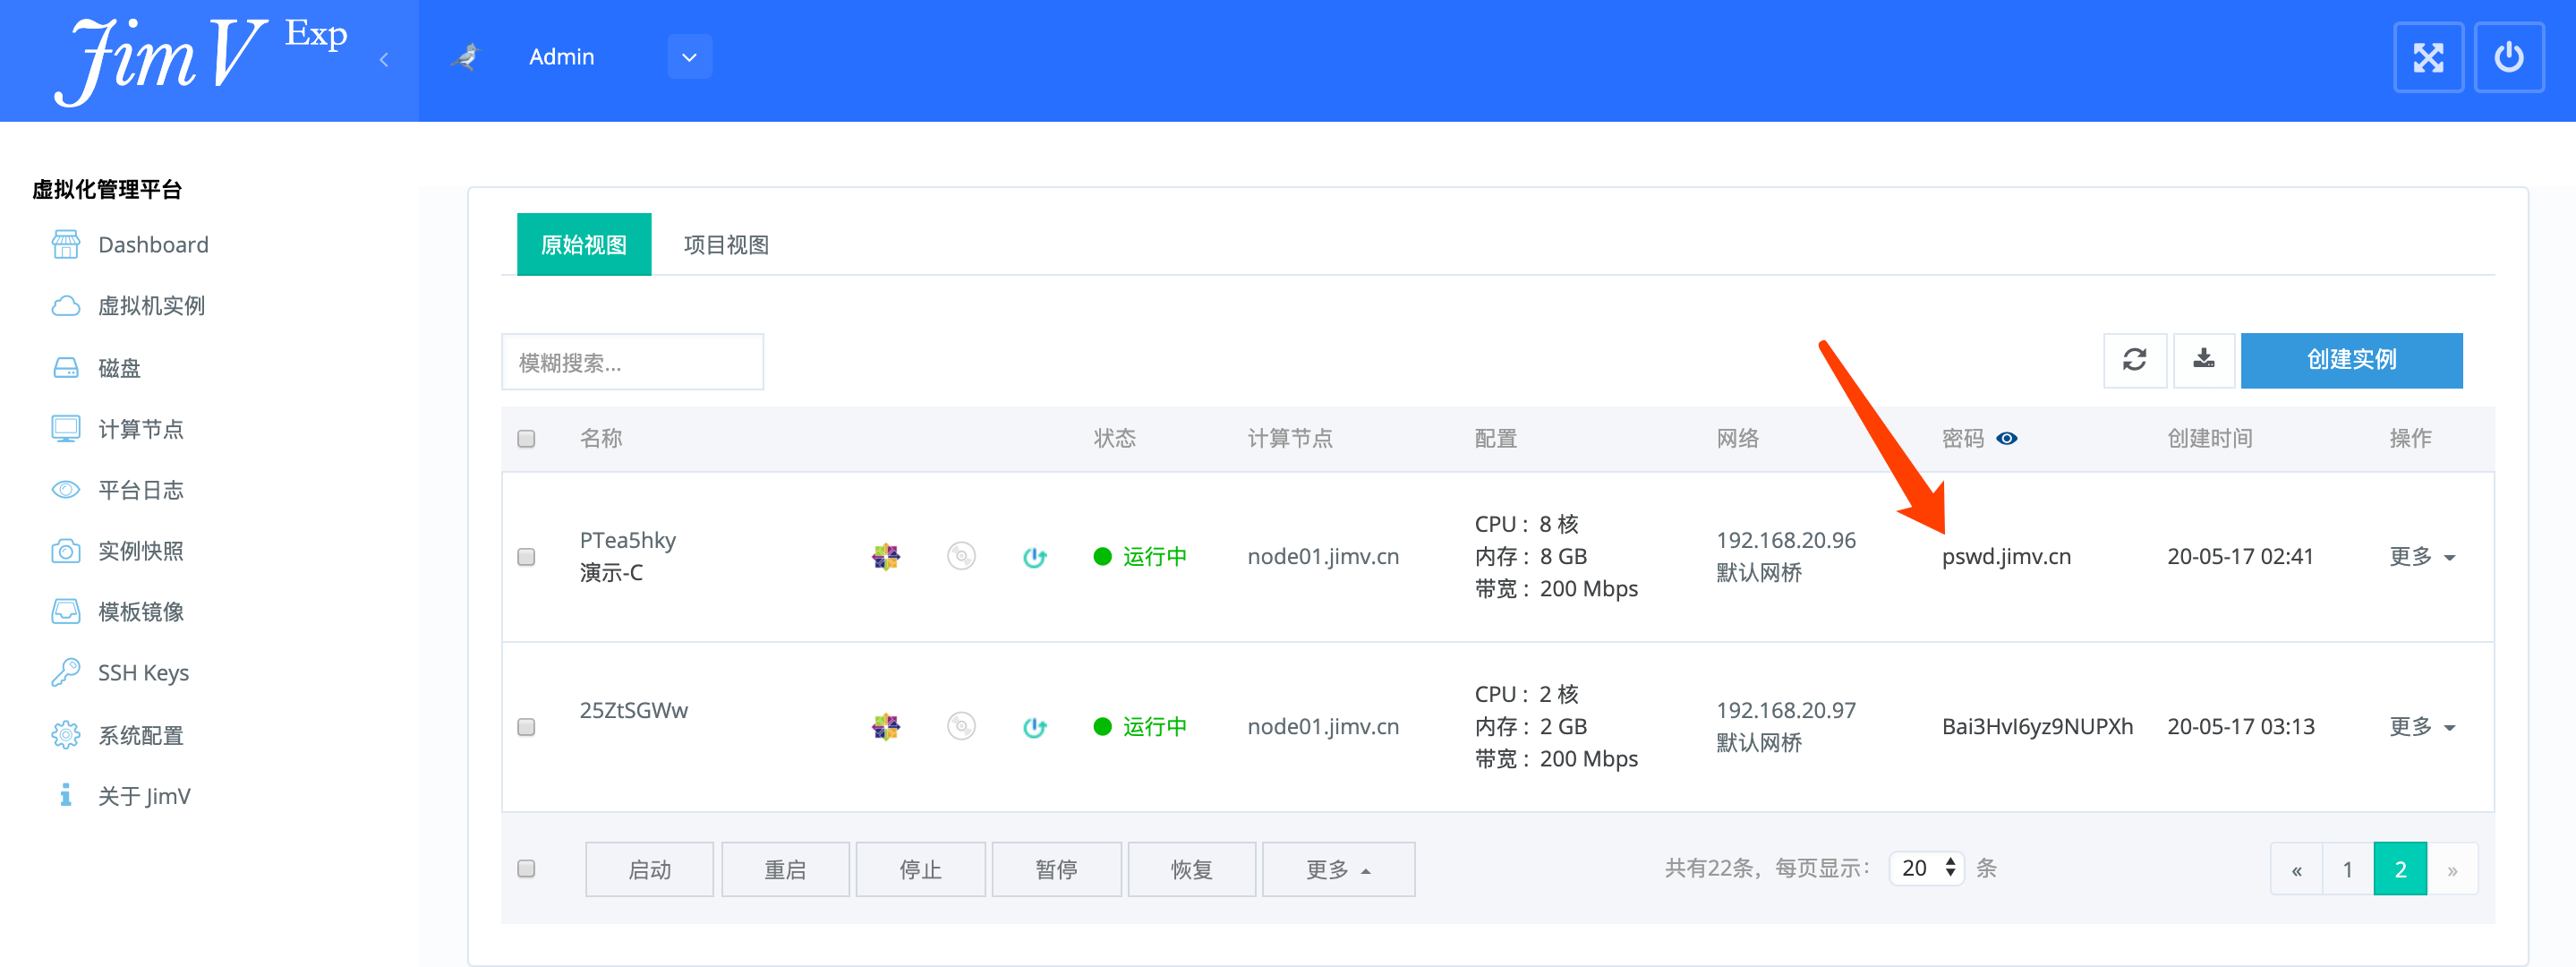
热迁移
提示:非共享存储模式下。虚拟机只支持热迁移,即「运行中」状态迁移。

VLAN
交换机适配
创建 VLAN
变更 VLAN
变更虚拟机 IP
从 VMWare 导入


接纳已有的 KVM 虚拟机
提示:思路与从 VMware 导入相同。可分为如下几步:
1、先从 JimV 创建虚拟机实例;
2、使虚拟机处于「断电」状态;
3、使用现有 KVM 虚拟机实例磁盘文件,对 JimV 虚拟机磁盘文件进行覆盖操作;
4、从 JimV 启动虚拟机实例。
1、先从 JimV 创建虚拟机实例;
2、使虚拟机处于「断电」状态;
3、使用现有 KVM 虚拟机实例磁盘文件,对 JimV 虚拟机磁盘文件进行覆盖操作;
4、从 JimV 启动虚拟机实例。
FAQ
迁移
VMware to JimV
Q1. 从 VMware 迁移到 JimV 到虚拟机,启动时出现如下异常该如何处理?


A1. 如上异常属于操作系统无法正常识别所在的硬件环境。重新生成一次 initramfs 文件即可。

